16 Beautiful Craft Room Storage Ideas for Small Spaces
Beautiful craft room storage ideas for small spaces solve the specific organizational challenge of craft materials — which are simultaneously diverse in format (paper rolls, yarn skeins, fabric bolts, small hardware, liquid mediums, tools of every size), visually rich in color, and practically demanding in terms of accessibility — within limited square footage by combining vertical shelving, wall-mounted systems, mobile units, repurposed furniture, and display-as-storage approaches that keep materials visible, organized, and inspiring. This article gives you exactly 16 ideas spanning wall systems, furniture solutions, desktop organization, mobile storage, and room-within-a-room approaches so every small craft space — from a dedicated spare room to a wardrobe conversion to a kitchen table corner — finds a workable and beautiful organizational approach.
A well-organized small craft space does something a large disorganized one cannot — it makes the materials themselves part of the inspiration. Yarn sorted by color in an open display, fabric folded on visible shelves, washi tape on a wall-mounted rod, buttons in glass jars — the organizational system becomes the room’s primary visual content. Here are 16 ideas worth saving — and building.
Why Beautiful Craft Room Storage Ideas Work So Well for Small Spaces
The organizational challenge of craft materials is categorically different from standard domestic storage challenges because craft materials combine several properties that standard household objects do not simultaneously exhibit: they are purchased in advance of use (meaning quantities accumulate before they are consumed), they are visually interesting enough that display-as-storage is aesthetically appropriate (unlike toiletries or cleaning products, which benefit from concealment), they are categorically diverse enough that a single storage approach (shelves, drawers, or bins alone) cannot address all types within a single space, and they are accessed with varying frequency (some materials are daily tools, others are occasional specialty items) requiring different accessibility levels within the same system.
The small craft space storage solutions that work most consistently share three design principles: vertical maximization (using wall height from floor to ceiling rather than treating horizontal surface area as the primary storage medium, which in a small room is always the scarcest resource), categorical visibility (organizing materials in a system where every category is visible rather than buried in drawers or closed boxes, because craft making is driven by visual inspiration and materials hidden from view are materials not used), and mobile flexibility (incorporating rolling carts, portable bins, and reconfigurable shelving that can be adapted as the crafter’s material collection and project types evolve, since a craft space serving quilting has entirely different storage demands than one serving watercolor or model making).
The craft room storage category has driven significant engagement in home organization and maker communities across Pinterest, YouTube, and Instagram since approximately 2016, when the parallel growth of adult craft participation (the documented increase in adult hobby crafting across knitting, embroidery, paper craft, resin, and mixed media following 2020) created a large and active audience for craft space organization content. The specific small-space challenge resonates particularly with urban apartment and small home dwellers who are active crafters — the majority of the adult craft community — because the assumption of dedicated crafting space is an aspirational fiction for most practitioners, who work at kitchen tables, in bedroom corners, or in small spare rooms that must also serve as guest rooms, home offices, or general storage.
The furniture systems that provide the most flexible and cost-appropriate foundation for small craft room storage are primarily from IKEA’s modular range: KALLAX (cubed shelving with optional inserts), BILLY (adjustable bookshelf with consistent depth and maximum height), ALGOT and BOAXEL (wall-mounted modular shelving with varied component types), RÅSKOG and NISSAFORS (rolling cart systems for mobile workshop storage), and SKÅDIS (pegboard panel system for wall-mounted tool and small accessory organization). These systems share dimensional compatibility (KALLAX drawer inserts, for example, also fit the BILLY bookshelf’s width when cut to size), availability, low entry cost, and the extensive third-party modification ecosystem of add-ons, custom doors, and compatibility accessories that makes IKEA the dominant furniture platform for functional small-space design.
Style at a Glance
| Element | Organizational Function | Beautiful Storage Edge |
|---|---|---|
| Philosophy | Every material visible, every category accessible | Display-as-storage turns organization into inspiration |
| Materials | KALLAX, BILLY, pegboard, wire basket, glass jar | Washi-papered shelf back, linen bin, brass hook |
| Color Palette | White system base, material color as display | Rainbow sorted yarn, tonal fabric fold, color-blocked paper |
16 Beautiful Craft Room Storage Ideas for Small Spaces
1. Floor-to-Ceiling BILLY Bookcase System as Craft Library
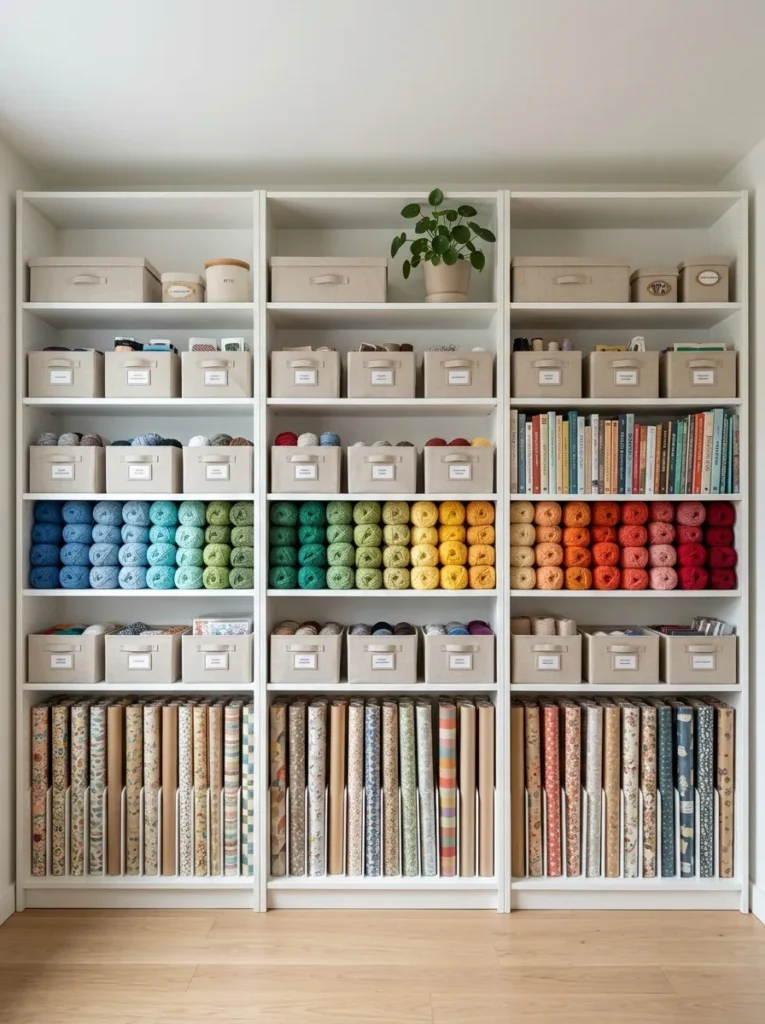
Vibe: The BILLY craft library feels like a material archive — the wall-to-wall, floor-to-ceiling system making the small room feel spacious rather than crowded because the storage rises vertically rather than sprawling horizontally.
Why it works: A floor-to-ceiling BILLY bookcase system applied to craft storage uses the vertical maximization principle — BILLY’s adjustable shelf design (shelves can be repositioned at 32mm intervals) allows the shelf spacing to be customized precisely to the height of stored materials, which is critical for craft storage where paper rolls, yarn balls, fabric bolts, and small boxes all have dramatically different optimal storage heights. Three BILLY units side by side with extension units create a 240cm wide by 237cm tall storage wall that provides approximately 18–20 linear metres of adjustable shelf space — sufficient for a substantial craft material collection within a single wall’s footprint.
How to get it: Install three BILLY bookcases (80cm wide each, the standard BILLY width) side by side against the longest wall of the craft space. Add BILLY height extension units (available separately) on top of each base unit to reach ceiling height — fill any remaining gap between the extension unit top and the ceiling with a painted MDF panel fixed to the wall. Adjust shelf heights before filling: paper rolls and fabric bolts need 35–40cm height, yarn balls and small containers need 15–20cm, books need 25–30cm. Anchor all units to the wall through the supplied back panel using the included wall fixings — multiple full bookcases must be wall-anchored without exception.
Quick Win: Removing the back panels from BILLY units and painting the wall behind in a contrasting warm tone before installation (a dusty sage, warm terracotta, or deep mustard) creates the visual effect of a custom built-in shelving installation that reads as significantly more designed than the white-panel equivalent, for the cost of one tin of paint applied to the wall before the units are positioned.
Shop The Look
| Product |
|---|
| BILLY bookcase white 80cm |
| BILLY height extension unit white |
| Yarn ball set color sorted gradient |
| Linen fabric storage box labeled set |
| Paper roll holder upright tube set |
Also view: 14 Creative Craft Night Themes for a Fun Gathering
2. SKÅDIS Pegboard Command Center for Tools and Small Accessories
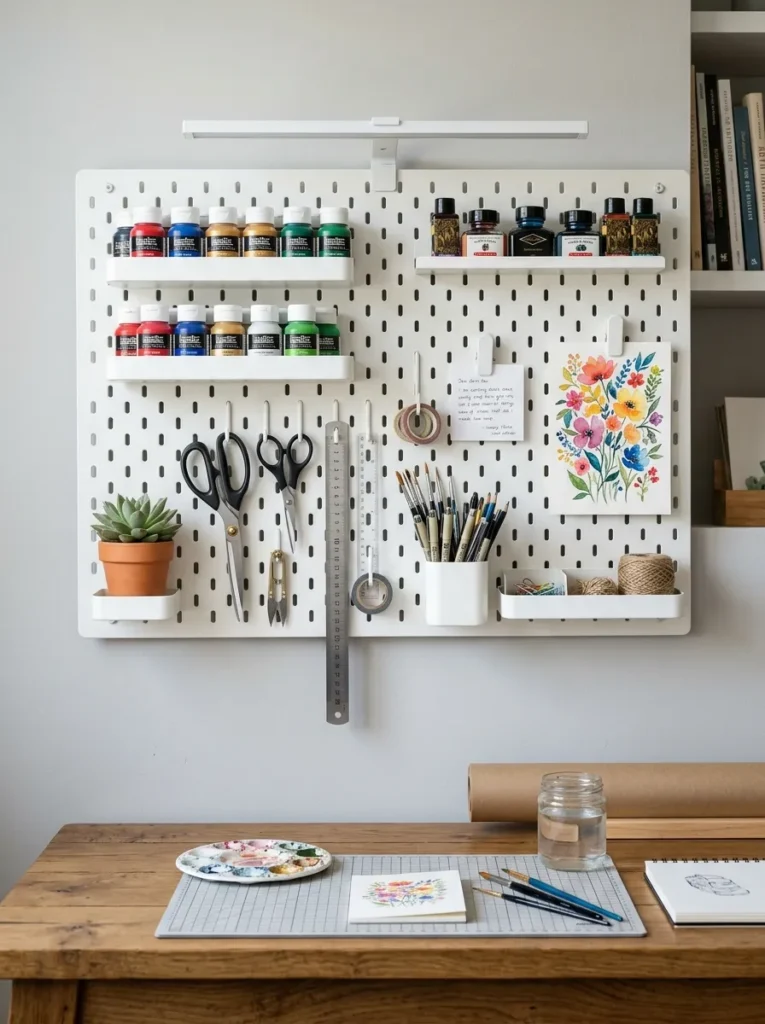
Vibe: The SKÅDIS command center feels like a professional workstation — the tools within arm’s reach of the desk surface, the system so complete that nothing is stored and everything is organized.
Why it works: A SKÅDIS pegboard above a craft desk applies the workstation design principle of immediate-access storage — tools used daily (scissors, rulers, tape dispensers, brushes, pens) that are stored in drawers or boxes require a retrieval step that interrupts workflow; the same tools on a pegboard above the desk surface are accessible in one motion without leaving the working position. The SKÅDIS system’s advantage over standard pegboard (wooden or metal pegboard with standard hooks) is its accessory ecosystem — SKÅDIS-specific shelves, containers, hooks, clips, and boxes are all designed to the same modular scale and attach to the same hole pattern, creating a more coherent and visually resolved organization system than the ad-hoc accumulation of varied pegboard accessories that standard pegboard typically produces.
How to get it: Mount the SKÅDIS panel directly to the wall using the supplied brackets at a height that positions the panel’s lower edge approximately 20cm above the desk surface — this allows pegboard accessories at the panel’s base to be reached without stretching. Prioritize SKÅDIS accessories by tool frequency of use: the most frequently used tools (primary scissors, main ruler, everyday tape) at eye level on the most accessible hooks; less frequently used tools at the panel’s edges and higher positions. Clip a current project reference image, mood board, or checklist to one clip accessory as the panel’s planning element.
Shop The Look
| Product |
|---|
| IKEA SKÅDIS pegboard panel white |
| SKÅDIS accessory set scissors hook shelf |
| SKÅDIS container small set |
| Fine brush set holder upright |
| Mini plant pot pegboard shelf |
Also view: 15 Mason Jar Crafts That Look Surprisingly Luxe
3. Glass Jar Display for Small Materials and Notions
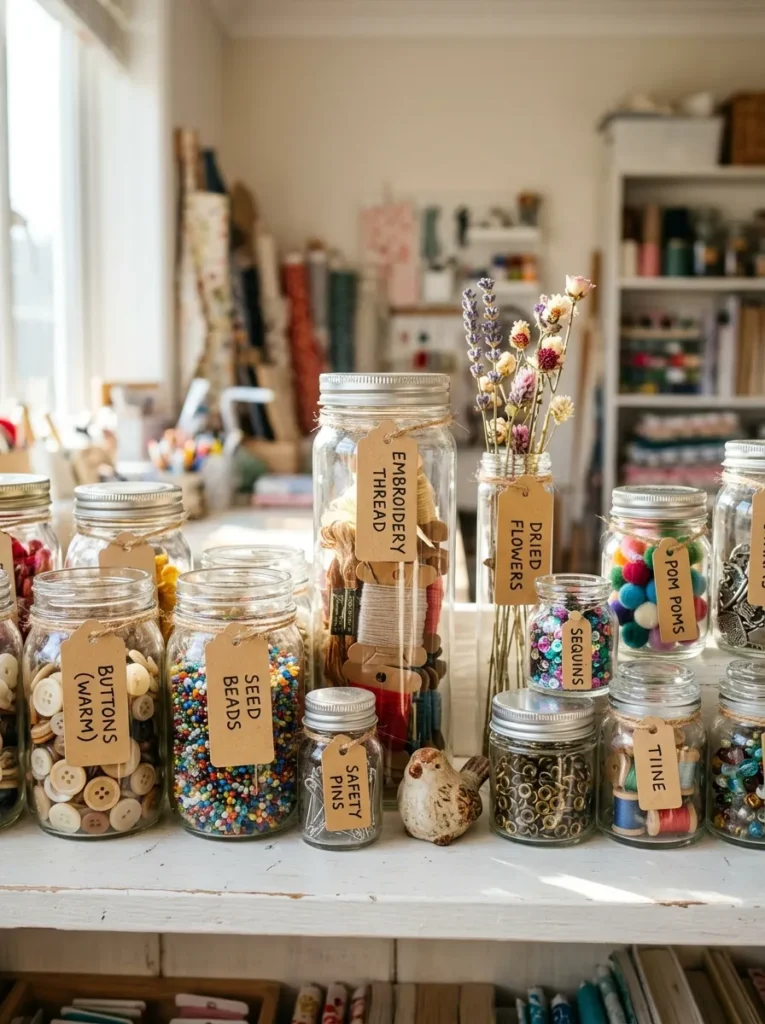
Vibe: The glass jar display feels like the craft room’s material inventory made beautiful — the jars turning the necessity of small-item storage into the room’s most visually compelling surface.
Why it works: Glass jar display storage for small craft materials applies the visual inventory principle — clear glass containers allow immediate visual assessment of both the category (visible content) and the quantity (visible fill level) of every stored item simultaneously, without opening any container. This visibility is a genuine functional advantage in a craft context because material awareness drives creative decision-making — a crafter who can see their button collection while planning a project will use buttons; a crafter with buttons in an opaque drawer will forget they exist. The glass jar as a storage format also has significant material cost advantages: it is the most reusable, most variable-in-size, and most visually appropriate container available, with everything from baby food jars to large pasta jars serving different small-material storage categories.
How to get it: Collect glass jars in varied sizes from household food consumption (pasta jars, baby food jars, jam jars, sauce jars) and wash thoroughly. Alternatively, source uniform glass jars from IKEA (KORKEN range) or Kilner for a more visually cohesive system. Sort all small craft materials into single-category groups and fill each appropriately sized jar. Create handwritten labels on small kraft card tags (punched with a hole and tied with thin twine through the jar’s screw thread) identifying each category with both the name and, where appropriate, the color family or specification.
Shop The Look
| Product |
|---|
| Glass jar set KORKEN assorted sizes |
| Kraft label card small set |
| Thin natural twine label tie |
| Button assortment storage set |
| Embroidery thread card set wound |
4. Rolling RÅSKOG Cart as a Mobile Project Station
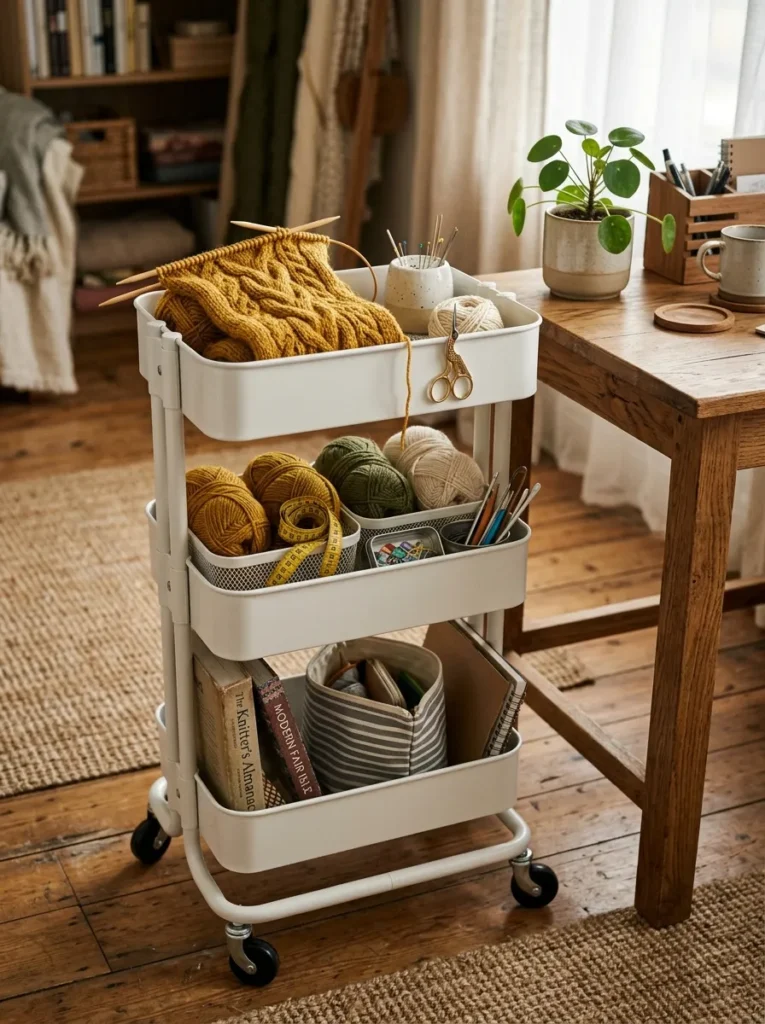
Vibe: The rolling cart feels like a portable workshop — the entire project ecosystem mobile, rolling to wherever the work is happening.
Why it works: A rolling RÅSKOG cart configured as a mobile project station applies the temporal organization principle of project-based containment — rather than organizing materials by type across a static storage system (all yarn in one place, all needles in another, all patterns in a third), a project-based cart organizes all the materials for a single current project in a single mobile unit that can be rolled to wherever the maker is working (desk, sofa, dining table, garden) and stored out of the way when not in use. This approach is specifically valuable in a small space because it eliminates the intermediate step of gathering project materials from multiple storage locations before work begins, and the returning-to-storage step when work ends — the project simply rolls aside.
How to get it: Assign one RÅSKOG cart per active project (a standard small craft space benefits from two carts — one for the current active project and one for the next project in progress). Configure each tier by project workflow: the top tier for the current working session’s materials (what will be touched today), the middle tier for the full project’s materials (everything needed to complete this project), and the bottom tier for project reference (pattern books, reference images, notes). When a project is complete, clear the cart and reconfigure for the next.
Shop The Look
| Product |
|---|
| IKEA RÅSKOG rolling cart white |
| Project yarn storage set basket |
| Needle and tool holder small |
| Tape measure set craft |
| Small plant desk display |
5. Washi Tape and Ribbon Wall Display on Wooden Dowels
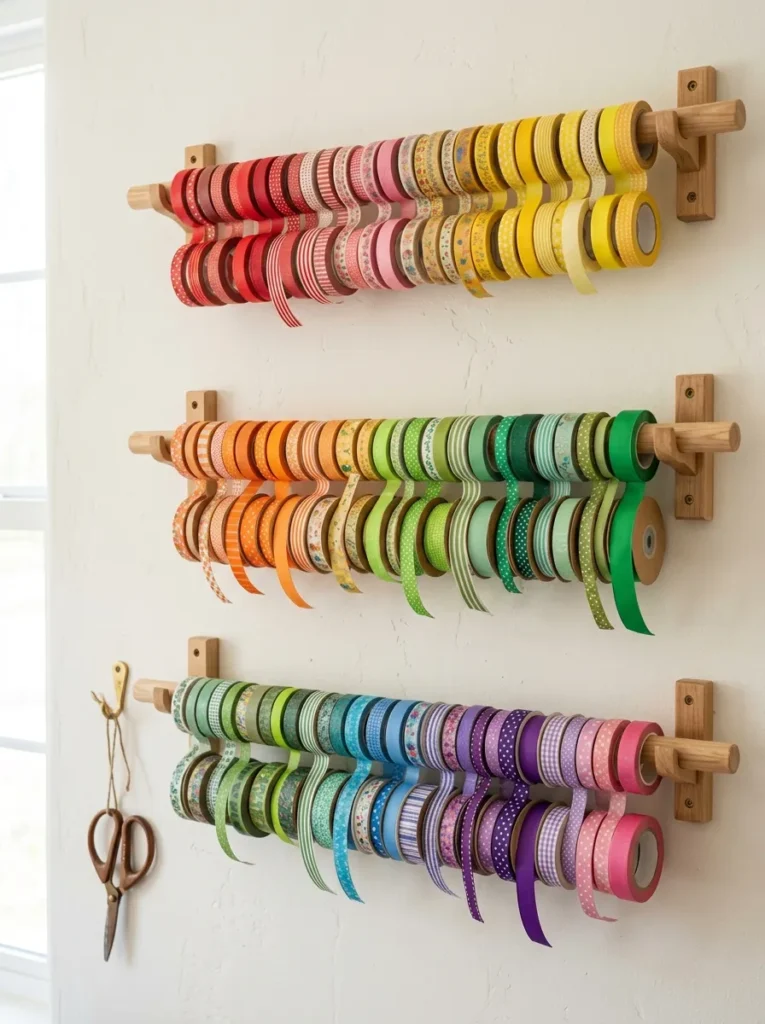
Vibe: The washi tape wall feels like a color chart that is also a storage system — the rainbow sort turning a functional display into the room’s most cheerful wall.
Why it works: A washi tape and ribbon wall display on wooden dowels applies the display-as-storage principle at its most visually effective — washi tape rolls and ribbon spools are objects with an inherent visual richness (their colors, their cylindrical form, their varied widths and patterns) that makes them ideal candidates for display storage, where the organizational system is itself the room’s decoration. Threading rolls onto a dowel solves the most common washi tape and ribbon organizational problem (rolls individually stored in boxes or drawers require excavation and create tangles) by providing a single retrieval action (slide off the dowel) and a single return action (slide back on). Rainbow-sorting the rolls across the dowels converts a functional display into a gradient color composition that is one of the most photographed craft room features in the amateur crafting community.
How to get it: Source three natural wood dowels in 1–1.5cm diameter and cut to 50–70cm length (to be positioned between two wall-mounted cup hooks at each end). Mount three pairs of cup hooks on the wall at approximately 40cm vertical intervals, each pair 55–75cm apart (matching the dowel length). Thread all washi tape rolls and ribbon spools onto the dowels, sorting by color family within each dowel and arranging the three dowels as complementary color sections (warm tones top, neutrals middle, cool tones bottom, for example). Add a small scissors hook immediately beside the display for immediate cutting access without leaving the roll-dispensing position.
Shop The Look
| Product |
|---|
| Natural wood dowel rod set 60cm |
| Cup hook set small screw brass |
| Washi tape collection rainbow sort |
| Ribbon spool set varied colors |
| Small scissors hanging hook wall |
6. Repurposed Armoire as a Hidden Craft Studio
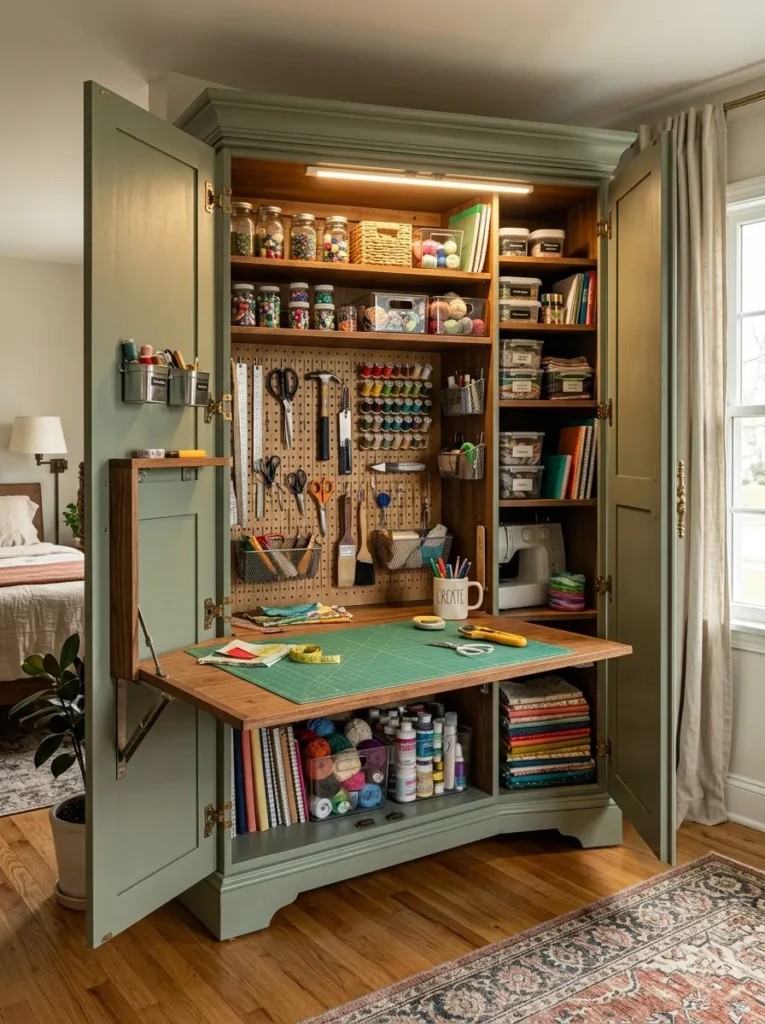
Vibe: The armoire craft studio feels like a magic trick performed on a piece of furniture — the regular wardrobe exterior concealing a complete workspace that appears and disappears with the opening and closing of two doors.
Why it works: A repurposed armoire as a hidden craft studio applies the small-space design principle of temporal zoning — a craft space that closes completely when not in use is a room-within-a-room that occupies the same floor space as a regular wardrobe, generating zero visual craft-room noise in the surrounding domestic space during the hours (typically the majority of the day) when crafting is not happening. This closure is particularly valuable in homes where the craft space is within a living room, bedroom, or other shared space rather than a dedicated room — the ability to close the craft studio entirely at the end of a session, concealing all materials and the working surface behind two doors, maintains the domestic character of the shared space without requiring any clearing or tidying.
How to get it: Source a large secondhand armoire or wardrobe with substantial interior depth (minimum 50cm for a workable desk surface) from a charity shop, marketplace, or furniture retailer. Remove any existing interior fittings (hanging rail, fixed shelves). Install a fold-down desk surface using heavy-duty piano hinges at approximately hip height from the wardrobe floor, supported in the open position by two chain supports on each side. Fit adjustable shelves above and below the desk surface using shelf pins in a drilled shelf pin hole pattern. Mount a SKÅDIS or equivalent pegboard panel on the back interior wall of the wardrobe. Install a battery-powered or rechargeable LED task light at the top interior edge of the wardrobe for working light.
Shop The Look
| Product |
|---|
| Secondhand armoire large painted |
| Heavy duty piano hinge fold-down desk |
| Chain support desk fold-down set |
| Battery LED task light rechargeable |
| Adjustable shelf pin hole set interior |
7. Fabric Storage — Folding Method and Color-Blocked Shelves
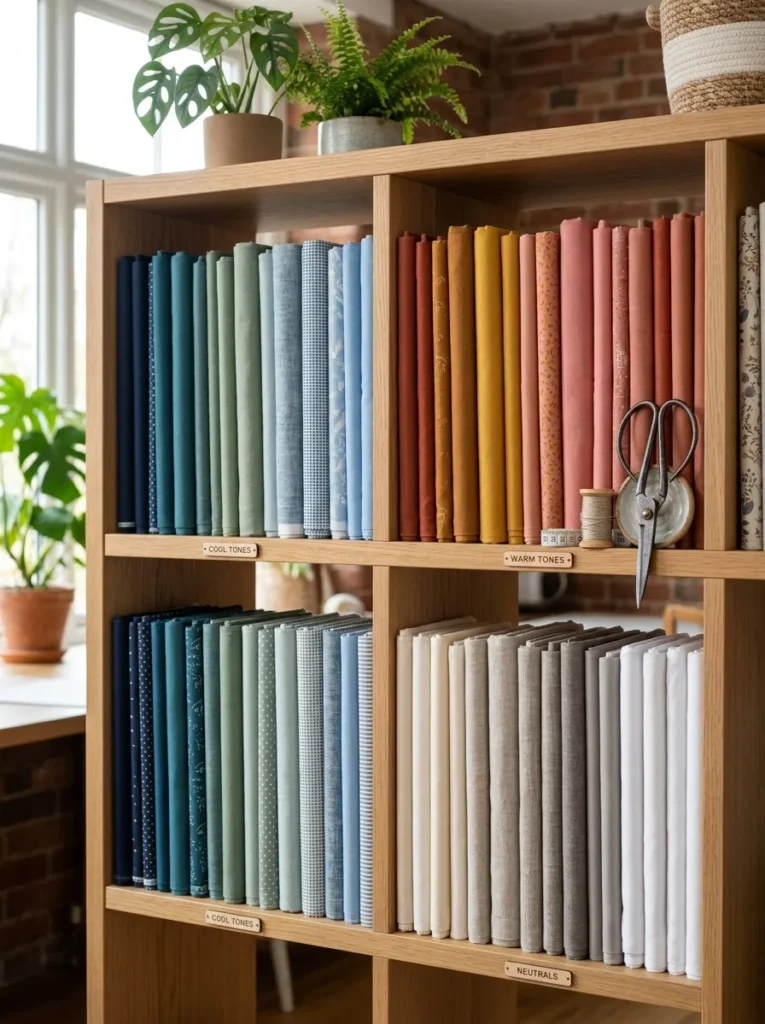
Vibe: The color-blocked fabric shelf feels like the most organized version of a fabric shop — the filing-style fold allowing every piece to be seen and selected without disturbing adjacent fabrics.
Why it works: Fabric storage using a consistent folding method and color-blocked shelf arrangement applies the textile retail display principle of filing over stacking — fabric stored in a stack (one piece on top of another) makes every piece below the top inaccessible without moving the entire stack; fabric folded to a consistent width and standing on edge like files allows every piece to be seen and retrieved individually without disturbing adjacent pieces. The specific folding method (fold to a consistent 20cm width, regardless of the original piece’s size, then fold in half once or twice to a consistent height) produces a library of fabric tiles that can be sorted in any sequence — by color, by weight, by pattern type — and resorted without any re-folding.
How to get it: Establish a consistent folding width (20cm works for most fabric pieces from fat quarters to half-metre cuts) and fold all fabric to this width, then fold the length to a height of approximately 12–15cm. Stand all pieces on edge in the shelf section. Sort into color blocks: cool tones together, warm tones together, neutrals together, and pattern types (floral, stripe, geometric, solid) within each color section. Label each color section with a small card label at the front of the shelf. Pieces thinner than 15cm in their folded form can be held upright using bookends or small folded pieces of cardboard as dividers.
Shop The Look
| Product |
|---|
| Wide shelf bracket set heavy duty |
| Fabric fat quarter set color sorted |
| Small shelf label card set craft |
| Bookend set small white metal |
| Ceramic scissors rest display |
8. BOAXEL or ALGOT Wall-Mounted System for a Craft Cupboard
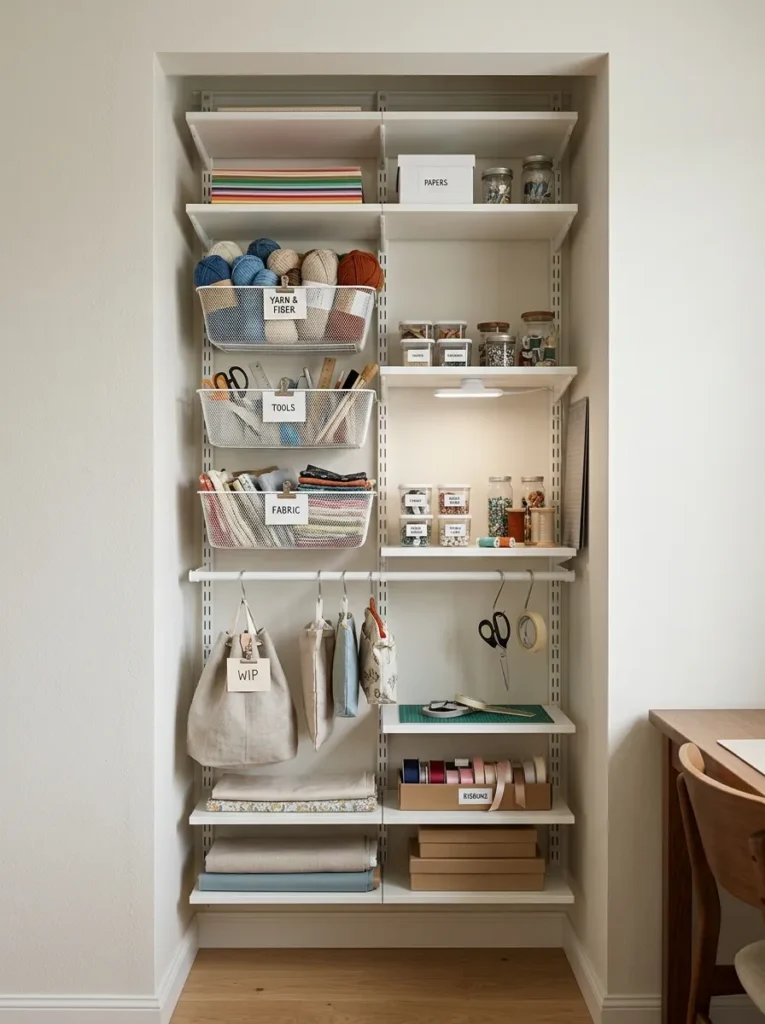
Vibe: The fitted alcove system feels space-maximally efficient — the BOAXEL components filling the alcove depth and height in a way that no freestanding furniture can achieve.
Why it works: A BOAXEL or ALGOT wall-mounted system in a craft cupboard or alcove applies the spatial efficiency principle of depth and height utilization — wall-mounted shelving systems that attach to the back wall of an alcove or cupboard use the full available depth of the recess (typically 35–60cm in a standard alcove) at every height level, whereas freestanding furniture placed in the same alcove typically uses only the front 30–40cm of depth and wastes the space behind. Wire basket accessories within the BOAXEL system are specifically appropriate for craft material storage because they provide visible inventory (the same principle as glass jar display applied to larger-format materials) while allowing the wall-mounted structure to bear the basket’s weight independently of the shelf surface above.
How to get it: Measure the alcove or cupboard’s width, depth, and height. Install BOAXEL upright rails (the primary mounting element — vertical rails screwed to the wall at the correct spacing for the chosen accessories) at the standard 40cm or 80cm spacing. Select accessories appropriate to the stored materials: flat shelves for boxes, books, and flat paper; wire baskets for yarn, fabric scraps, and loose accessories; hanging rod accessories for bags, tools, and rolled materials. Install at heights appropriate to the material: floor to 90cm for heavy and frequently accessed items, 90–180cm for medium-weight and medium-frequency items, above 180cm for light and infrequently accessed items.
Shop The Look
| Product |
|---|
| BOAXEL upright wall rail white set |
| BOAXEL wire basket set |
| BOAXEL flat shelf set |
| Labeled bin set wire basket |
| Clip light small rechargeable shelf |
9. Craft Supply Display on a Dedicated Inspiration Shelf
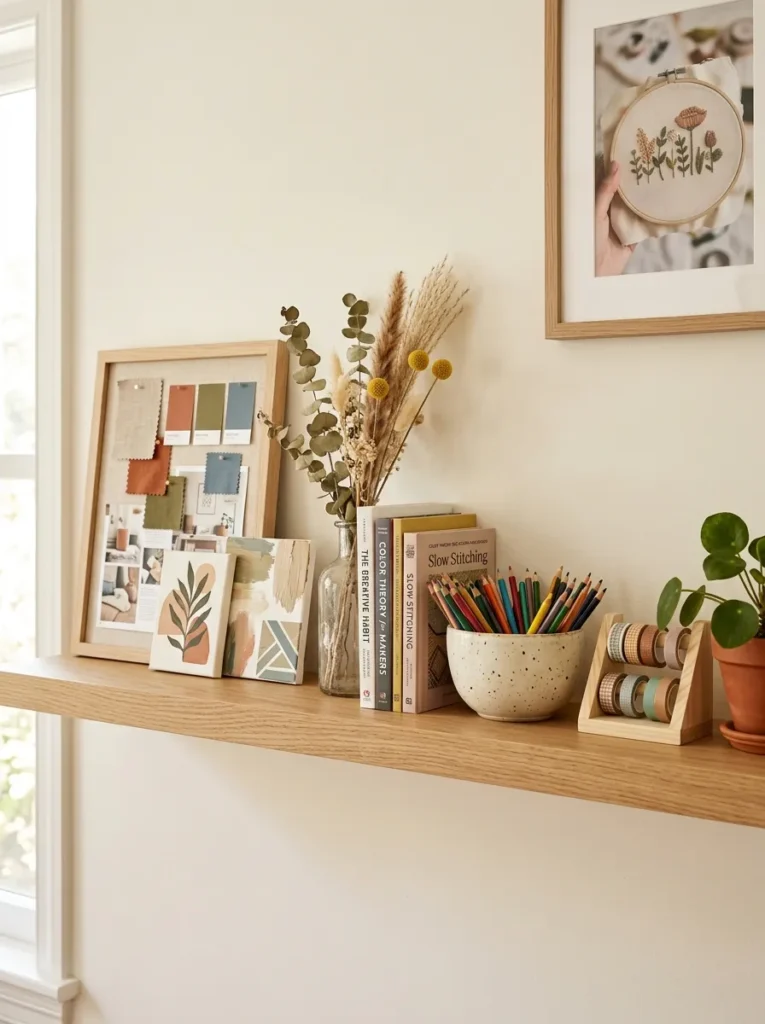
Vibe: The inspiration shelf feels like the room’s creative mood board made three-dimensional — the arrangement of objects on the shelf simultaneously storing and displaying the aesthetic direction of the maker’s practice.
Why it works: A dedicated inspiration shelf applies the creative environment principle of ambient inspiration — an artist or crafter’s best work is supported by an environment that continuously references the aesthetic directions, color palettes, and material qualities that inspire them. A single shelf specifically designated for inspiration objects (rather than functional storage) provides this continuous reference without requiring deliberate consultation — the objects are visible in peripheral vision during working sessions, the color palette of the displayed objects informs spontaneous color choices, and the physical presence of completed and in-progress work provides motivation and context. The organization constraint of a single shelf forces genuine curation — only the most genuinely inspiring objects can earn their place.
How to get it: Install one natural oak or warm wood floating shelf at eye height (approximately 140–150cm from the floor) in the most visible position from the primary working position in the craft space. Style the shelf using the display rule of three: group objects in odd numbers (3, 5, 7), vary heights using books as risers for lower objects, include at minimum one living element (small plant, fresh flower) and one current work element (a test swatch, a small completed piece, an in-progress project sample). Refresh the shelf display monthly rather than seasonally — more frequent rotation prevents the inspirational value from becoming habituated.
Shop The Look
| Product |
|---|
| Natural oak floating shelf 120cm |
| Concealed shelf bracket set |
| Small ceramic bowl desk display |
| Craft book set inspiration volumes |
| Dried botanical stem display vase |
10. Under-Desk Storage with Labeled Pull-Out Crates
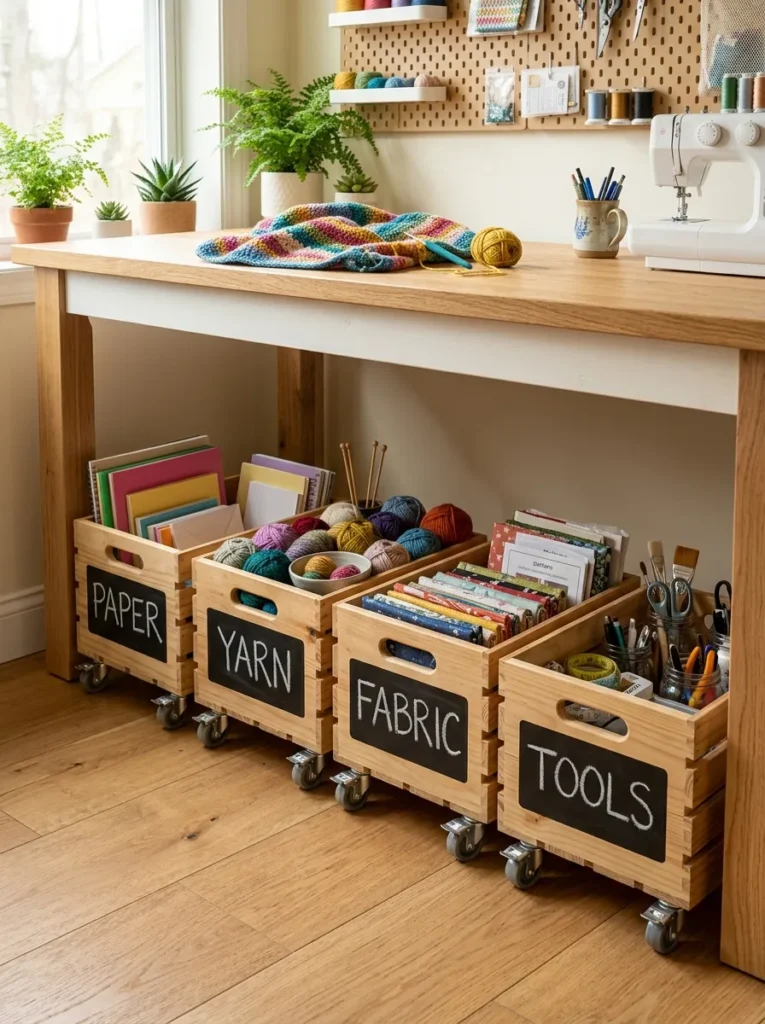
Vibe: The under-desk crate system feels like the desk has its own efficient basement — the space beneath the surface as organized as the surface above it.
Why it works: Under-desk storage with labeled rolling crates applies the dead zone activation principle — the space beneath a standard desk (typically 65–75cm height, 60–70cm depth, and the full desk width) is the most consistently underused storage zone in any small craft room, often filled with loose bags, random boxes, and miscellaneous overflow that requires clearing before the desk can be used comfortably. Rolling wooden crates on smooth casters fill this zone with categorical storage that is fully accessible (pull out any crate fully for complete access to its contents) while maintaining the clearance for comfortable seated work. The labeling of the short side (the face visible when looking under the desk from the working position) allows the correct crate to be identified and retrieved without pulling out multiple crates.
How to get it: Source wooden crates in a consistent size that fits the under-desk height (wooden wine crates, craft crates, or custom-cut plywood boxes — standard crate heights of 20–30cm fit comfortably beneath most desks). Attach two smooth 5cm swivel casters to the base of each crate using the manufacturer’s screws. Label the short side of each crate using chalk paint labels (paint a rectangle with chalkboard paint, letter in chalk marker) or kraft card labels attached with staples or strong adhesive. Sort all craft materials into four to six clear categories and assign one category per crate. Roll completely under the desk when not in use.
Shop The Look
| Product |
|---|
| Wooden crate set storage craft |
| Smooth swivel caster set 5cm |
| Chalk marker white fine tip |
| Chalkboard paint small tin craft |
| Kraft label card self-adhesive set |
11. Thread and Floss Organization on a Wall-Mounted Frame
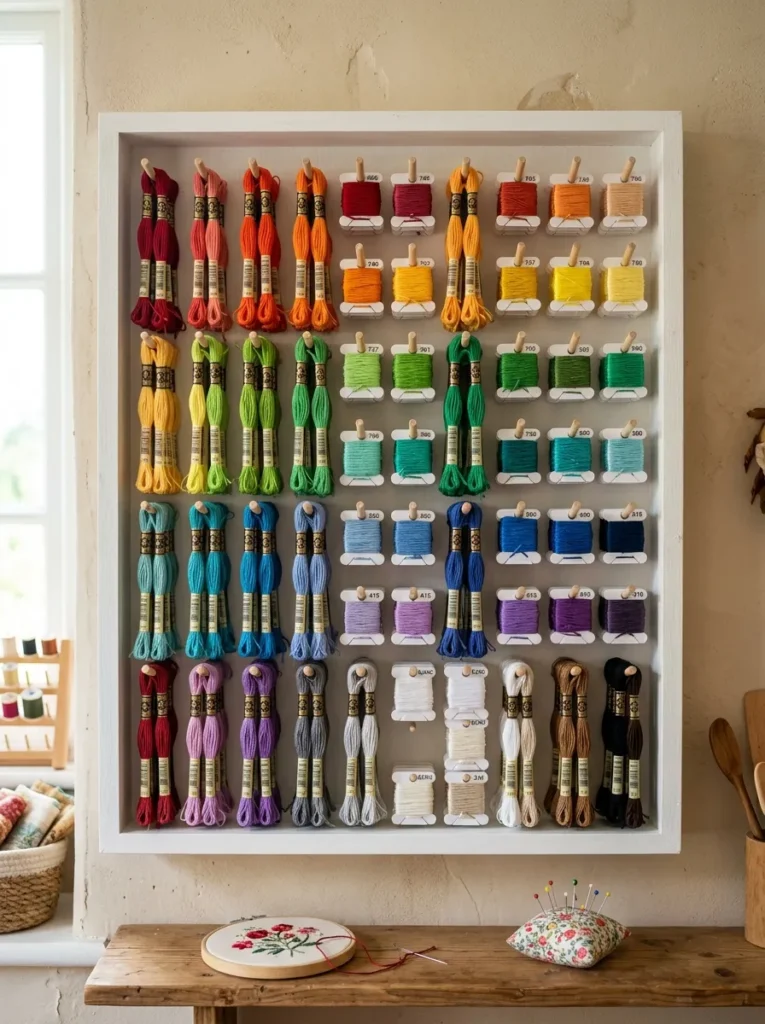
Vibe: The thread display feels like a rainbow archive — every color organized in its place and visible at a glance, the organizational system a work of color art in its own right.
Why it works: An embroidery thread wall display applies the display-as-storage principle at the small-material scale — embroidery thread and floss stored loose in a box is among the most frustrating storage problems in craft because the skeins tangle, the colors are difficult to locate, and the full collection’s extent is invisible from the box’s exterior. Mounting each skein on a small wound card (standard DMC floss cards, or cut-down cardboard) and hanging from individual small dowels or pegs on a wall-mounted grid converts the same collection into a completely visible, completely accessible, tangle-free color archive. Rainbow-sorting the collection (by hue from red through the spectrum to neutrals) converts the organizational system into a visual composition that operates simultaneously as the craft room’s primary wall artwork.
How to get it: Source or make a mounting board: either a shadow box frame with the backing board accessible, or a painted MDF panel. Mark a regular grid of points across the board (3cm intervals in each direction creates a comfortable hanging density for standard floss cards). Drive small 2cm panel pins or screws at each grid point, leaving 1cm proud of the surface as a hanging post. Wind all embroidery thread onto standard DMC-format cards (available cheaply from embroidery retailers, or cut from thin card stock using a template) and hang from the posts, sorted by color in rainbow sequence from left to right and top to bottom.
Shop The Look
| Product |
|---|
| Embroidery thread card set DMC format |
| Panel pin set small 2cm |
| MDF board painted white 40x50cm |
| Embroidery floss rainbow sort set |
| Needle cushion small desk |
12. Craft Wardrobe Conversion — The Dedicated Craft Closet
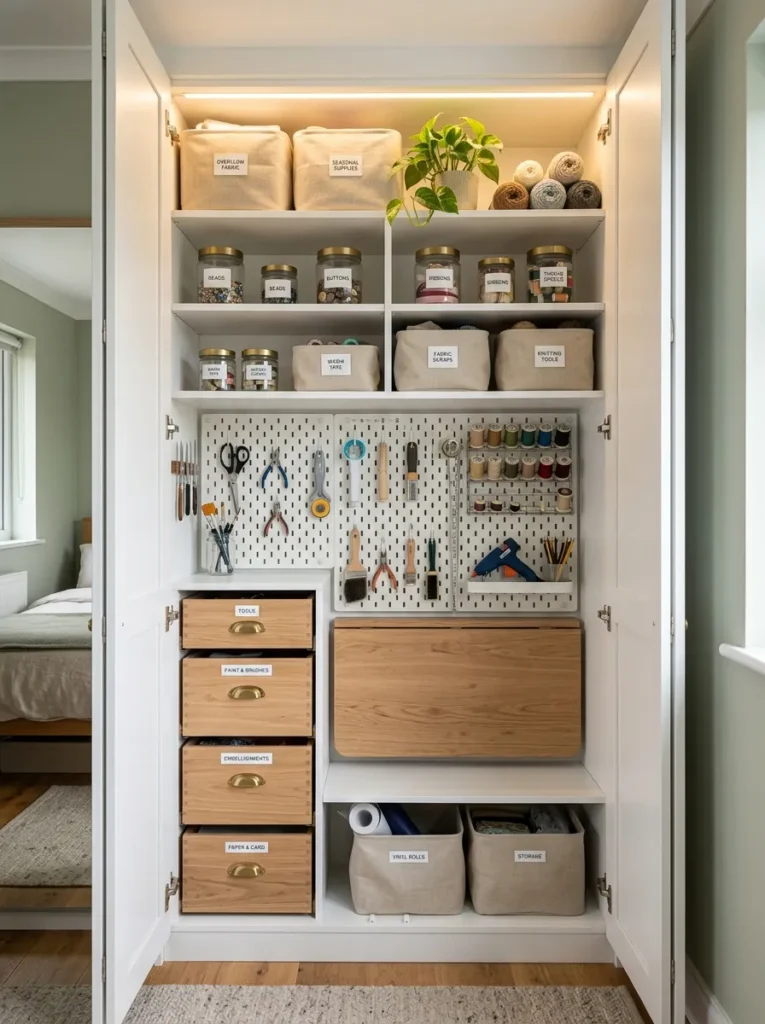
Vibe: The craft wardrobe conversion feels like finding a complete studio hiding in an unused bedroom wardrobe — the standard cupboard footprint containing everything a craft practice needs in three square feet of floor space.
Why it works: A wardrobe conversion to a dedicated craft closet applies the principle of the smallest possible dedicated space — research in creative productivity consistently documents that a space dedicated exclusively to a creative practice (even a very small one) produces better creative outcomes than a shared multipurpose space, because the dedicated space allows materials to remain set up between sessions, eliminates the setup and clearing overhead of multipurpose space use, and creates a psychological association between the space and the creative activity. A single standard wardrobe opening (120×200cm) provides sufficient floor space for a small-to-medium craft material collection and a fold-down work surface for seated crafting, within a footprint available in the majority of domestic bedrooms.
How to get it: Remove the existing wardrobe’s interior fittings entirely (hanging rail, shelves, drawers). Install an LED light strip at the top interior edge, wired to a smart plug for simple on-off control from outside the wardrobe. Build a fold-down desk surface from 18mm MDF at 75cm height from the floor, hinged at the back wall and supported by two chain supports when open. Install adjustable shelves above the desk at 20–30cm intervals. Fit a pegboard panel on the back wall between the desk surface and the top shelf. Add a small set of pull-out drawers (IKEA ALEX small drawer unit, or similar) within the lower section beside or under the fold-down desk for tool storage.
Shop The Look
| Product |
|---|
| LED strip light with smart plug |
| MDF board fold-down desk surface |
| Piano hinge heavy duty fold-down |
| Chain support fold-down desk set |
| Pull-out drawer unit small ALEX |
13. Paper and Card Stock Organization Using a Vertical File System
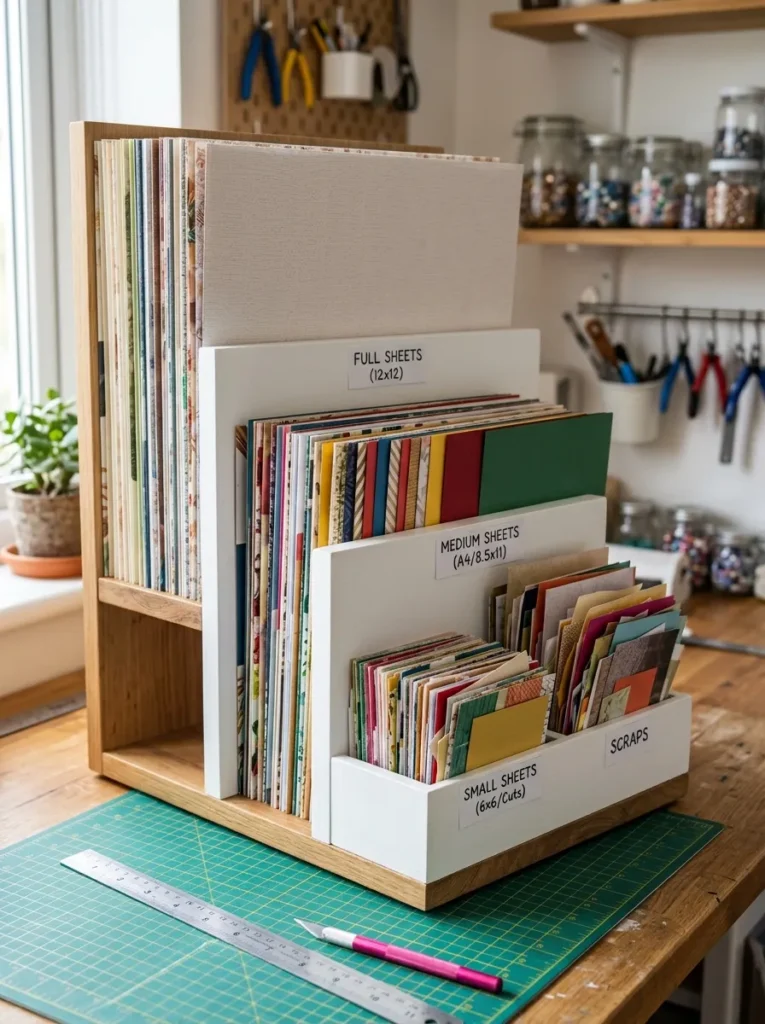
Vibe: The vertical paper file feels like a well-organized print shop’s paper library — every sheet visible, accessible, and returned to its place without disturbing adjacent sheets.
Why it works: Vertical file storage for paper and card stock applies the same filing principle as the fabric fold method (Idea 7) — storing papers vertically (on their long edge) rather than horizontally (stacked) allows every sheet to be seen from above and retrieved individually without moving adjacent sheets. This is the single most important practical principle in paper storage for crafters, because stacked paper storage makes every sheet below the top effectively inaccessible (locating a specific paper requires lifting and searching through the entire stack), while vertical paper storage allows immediate visual location and single-motion retrieval. Dividing the vertical storage into sections by size (full sheet at the back, A4 in the center, smaller and scraps at the front) further reduces retrieval time by providing a consistent location for each paper format.
How to get it: Build or adapt a storage unit with the appropriate internal dimensions: minimum 40cm depth (to accommodate A2/full sheet paper widths), 30cm height (sufficient for A1/full sheet paper standing on its long edge), and 60–80cm total width. Install MDF dividers at 10–12cm intervals to create individual paper-file sections. Paint each divider in a color that corresponds to the paper category it contains (white for plain, blue for patterned, green for textured, for example) to allow instant section identification. Stand all papers in their section, sorted by color within each size category.
Shop The Look
| Product |
|---|
| Deep shelf paper storage custom or adapted |
| MDF divider board 9mm set |
| Paper assortment set varied weight |
| Cutting mat self-healing A2 |
| Label card set section labeling |
14. Yarn Stash Display in a Wire Grid Wall System
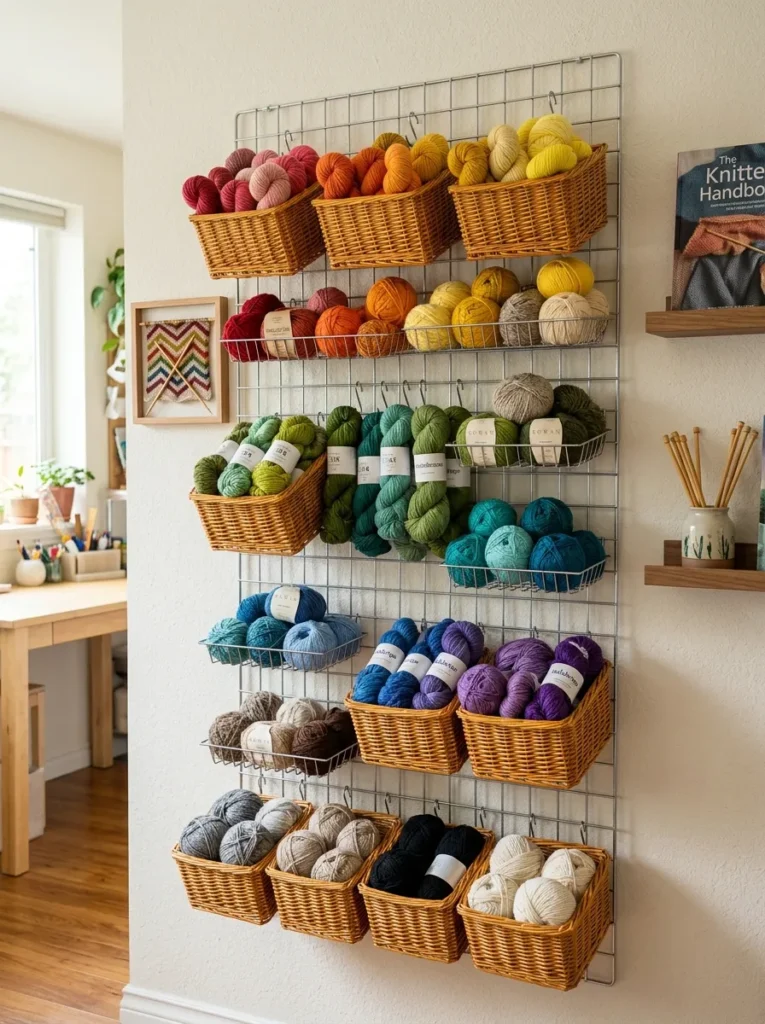
Vibe: The yarn wall feels like the most colorful wall in any home — the organized rainbow of yarn skeins and balls creating a color display that makes the craft space feel like a professional yarn shop.
Why it works: A wire grid wall system for yarn stash display applies the maximum display-as-storage principle to yarn — a material that is simultaneously bulky (yarn stashes accumulate significant volume quickly), visually beautiful (the color range of yarn is extraordinary), and organizationally challenging (yarn stored in bags or boxes becomes tangled and inaccessible). A wire grid with basket attachments provides a scalable, reconfigurable storage system that grows with the stash (additional baskets and hooks added as the stash expands) while keeping all yarn visible for color inspiration during project planning. The S-hook attachment of baskets to the grid allows the system to be completely reconfigured (different basket positions, different size baskets, different sorting sequences) without any tools.
How to get it: Source a wire grid panel (also called a gridwall panel, available from retail display suppliers and homeware retailers) in the largest size that fits the intended wall. Mount with appropriate wall fixings for the panel weight plus the anticipated stash weight — always fix into studs for a fully loaded yarn wall. Source wicker or wire baskets in sizes that hold 3–5 yarn skeins per basket (baskets that are too large encourage over-filling and create the tangling problem the system is designed to prevent). Sort yarn into color families and assign one family per basket. Display in rainbow sequence across the grid from warm to cool, with neutrals at the bottom.
Shop The Look
| Product |
|---|
| Wire grid panel wall mount 60x120cm |
| Wire S-hook set grid basket |
| Wicker basket small yarn size set |
| Yarn stash set varied colors |
| Framed knit sample small display |
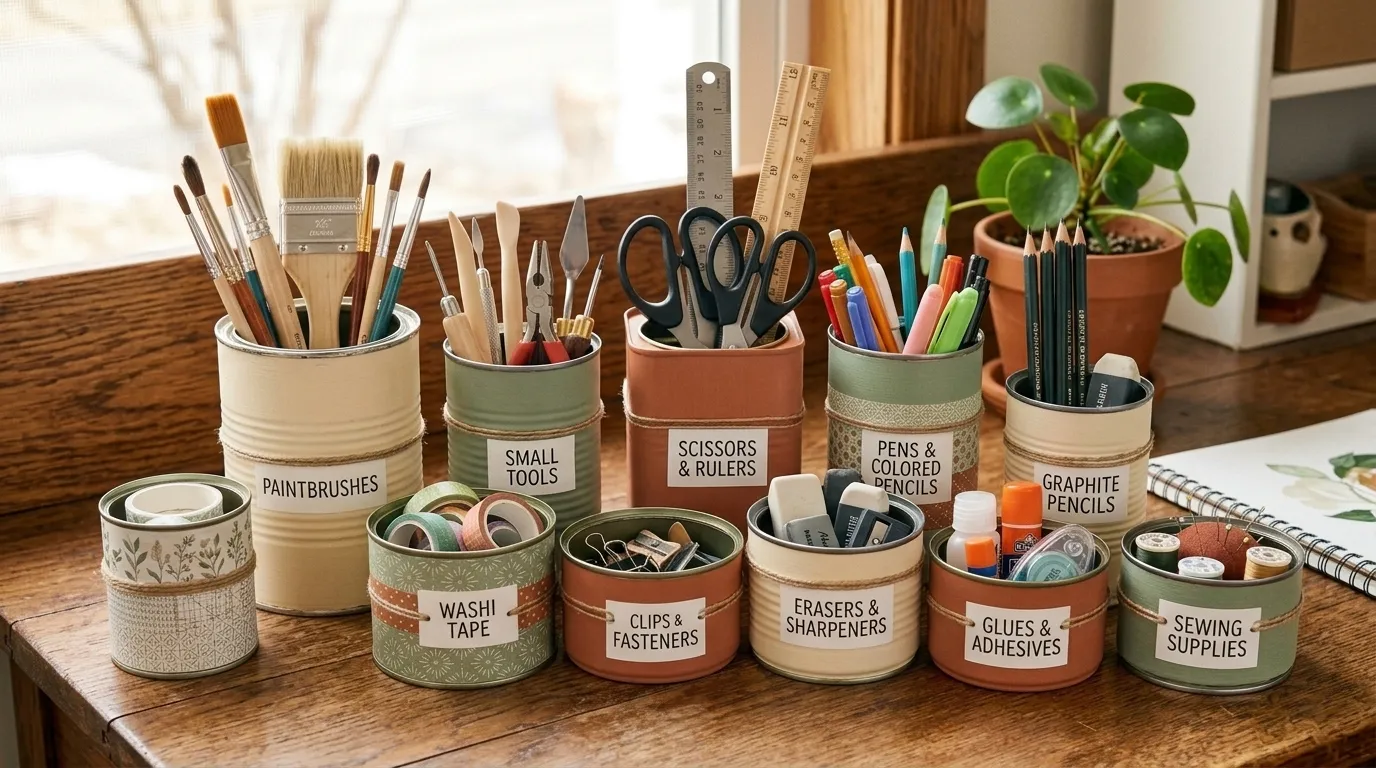
15. Desktop Organization System with Repurposed Tins and Cans
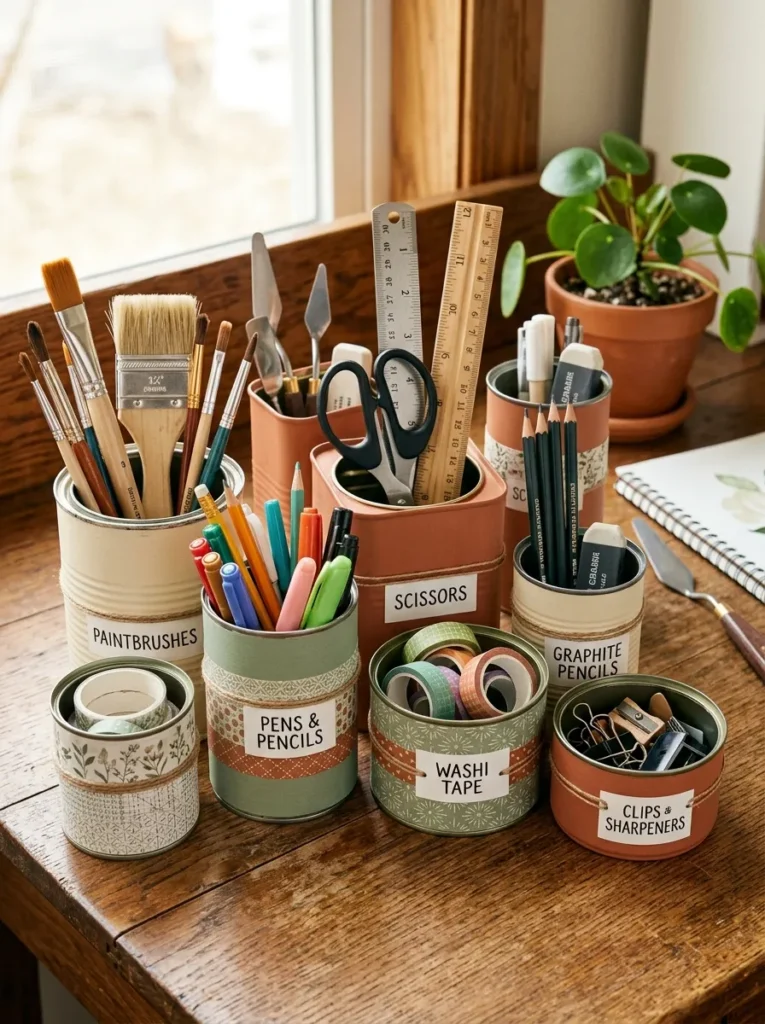
Vibe: The repurposed tin collection feels warm and personal — the variety of tin forms and sizes creating the specific charm of a desktop organization system that was assembled rather than purchased.
Why it works: A repurposed tin and can desktop organization system applies the display-as-storage principle at the most accessible material cost — zero, for a basic version using household waste tins — while creating a personalized desktop display that commercial organizer sets cannot replicate because the variety of tin forms (round, square, tall, wide, small, large) precisely matches the varied height and diameter requirements of different tool categories. Paint brushes require a tall narrow container; washi tape rolls require a wide low container; pens and pencils require a medium-height round container; scissors require a medium-height rectangular container. A repurposed tin collection naturally provides this variety of forms, while a commercial organizer set typically provides a uniform set of containers that compromises for each specific tool type.
How to get it: Collect tins and cans over several weeks (paint tins from a hardware store, vintage tins from charity shops, food cans thoroughly washed and with sharp edges removed using a can opener that cuts the side rather than the top). Clean, dry, and if desired, cover using one of three methods: paint with chalk paint in the chosen coordinating palette (two coats, no primer required on metal for chalk paint), wrap with a length of coordinating washi tape, or cover with a strip of paper cut from coordinating patterned wrapping paper adhered with Mod Podge. Assign one tool category per tin based on the tin’s dimensions, and label with a small handwritten tag or a chalk marker directly on a chalk-painted surface.
Shop The Look
| Product |
|---|
| Chalk paint set coordinating palette |
| Vintage tin set charity sourced |
| Washi tape set coordinating warm |
| Small plant desk display ceramic |
| Chalk marker fine tip white |
16. Craft Supply Color Sort — Making the Collection the Decoration.
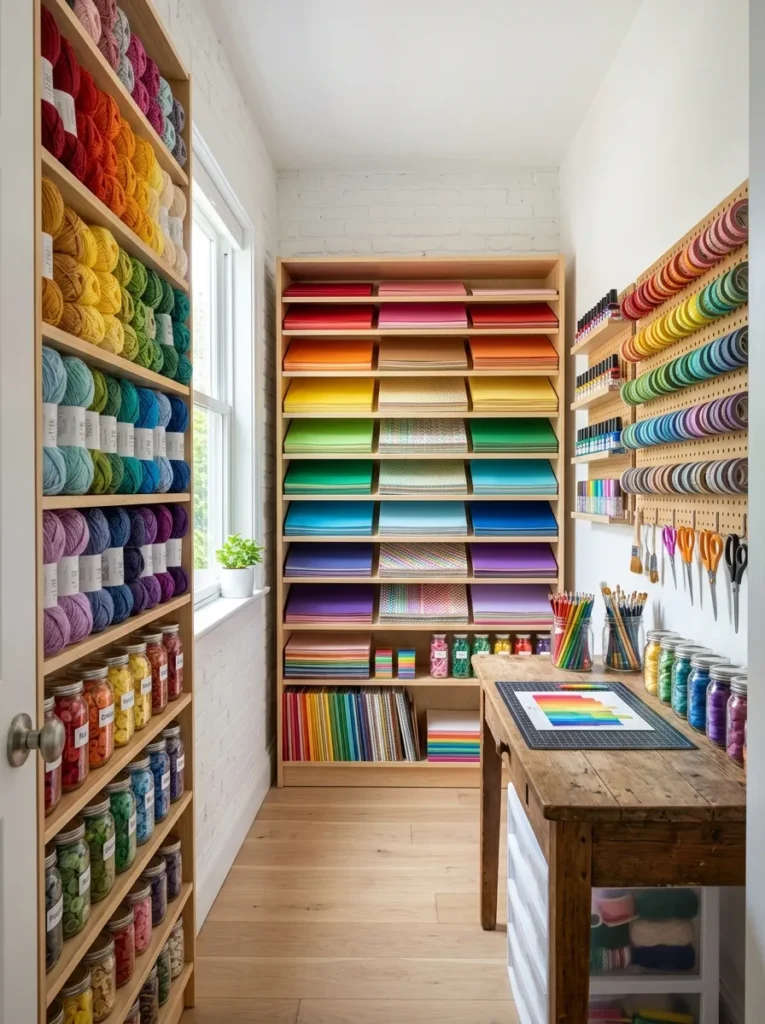
Vibe: The color-sorted craft room feels like living inside a rainbow — the organizational system and the decoration being exactly the same thing.
Why it works: A room-wide color sort across all visible storage applies the unified display principle of collection-as-decoration — when every visible element of a craft collection is color-sorted, the combined visual effect of multiple rainbow-gradient storage systems within the same room creates a cohesive, designed visual environment from materials that already exist. No additional decoration is needed or appropriate — the materials themselves, organized by color, are the room’s primary visual content. This approach is simultaneously the most functional (color sorting makes any item within any collection findable in seconds without labels, because the maker knows the approximate location of any material by its hue) and the most beautiful — a color-sorted craft room is the most photographed and most aspirationally referenced small craft space format in the maker community.
How to get it: Conduct a complete color-sort audit of all craft materials: sort all yarn by hue (red → orange → yellow → green → blue → violet → neutral), all thread by the same sequence, all card and paper by hue, all buttons by hue, all washi tape by hue, all colored pencils, markers, and pens by hue. Reorganize every storage system to display materials in color sequence. This full audit typically takes one full day for an established craft collection. The result requires maintenance (returning each item to its correct color position after use rather than simply returning it to any available space) but is self-reinforcing — because the color sort is both beautiful and functional, the motivation to maintain it is higher than for any other organizational system.
Shop The Look
| Product |
|---|
| Full craft material color sort audit |
| Rainbow yarn stash display set |
| Color-sorted button jar set |
| Color-sorted paper stack set |
| Washi tape rainbow display set |
How to Start Your Small Craft Room Storage Transformation
The single best first move in any small craft room storage transformation is conducting a material audit before purchasing any storage products — removing every craft material from its current location, placing it all in one visible space (the floor of the room, a cleared dining table), categorizing it into clear type groups, and counting the quantity in each category. This audit, which takes 2–4 hours for a standard accumulated craft collection, reveals the three pieces of information that all storage purchasing decisions require: how many distinct categories of material need storage solutions, what the approximate quantity in each category is (which determines the volume of storage needed), and what materials currently have no appropriate storage at all (which indicates where the most acute organizational problem is). No storage purchase made without this audit will precisely fit the actual collection’s needs.
The most common mistake in small craft room storage is purchasing closed-box storage (opaque lidded boxes, drawer units with no labeling system) for materials that benefit from open display storage. Closed storage is appropriate for materials that are visually unappealing (tool supplies, adhesives, materials in commercial packaging that cannot be decanted), infrequently used (seasonal materials, specialist tools), or fragile (delicate projects in progress). Everything else in a craft room — yarn, fabric, thread, paper, buttons, ribbon, washi tape, markers — benefits from open display storage, because visibility drives use and closed storage drives accumulation of forgotten materials. The most expensive closed storage unit does not solve the “I forgot I had that” problem; the simplest open shelf does.
Three specific items under $50 that immediately improve any small craft room storage: a set of ten glass jars in varied sizes ($12–18, sourced from IKEA’s KORKEN range or collected from household recycling) for the immediate decanting of all small materials (buttons, beads, pins, small tools) from their commercial packaging into visible glass containers; a roll of washi tape and a wooden dowel ($6–12 combined) for converting an existing nail or picture hook into a small washi tape dispensing display; and a pack of uniform kraft label cards with hole punches and thin twine ($5–8) for immediately labeling every storage container in the system so that the organizational system can be maintained after the initial setup. These three items combined for under $40 create the visibility, the display quality, and the labeling discipline that sustain any craft room storage system over time.
A basic small craft room storage refresh — glass jars for small materials, color-sorted visible storage, and a desktop tin system — is achievable over a single weekend for $30–80 in materials. A mid-range craft storage transformation — BILLY or KALLAX system, pegboard, fabric fold and color sort, rolling cart for projects — takes two weekends and costs $150–350. A complete small craft studio build — wardrobe conversion or armoire conversion with full interior fitting, comprehensive wall-mounted system, and complete material organization — represents a $300–700 investment in materials and typically 4–6 weekends of work. The glass jars and the label cards are achievable today; the BILLY system and the color sort follow this weekend, and the wardrobe conversion takes its time and arrives as the space proves what it can become.
Frequently Asked Questions About Craft Room Storage for Small Spaces
How do you organize a craft room with limited wall space?
When wall space is limited, the most effective alternative to wall-mounted storage is vertical freestanding storage — specifically, tall narrow units (BILLY bookcases at 28cm depth or KALLAX vertical configurations) that use ceiling height rather than wall width. Floor-to-ceiling units that occupy 80cm of wall width but reach 220cm of ceiling height provide more storage than a wide low bookcase in the same floor footprint. A second strategy for wall-space-limited craft rooms is door-mounted storage — the back of a craft room door (or a cupboard door within the space) can accommodate a full-length over-door organizer holding small tools, spice-rack-style shelves for small containers, or a pegboard panel. Third, mobile storage (rolling carts, totes on casters) provides storage capacity without permanent wall mounting.
What is the best way to store yarn in a small space?
The most space-efficient and most visually appropriate yarn storage for a small space is open display storage in yarn-appropriate containers arranged by color. Wicker baskets on shelves (allowing air circulation that prevents moth damage), wire grid wall panels with basket attachments, and cube shelving units with one yarn category per cube all provide visible storage that makes the yarn collection both accessible and attractive. Yarn should not be stored in sealed plastic containers (which trap moisture and can encourage moth damage over time) or in opaque bags or boxes (which make the collection invisible and unused). A small yarn collection (under 50 skeins) can be entirely displayed in one KALLAX 2×2 unit with four baskets; a medium collection (50–150 skeins) suits a yarn wall system on a wire grid.
How do you make a shared room (bedroom, living room, spare room) work as a craft space?
The most effective shared-room craft space strategy is vertical concealment — organizing all craft materials within a piece of furniture that reads as domestic rather than as a craft storage unit when closed. The repurposed armoire (Idea 6) and the wardrobe conversion (Idea 12) both achieve this: the craft space is entirely hidden when not in use, and the room reverts completely to its domestic character. A secondary strategy for shared rooms is the dedicated rolling cart system — one or two RÅSKOG carts organized for the craft practice can be rolled to a workspace when crafting is happening and rolled into a cupboard or behind a door when the room is in its primary domestic use.
What storage products are most worth investing in for a small craft room?
The storage products with the highest return on investment for a small craft room are those that provide the combination of visual accessibility and categorical organization that craft making requires. In approximate priority order: a wall-mounted pegboard system above the primary work surface (immediate-access tool storage that eliminates desk surface clutter), a modular cube shelving system (KALLAX or BILLY) for the primary material collection (adjustable, expandable, and compatible with the widest range of insert and basket accessories), glass jars in varied sizes for all small materials (the highest visibility-to-cost ratio of any storage product), and a rolling cart for the current project (the most impactful workflow improvement for frequent crafters who work in multiple locations within the home). These four product categories together cover the organizational needs of most craft practices at a combined cost of $120–350.
How do you maintain a craft room storage system once it is set up?
The most reliable maintenance practice for a craft room storage system is a one-in-one-out rule for new material purchases — when a new material is purchased, the same material category is reviewed and any pieces of the same type that are no longer needed (duplicates, colors that no longer suit the current palette, remnants too small to be useful) are removed to charity or recycling before the new purchase is stored. This prevents the gradual re-accumulation of the material excess that prompted the initial storage transformation. A second maintenance practice is the monthly 20-minute reset — twenty minutes at the end of each month specifically dedicated to returning any materials that have drifted from their designated location back to their correct storage position. This reset prevents the gradual entropy that any active craft practice generates and sustains the organizational system’s usability over months and years.
Ready to Build Your Dream Small Craft Room Storage?
These 16 ideas move through every dimension of what makes small craft room storage genuinely beautiful and genuinely functional — from the vertical maximization of floor-to-ceiling BILLY systems and yarn wall grids, to the display-as-storage brilliance of glass jars, washi tape dowels, and color-sorted material collections, to the spatial ingenuity of armoire conversions, wardrobe studios, and under-desk crate systems. Starting with the material audit — emptying everything out, categorizing, counting, and seeing the actual collection rather than the accumulated impressionistic sense of it — is not a delay before the transformation begins. It is the transformation’s most important act, because every storage decision that follows it is informed by real knowledge of real materials in real quantities rather than by the aspiration of what the space might become. Clear the shelf, spread the collection on the floor, sort by category, and spend one afternoon understanding what you actually have. The storage system that follows will fit your practice precisely because it was designed for it specifically. Pin the ideas that match your materials, your wall, and your room, and begin building the craft space that makes you want to make.