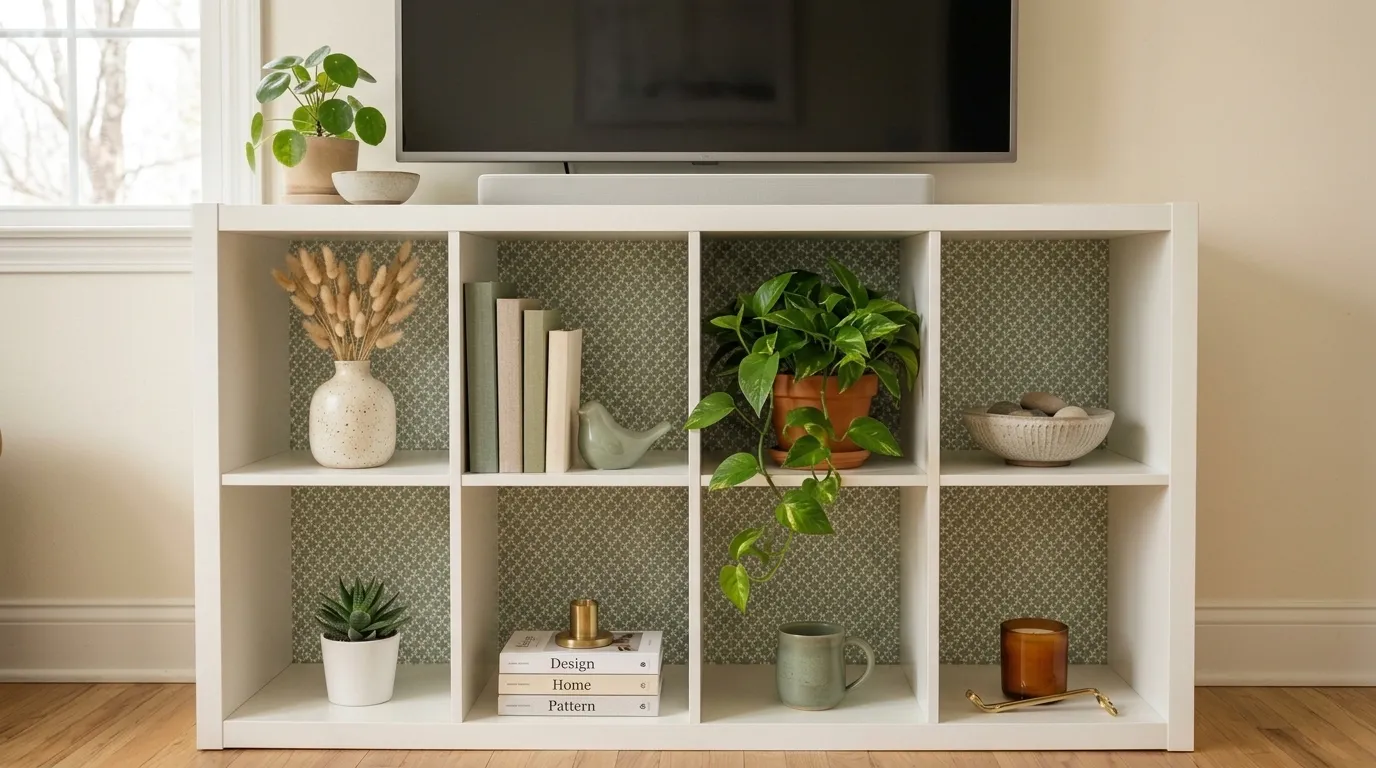
14 IKEA KALLAX TV Unit Hacks for Modern Homes
IKEA KALLAX TV unit hacks use the iconic cube shelving system as a television stand or media console base — combining its modular grid with custom paint, hardware swaps, cladding additions, styling choices, and configuration modifications that transform flat-pack storage into a media unit that reads as bespoke, built-in, or boutique rather than off-the-shelf. This article gives you exactly 14 ideas spanning configuration choices, material upgrades, paint transformations, built-in looks, and small-space solutions so every room size, aesthetic, and skill level finds a KALLAX TV hack that genuinely works.
A KALLAX TV unit done well disappears into the room — the television sits at the correct height, the storage below and beside it handles the room’s media and display needs, and the whole composition reads as something designed for that specific wall rather than assembled from a flat-pack box. That transformation — from furniture to architecture — is what the best KALLAX TV hacks achieve, and it is within reach at every budget and skill level in this list. Here are 14 ideas worth saving — and building.
Why IKEA KALLAX TV Unit Hacks Work So Well for Modern Homes
The KALLAX shelving unit’s suitability as a television stand base rests on a specific combination of dimensional and structural properties that most other affordable shelving units do not share. The KALLAX’s 33×33 cm interior cubby dimension, when arranged in horizontal configurations (1×4 or 2×4 units oriented with the long dimension running horizontally), produces a media console of precisely the width and height that contemporary television placement requires: wide enough to support a 55–75 inch screen visually, deep enough (42cm) to house a media player, router, and gaming console, and tall enough in a 2×4 horizontal configuration (77cm, equivalent to a standard media console height) to position a 55-inch television at approximately the correct eye-level for seated viewing when the TV is wall-mounted or sat on top.
The structural properties that make KALLAX appropriate for TV unit modification include: 25kg per shelf load capacity (sufficient for most AV equipment when distributed across the cabinet’s base), MDF construction that accepts paint, cladding, and adhesive modification without the surface preparation challenges of melamine-coated surfaces (though adhesion priming is still required for paint applications), and the modular format that allows horizontal units of varied lengths to be created from standard 1×4 and 2×4 units placed end-to-end. The 42cm depth also handles cable management more generously than shallower shelving systems — equipment placed fully within the cubby spaces has adequate depth for cable routing behind.
KALLAX TV unit hacks have been among the most consistently documented projects in the IKEA hacking community since approximately 2016, appearing across IKEA Hackers, YouTube, and Pinterest in hundreds of documented variations. The category’s sustained engagement reflects genuine domestic utility — the gap between what purpose-built media furniture costs (custom joinery, purpose-built media units, and designer consoles all command significant premiums) and what the KALLAX base costs creates a strong motivation to modify rather than purchase, particularly when the modification results in a unit visually equivalent to one that costs three to five times more.
Small living rooms and open-plan studio apartments benefit particularly from KALLAX TV unit hacks because the system’s modular format allows TV console configurations that span the full width of a short wall — creating the visual proportion of a full media wall at a fraction of the cost and structural complexity of bespoke built-ins. The honest consideration: KALLAX units in TV unit configurations should always be secured to the wall using the supplied anti-tip hardware, particularly when configured horizontally or when stacked. A media unit bearing the weight of AV equipment and potentially carrying a heavy television on top requires structural stability that flat-pack furniture’s own weight does not inherently provide.
Style at a Glance
| Element | Functional Core | Hack Potential |
|---|---|---|
| Philosophy | Modular cube becomes media console | Bespoke appearance at flat-pack cost |
| Materials | White or birch MDF, push-open inserts | Fluted panel, cane, marble contact paper |
| Color Palette | KALLAX white, black-brown, birch | Warm charcoal, forest green, sage, navy |
1. Horizontal 2×4 KALLAX as a Full-Width Media Console with Painted Finish
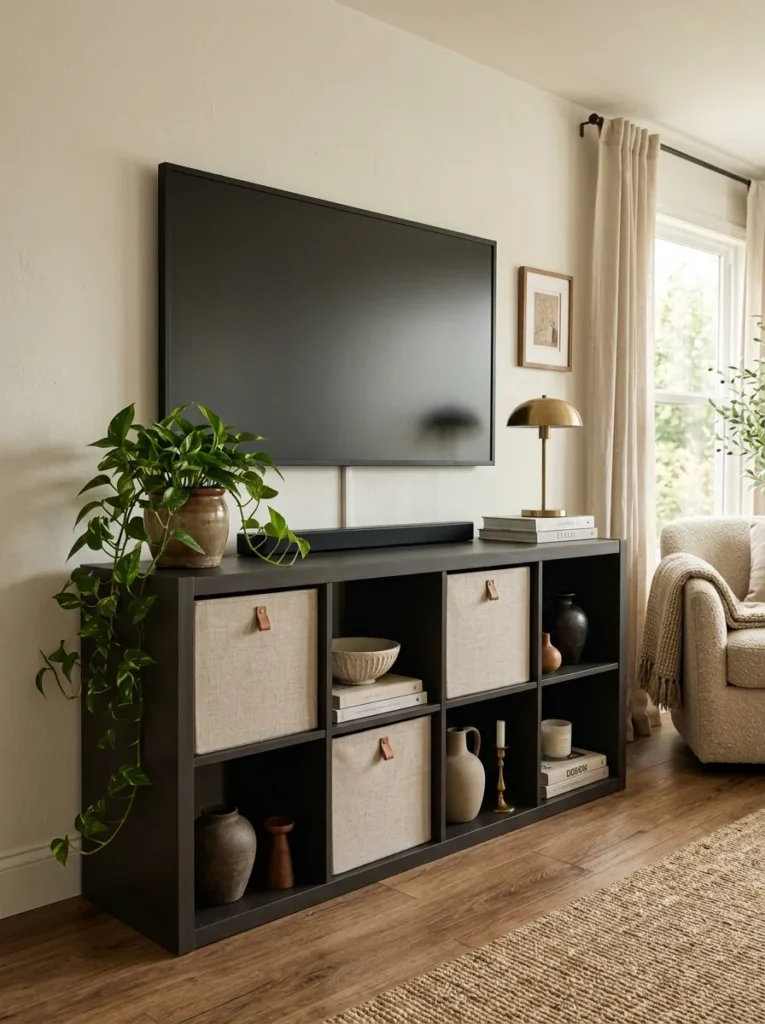
Vibe: The console feels grounded and considered — the charcoal paint doing the visual work of bespoke joinery at paint cost.
Why it works: A horizontal KALLAX 2×4 in deep warm charcoal applies the design principle of tonal depth through color — a piece painted in a warm dark tone reads as materially present and designed in a way that the original white or birch finish never achieves, because the dark value makes the unit visually heavy and permanent rather than lightweight and functional. At 42cm height and 147cm width, the horizontal 2×4 produces media console dimensions that match purpose-built units costing significantly more. The eight cubbies provide sufficient volume for AV equipment, gaming controllers, and display objects without requiring any additional storage furniture in the room.
How to get it: Sand the KALLAX surfaces with 180-grit sandpaper and apply one coat of Zinsser BIN shellac primer to all surfaces before painting — the shellac primer is essential for KALLAX’s factory finish, which actively repels standard water-based paint without primer. Apply two coats of Farrow & Ball Railings No. 31 or Little Greene Loft in a satin finish using a short-nap foam roller. Allow full cure (72 hours minimum) before placing equipment inside the unit. Secure to the wall using the included anti-tip hardware once positioned in its final location.
Quick Win: A 750ml tin of furniture chalk paint in warm charcoal ($18–28) applied directly to a KALLAX without sanding (chalk paint’s high adhesion makes sanding optional on this surface) with two coats and a matte furniture wax topcoat transforms a white KALLAX into a sophisticated media console for under $30 in paint materials.
Shop The Look
| Product |
|---|
| Furniture chalk paint warm charcoal 750ml |
| Short nap foam roller mini 4 inch set |
| Oat linen fabric cube bin KALLAX size |
| Ceramic vessel medium display shelf |
| Trailing pothos artificial plant realistic |
Also view: 14 Modern Tan Sofa Living Room Ideas Worth Saving
2. KALLAX with Fluted Oak Panel Overlay as Designer Media Console
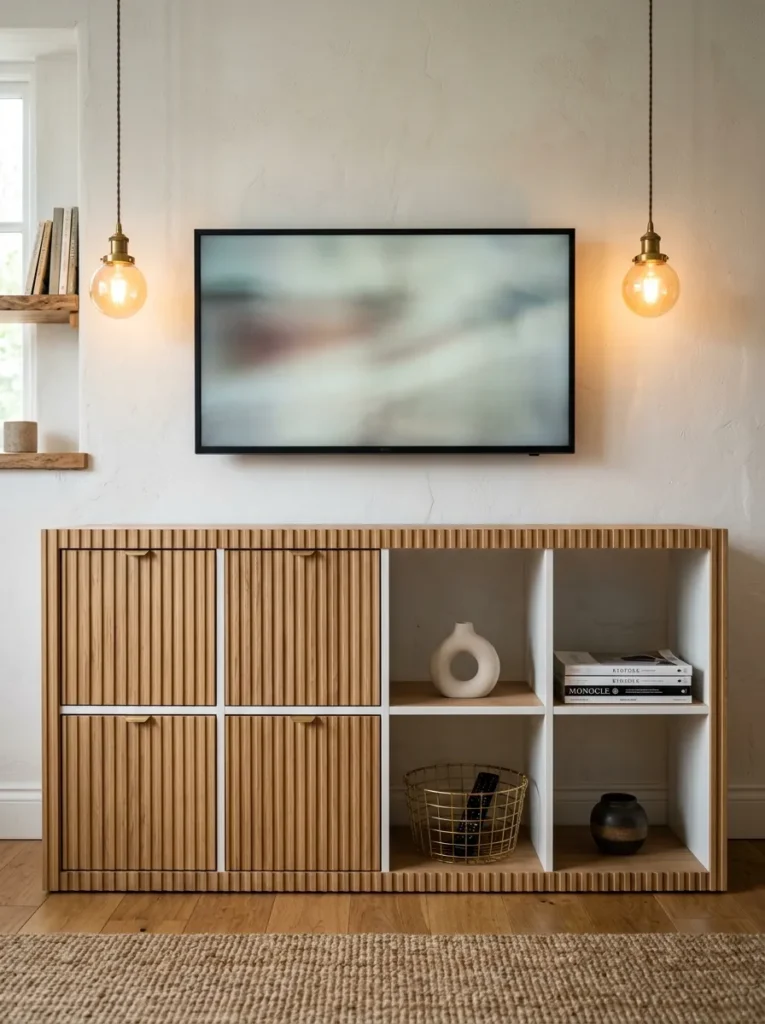
Vibe: The unit feels custom and warm — the fluted texture reading as designer furniture at a DIY material cost.
Why it works: Fluted oak panel overlay on a KALLAX TV unit applies the designer furniture principle of textural surface transformation — the fluted vertical groove profile that characterizes premium custom joinery and high-end furniture collections is applied here as an adhesive or fastened overlay panel to the KALLAX’s existing flat front face, achieving the identical visual result at a fraction of the custom furniture cost. Fluted panels catch directional light along their groove depths, creating a shifting shadow pattern that makes the surface appear three-dimensional and materially rich in a way that flat painted or veneered surfaces cannot replicate. This is the most transformative single material modification available for a KALLAX TV unit.
How to get it: Source fluted MDF panel sheets (available from specialist joinery suppliers and some timber merchants in standard 2400×1200mm sheet sizes) and cut to fit the KALLAX’s visible front face dimensions — the panel overlay sits proud of the KALLAX’s existing front face by the panel’s thickness (typically 12–18mm). Attach using strong contact adhesive or construction adhesive (Evo-Stik or equivalent) applied to both the KALLAX face and the panel back. Where cubby openings interrupt the panel, cut the panel to the opening dimensions and apply on either side of each opening. Stain or paint the panels in a warm white oak tone before installation for the most refined result.
Shop The Look
| Product |
|---|
| Fluted MDF panel sheet white oak finish |
| Contact adhesive furniture panel mounting |
| Iron-on edge banding white oak |
| Brass wire basket KALLAX cubby size |
| Small ceramic display object shelf |
Also view: 15 Halloween Decor Ideas That Are Spooky Cute
3. KALLAX TV Unit with Cane Webbing Inserts for Boho Modern Look
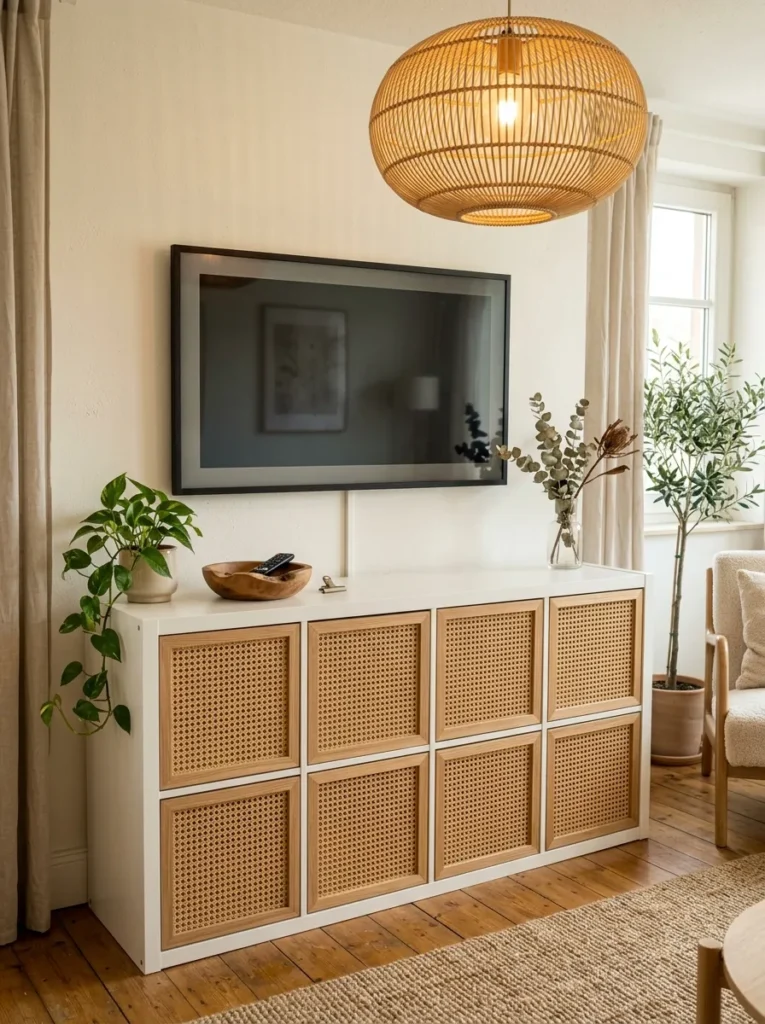
Vibe: The console feels warm and organic — mid-century modern material references applied to a contemporary format.
Why it works: Cane webbing inserts in KALLAX TV unit cubbies apply the furniture design principle of material contrast at the front face — the organic, open-weave texture of natural cane against a smooth white painted frame creates the same warm, textural quality that characterizes mid-century modern sideboards and credenzas. The cane’s slight permeability (it allows air circulation rather than fully closing the cubby) also provides practical benefits for AV equipment storage — routers, media players, and streaming devices generate heat that benefits from ventilation that solid drawer or door inserts do not allow. This makes cane inserts simultaneously the most aesthetically appropriate and most technically practical option for cubbies housing heat-generating electronics.
How to get it: Build replacement front panels for each cubby from 18mm MDF with a routed rectangular recess, leaving a 40mm timber border on all four sides. Source natural cane webbing (sold by the metre from craft and upholstery suppliers) and cut to the recess dimensions plus 20mm overhang on each side. Stretch the webbing across the recess under even tension and staple the overhang to the MDF back. Paint the MDF border in warm white to match the KALLAX body and attach the panel to the KALLAX front face using strong adhesive or small trim nails on the border’s back edge.
Shop The Look
| Product |
|---|
| Natural cane webbing roll metre natural |
| MDF panel sheet 18mm router recess |
| White furniture paint satin finish |
| Rattan pendant light shade warm |
| Dried botanical stem display console |
4. Two KALLAX Units Side by Side with a Continuous Top Surface
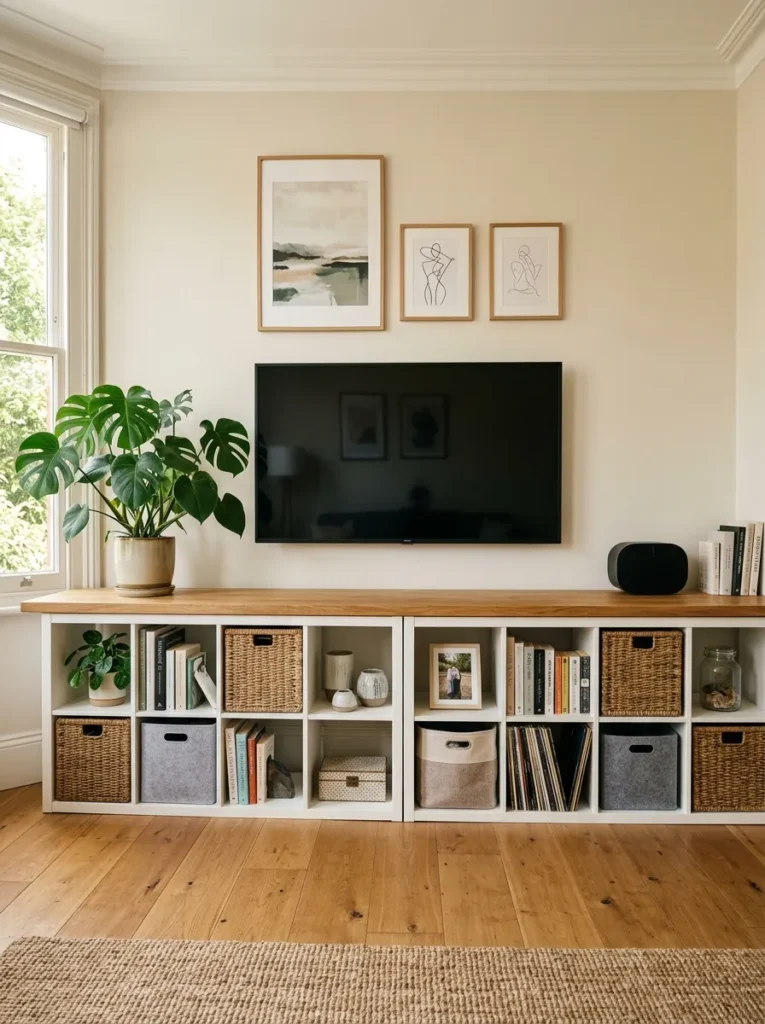
Vibe: The double unit feels like a piece of furniture that was designed for the wall — the continuous oak surface erasing the seam between units.
Why it works: Two KALLAX units combined with a continuous top surface apply the architectural principle of datum line — a continuous horizontal element running the full width of a wall creates a visual baseline that organizes everything above it (the TV, any wall art, the wall itself) into a unified composition. The oak surface serves double function: aesthetically it unifies the two separate units into a single apparent piece of furniture; practically it provides a continuous, heat-resistant surface for AV equipment and display objects across the full console width. The slight extension beyond each unit’s outer edge (typically 5–10cm on each side) references the overhang proportion of a traditional sideboard or credenza, which carries strong furniture association even in a contemporary context.
How to get it: Place both KALLAX units side by side, ensuring both are level and the front faces are flush. Fill the unit-to-unit joint with white paintable caulk and allow to cure. Cut a solid oak worktop (or an oak-veneered MDF top) to the combined unit width plus the desired overhang on each end. Secure the top to the KALLAX units from below using furniture connector bolts through the top panel of each unit. Apply a matte or satin finish oil to the oak surface for protection.
Shop The Look
| Product |
|---|
| Solid oak worktop board 25mm console |
| White paintable caulk smooth joint |
| Furniture connector bolt set worktop |
| Hardwax oil natural wood finish |
| Small plant pot console top display |
5. KALLAX with Marble Contact Paper Cubby Interiors for Luxe Effect
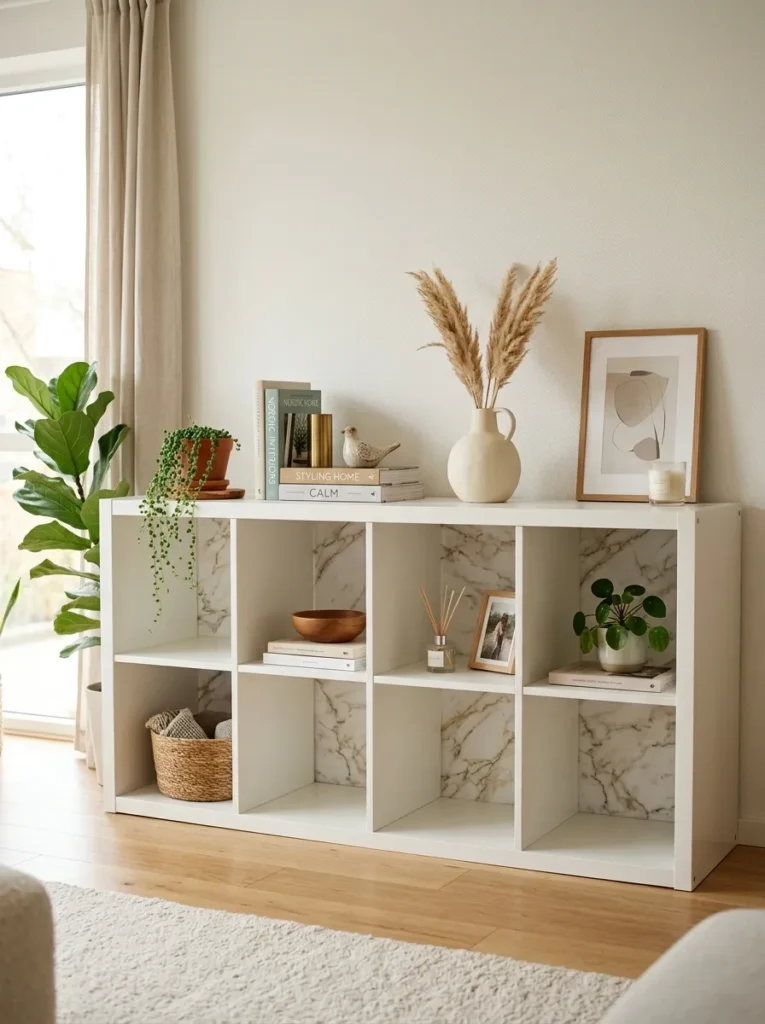
Vibe: The console feels unexpectedly luxurious — the marble interiors visible only when looking directly into each cubby, a detail that rewards attention.
Why it works: Marble-effect contact paper on the interior back wall of KALLAX display cubbies applies the design principle of depth reveal through interior finish — the interior of a display cubby is experienced differently from the room’s overall surface, at closer range and under a different viewing angle. When the cubby interior is a different material and tone from the unit’s exterior (marble against white), displayed objects appear to sit within a distinct visual pocket, elevating them from items placed on a shelf to objects composed against a designed backdrop. Premium marble-effect contact paper (with large-scale, irregular Calacatta veining) at the small scale of a KALLAX cubby back wall is entirely convincing — the limited viewing area prevents the scale reference that might otherwise reveal a print pattern.
How to get it: Source premium Calacatta or Arabescato marble-effect contact paper with large, irregular veining (Chasing Paper or Con-Tact Brand premium ranges). Cut to the exact interior back wall dimension of each display cubby (typically 33×33 cm per cubby). Clean the cubby interior with isopropyl alcohol and allow to dry completely before application. Apply from the top of the back wall downward, using a squeegee to eliminate air bubbles as you press each section flat. Trim edges flush with the cubby’s interior walls using a sharp craft knife.
Shop The Look
| Product |
|---|
| Premium marble contact paper Calacatta |
| Squeegee application tool craft |
| Isopropyl alcohol cleaning prep wipe |
| Craft knife precision blade set |
| Small ceramic display object cubby |
6. KALLAX TV Console with Built-In Look Using Cornice and Plinth
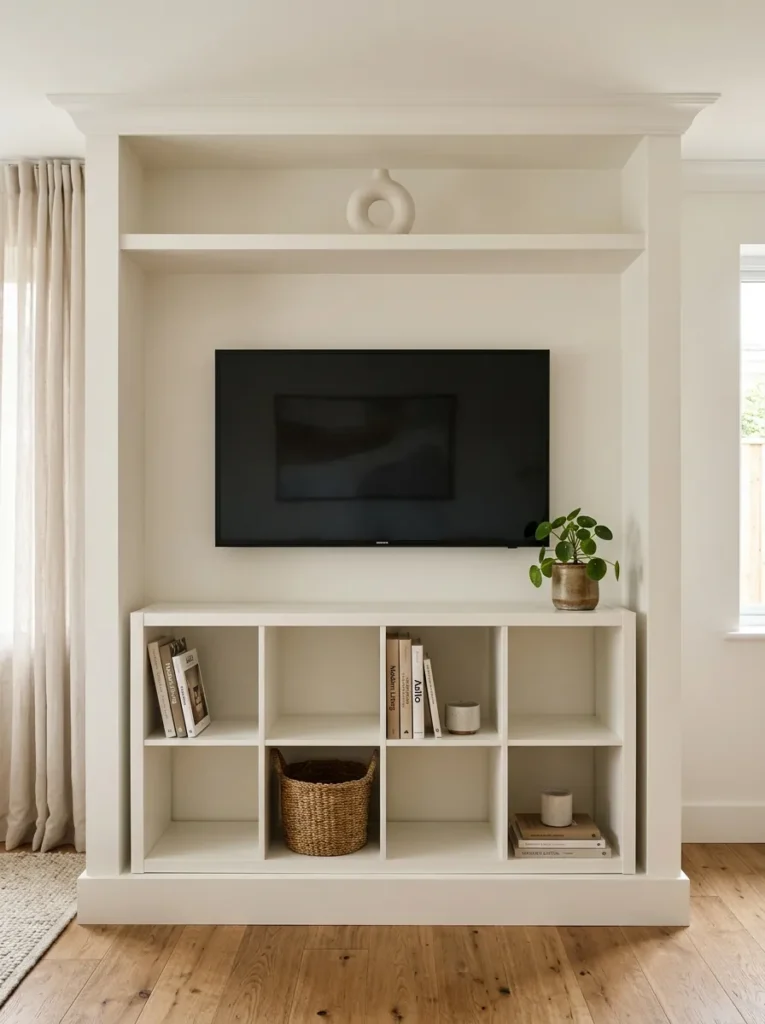
Vibe: The assembly reads as genuinely built-in — the KALLAX beneath the painted cornice indistinguishable from custom millwork at normal viewing distance.
Why it works: A cornice panel above and base plinth below a KALLAX TV console applies the architectural principle of complete vertical enclosure — when a piece of furniture is connected to the ceiling by a cornice panel and to the floor by a continuous plinth, it reads as built architecture rather than placed furniture. This is the same visual mechanism that makes bespoke fitted TV units read as architectural features rather than furniture, and it is achievable with approximately $40 of MDF and paint. The critical proportion detail is the cornice’s depth — it must project to the same depth as the KALLAX unit (42cm) to create the sense of a single continuous volume from floor to ceiling.
How to get it: Build the cornice from 18mm MDF: a horizontal top panel (same depth as the KALLAX, 42cm) fixed to the wall above the unit, with a vertical face panel below it projecting forward to align with the KALLAX front face. Fill any gap between the unit top and the cornice’s underside with a slim horizontal MDF filler panel. Build the base plinth from 3×2 timber painted in the same white as the KALLAX, running continuously beneath the full unit width. Caulk all transitions with white paintable caulk and paint the complete assembly in a single consistent white.
Shop The Look
| Product |
|---|
| MDF sheet 18mm cornice panel cut |
| White furniture paint satin eggshell |
| White paintable caulk smooth trim |
| 3×2 timber base plinth framing |
| Small ceramic object cornice ledge |
7. KALLAX TV Unit in Forest Green with Brass Pull Inserts
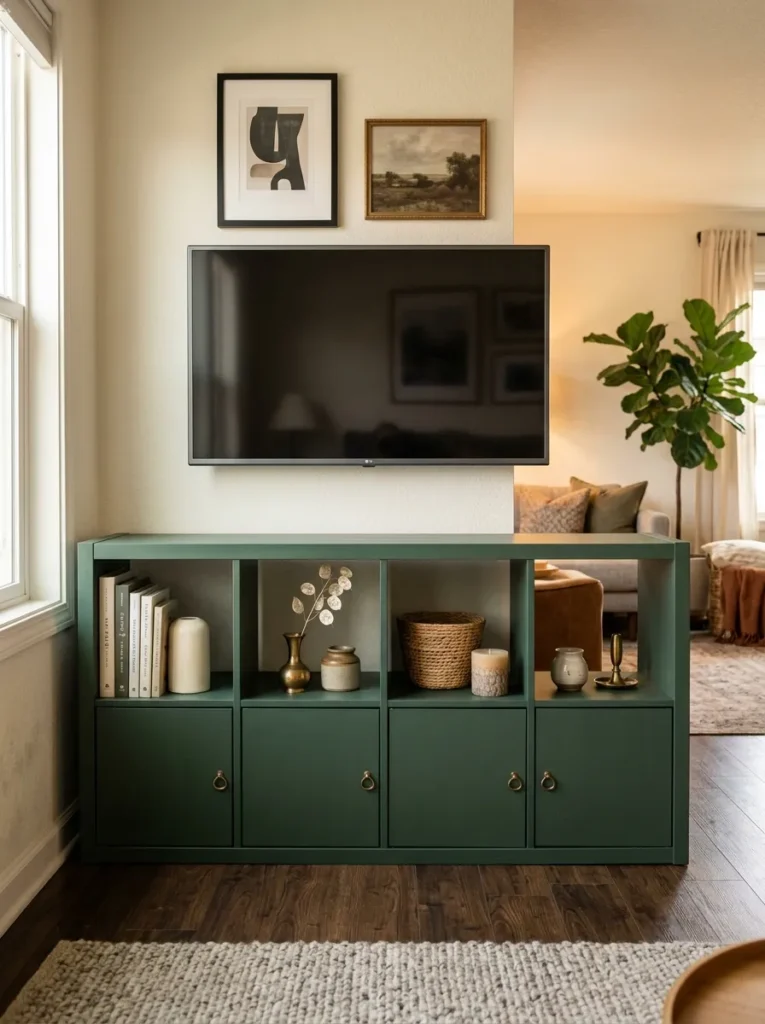
Vibe: The console feels rich and designed — the green deep enough and the brass warm enough to make the combination feel considered rather than themed.
Why it works: A forest green KALLAX with brass door inserts applies the interior design principle of the statement media console — using the television unit as the room’s most designed piece of furniture rather than its most neutral, treating the media wall as a color and material decision rather than a background element. Forest green and aged brass is among the most commercially successful material combination in contemporary interior design because the two materials share the same warm, earthy undertone (the yellow-green of forest green and the yellow-orange of brass both sitting in the warm color family), making the combination feel cohesive rather than contrasted. Door inserts on the lower cubbies conceal AV equipment and cable clutter while the open upper cubbies maintain the styled display quality of the room’s primary visual surface.
How to get it: Paint the KALLAX in Farrow & Ball Studio Green No. 93 or Little Greene Obsidian Green, primed with Zinsser BIN first. Fit the lower four cubbies with KALLAX door inserts (purchased as a separate IKEA accessory and installed into the existing cubby openings using the supplied hardware) painted in the same forest green. Attach a small brass D-ring (available as a decorative hardware piece from online jewelry or hardware suppliers, $2–4 each) to each door’s center using strong adhesive — the D-ring is decorative rather than functional since KALLAX door inserts have their own magnetic opening mechanism.
Shop The Look
| Product |
|---|
| Forest green furniture chalk paint 750ml |
| KALLAX door insert white convertible |
| Small brass D-ring decorative pull set |
| Strong adhesive E6000 hardware |
| Small brass vase dried botanical stem |
8. KALLAX as a Small Living Room TV Stand with Hairpin Leg Elevation
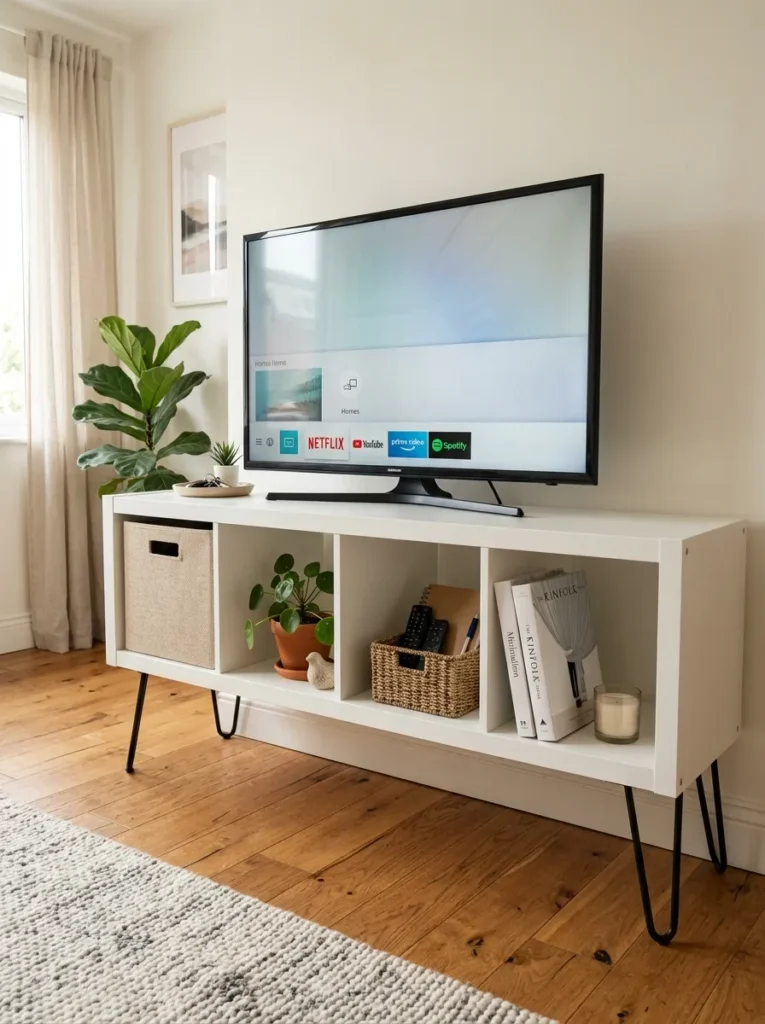
Vibe: The stand feels light and modern — the hairpin legs lifting the unit visually off the floor in a way that transforms its perceived weight.
Why it works: Elevating a KALLAX TV stand on hairpin legs applies the furniture design principle of visual lightness through leg elevation — any floor-sitting piece of furniture that is raised on slender legs appears physically lighter than the same piece sitting flush on the floor, because the gap between the unit’s base and the floor allows the eye to read the unit as a discrete object rather than as an extension of the floor surface. Hairpin legs in matte black are the most contemporary and commercially recognized leg style for this modification, referencing mid-century modern furniture design while maintaining a graphic simplicity that coordinates with virtually any room aesthetic. The elevation also improves the TV’s viewing angle when the TV sits on top of the unit rather than being wall-mounted — the additional 20cm of leg height raises the screen to a more appropriate seated viewing position for a low-profile sofa.
How to get it: Source matte black hairpin legs in 20cm height (the most appropriate length for a KALLAX TV stand) with pre-drilled mounting plates. Invert the KALLAX unit and attach the legs using 20mm wood screws through the mounting plate into the KALLAX’s base panel — do not use longer screws that might penetrate through to the interior. Space the four legs near the unit’s outer corners for maximum stability. Reorient the unit and check level before placing any equipment or the television on top. The leg attachment alone does not require the unit to be secured to the wall if the TV is sitting on top rather than being wall-mounted — but wall anchoring remains recommended for additional stability.
Quick Win: A set of four matte black hairpin legs in 20cm height ($25–40 for a set of four from online hardware suppliers) attached to an existing KALLAX transforms its visual profile from furniture to designer piece in under 30 minutes — the fastest single modification that changes the perception of the unit most dramatically.
Shop The Look
| Product |
|---|
| Matte black hairpin leg 20cm set of 4 |
| KALLAX 1×4 shelving unit white |
| Oat linen fabric bin KALLAX size |
| Small plant ceramic pot display |
| Remote control basket small woven |
9. KALLAX TV Unit with Sliding Barn Door Inserts for Hidden Storage
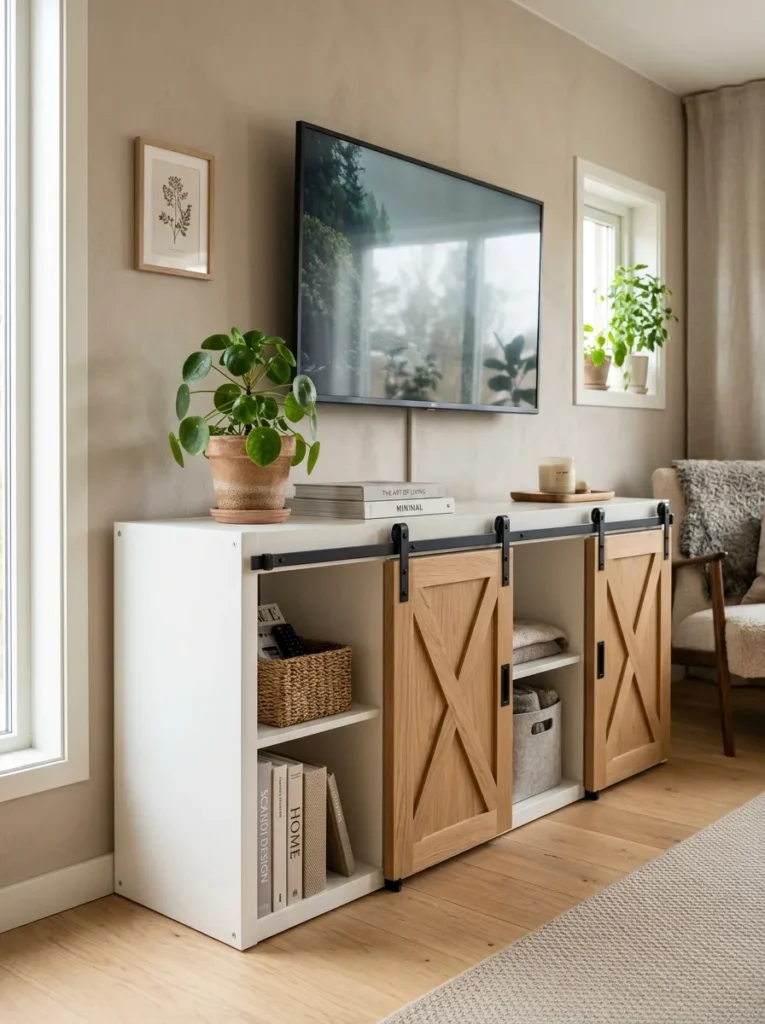
Vibe: The sliding doors feel clever and warm — revealing the storage within on an intentional rather than an always-visible basis.
Why it works: Sliding barn door inserts over a KALLAX TV console apply the design principle of selective reveal — doors that slide rather than swing require no clearance space in front of the unit, which is a critical practical constraint for a media console positioned in front of seating, and they allow the unit’s full contents to be concealed when the space requires visual calm (during social events or when the television is off) and fully accessible when needed for equipment operation. The barn door slide mechanism (a simple overhead track with hanging door panel hardware) is a well-established DIY solution for many types of furniture modification and adds the visual character of crafted woodwork to the KALLAX’s otherwise plain front face.
How to get it: Source a slim internal barn door track kit sized to the KALLAX unit’s total width (allowing two panels to slide from center to each end, covering all eight cubbies when closed). Build two door panels from 18mm solid oak or oak-veneered MDF cut to the combined cubby height and half the unit’s width. Sand, seal, and finish each panel before installation. Attach the hanging door hardware to the top of each panel according to the track kit’s instructions, then hang both panels on the track. Add a small recessed finger-pull or magnetic push-to-open mechanism on each door’s inner edge for operation.
Shop The Look
| Product |
|---|
| Internal barn door track kit slim |
| Oak door panel veneer MDF 18mm |
| Door hanger hardware hanging set |
| Finger pull recessed door hardware |
| Magnetic catch door closure small |
10. KALLAX TV Console with Wallpaper-Lined Cubby Interiors
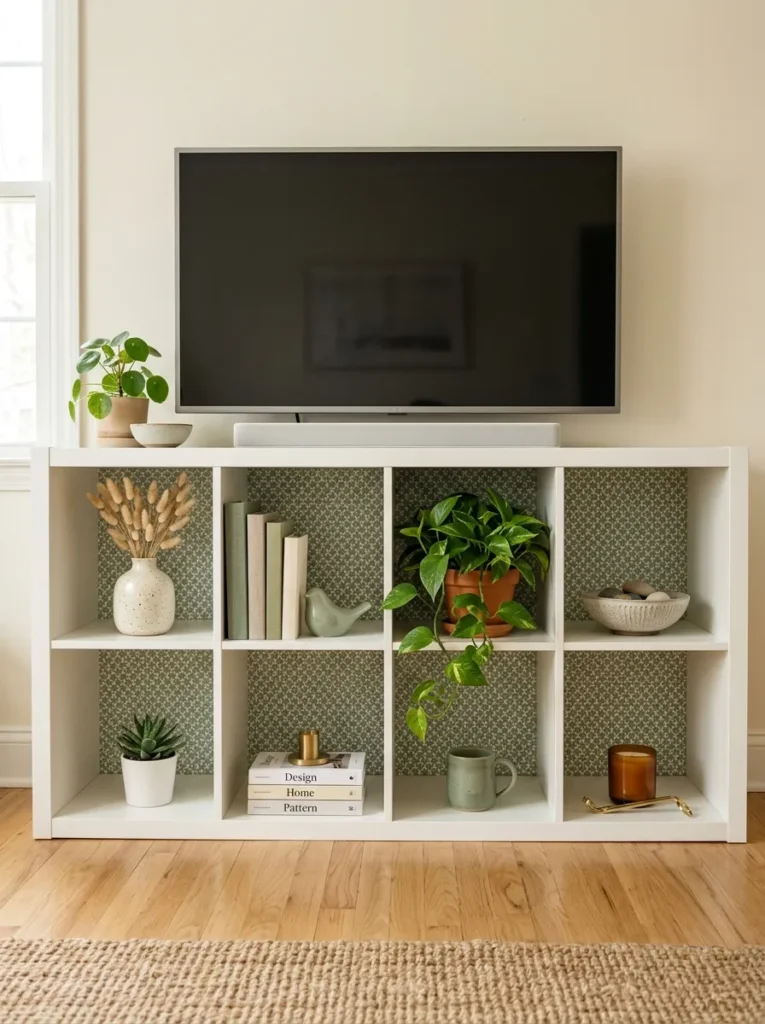
Vibe: The lined cubbies feel designed at the detail level — a pattern that rewards looking directly into the unit rather than simply across it.
Why it works: Wallpaper-lined KALLAX cubby interiors apply the design principle of interior finish differentiation — the space inside a display cubby is experienced differently from the room’s overall surface, at closer range and with a distinct spatial frame (the cubby’s four walls creating a small rectangular pocket). Introducing a patterned wallpaper on the cubby’s back wall makes each open cubby into a small composed scene — objects displayed against a patterned backdrop read as arranged rather than stored, creating a gallery-like quality that plain white backs cannot achieve. This modification requires only small quantities of wallpaper per unit (four squares of 33×33 cm for a 1×4 configuration) and can use remnant pieces from a room’s main wallpaper installation.
How to get it: Select a wallpaper with a small to medium scale pattern that reads legibly at the small 33×33cm back wall format — very large-scale prints show only a fragment at this scale and lose their pattern character. Cut each back wall piece to exactly 33×33cm (or the specific cubby interior dimension for non-standard configurations). Apply using standard wallpaper paste or a peel-and-stick wallpaper version, pressing firmly into the interior back wall from the center outward to eliminate air bubbles. For a neater finish, apply the wallpaper before assembling the KALLAX unit — the flat panel is significantly easier to paper before the cubby walls are attached.
Shop The Look
| Product |
|---|
| Geometric wallpaper sage cream small scale |
| Wallpaper paste standard wall hanging |
| Squeegee smooth application craft |
| Small ceramic vessel display cubby |
| Trailing plant small pot display |
11. KALLAX TV Unit for Small Rooms — 1×4 Configuration with Wall Storage Above
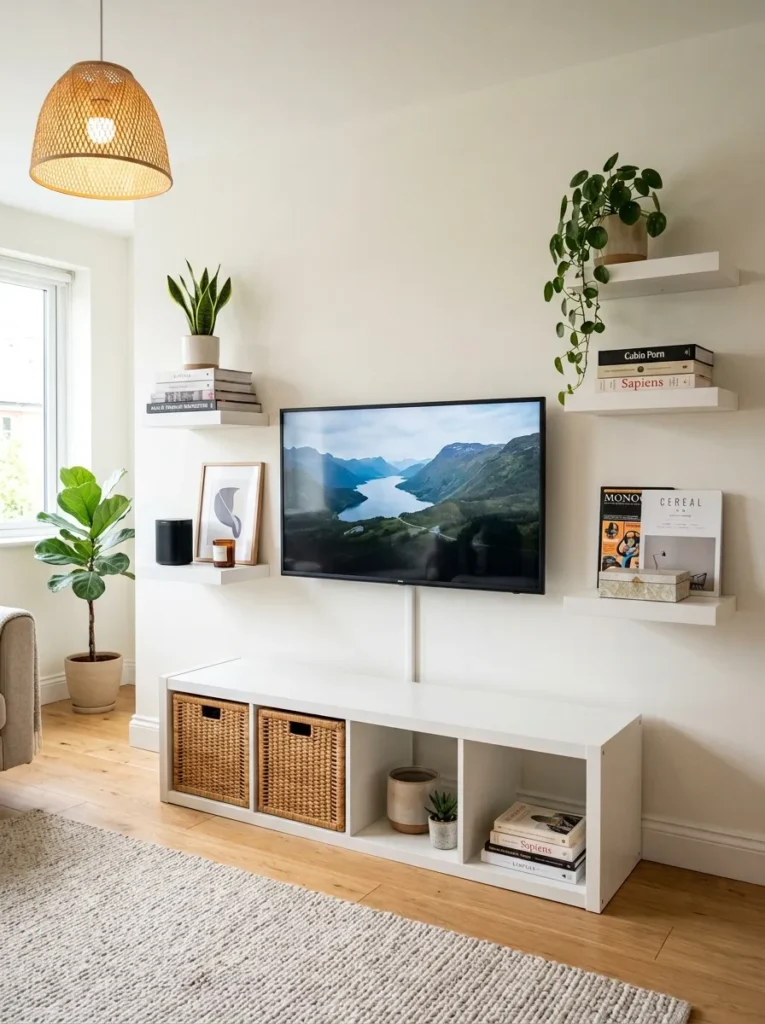
Vibe: The small media area feels fully resolved — the vertical shelves filling the wall around the TV in a way that makes a limited space feel intentionally designed.
Why it works: A 1×4 KALLAX TV unit combined with flanking floating shelves applies the small-room design principle of vertical wall activation — in a room where horizontal floor space is limited, extending the media console composition vertically (with floating shelves rising above the console on either side of the TV) uses the wall’s height to create storage and display capacity without consuming additional floor area. The KALLAX 1×4 in horizontal orientation at 77cm width is the most appropriate base for a small living room because its modest footprint allows space for furniture on either side while its four cubbies provide the storage volume needed for AV equipment and media accessories. The floating shelves above extend the composition without additional floor furniture.
How to get it: Position the KALLAX 1×4 horizontally against the wall, centered on the television’s intended position. Wall-mount the TV centrally above the unit using a slim-profile TV mount (important in a small room — the TV should sit as close to the wall as possible to avoid projecting into circulation space). Install two pairs of floating shelves (IKEA LACK or MDF cut to size) on the wall on either side of the TV, staggered at different heights for visual interest. Style each shelf with no more than two to three objects to maintain the spacious quality that small rooms require.
Shop The Look
| Product |
|---|
| KALLAX 1×4 shelving unit white |
| Slim profile TV wall mount adjustable |
| White floating shelf set LACK 30cm |
| Small plant ceramic pot shelf |
| Small speaker portable compact |
12. Dark Stained Birch KALLAX for a Warm Industrial Look
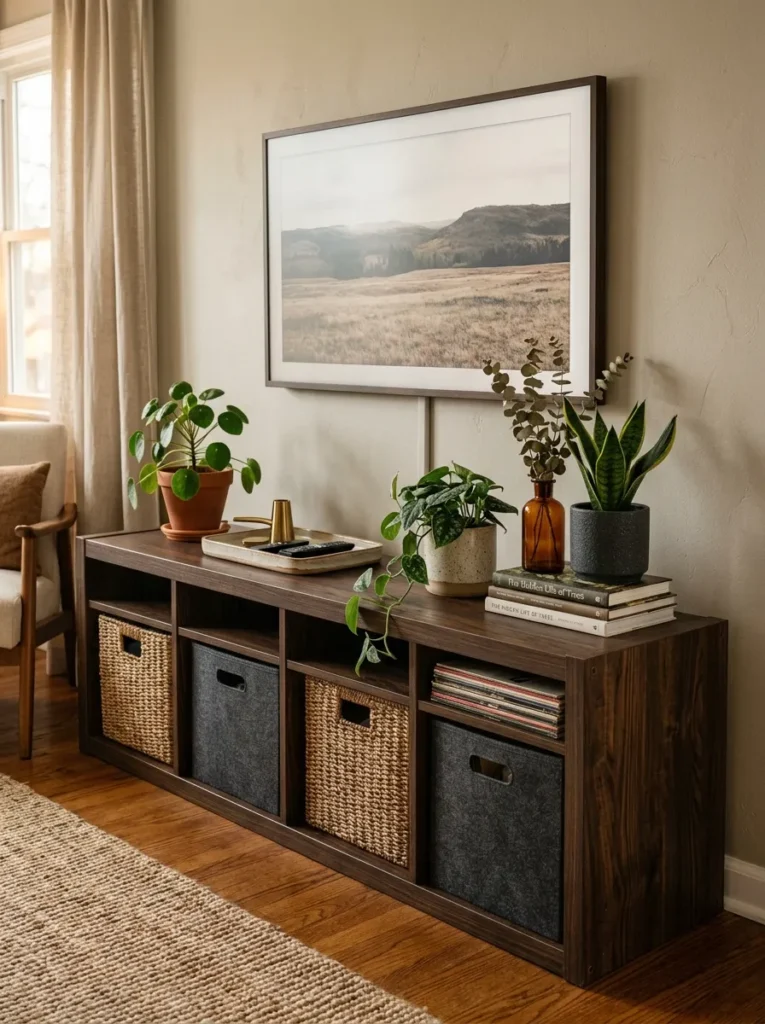
Vibe: The stained unit feels rich and material — the wood grain reading through the dark stain gives the piece a warmth that painted surfaces cannot replicate.
Why it works: Dark staining the KALLAX birch veneer version (rather than painting the white MDF version) applies the woodworking principle of material enhancement rather than surface concealment — the stain darkens and enriches the birch’s natural grain pattern rather than covering it, producing a surface that reads as genuine darkened wood rather than painted furniture. The KALLAX birch veneer’s tight, consistent grain pattern absorbs wood stain evenly and predictably, making it one of the most reliable IKEA surfaces for staining modification. A dark walnut-toned stain brings the unit into the same material register as more expensive solid walnut media furniture, achieving a comparable visual quality at a fraction of the cost.
How to get it: Purchase the KALLAX birch veneer version. Sand all exposed surfaces with 180-grit sandpaper to remove any factory finish that would repel the stain. Apply a walnut oil-based stain (Minwax Dark Walnut, Osmo Walnut, or equivalent) using a cloth or brush, working in the direction of the grain. Allow each coat to penetrate for the manufacturer’s specified time before wiping off the excess. Apply two to three coats for the desired depth of color. Finish with a coat of clear matte hardwax oil to seal the stained surface and protect against daily use wear.
Shop The Look
| Product |
|---|
| KALLAX birch veneer shelving unit |
| Dark walnut oil stain furniture wood |
| Matte hardwax oil clear finish |
| Cloth application stain wipe set |
| Small plant collection varied ceramic |
13. KALLAX TV Console with LED Strip Backlighting for Atmosphere
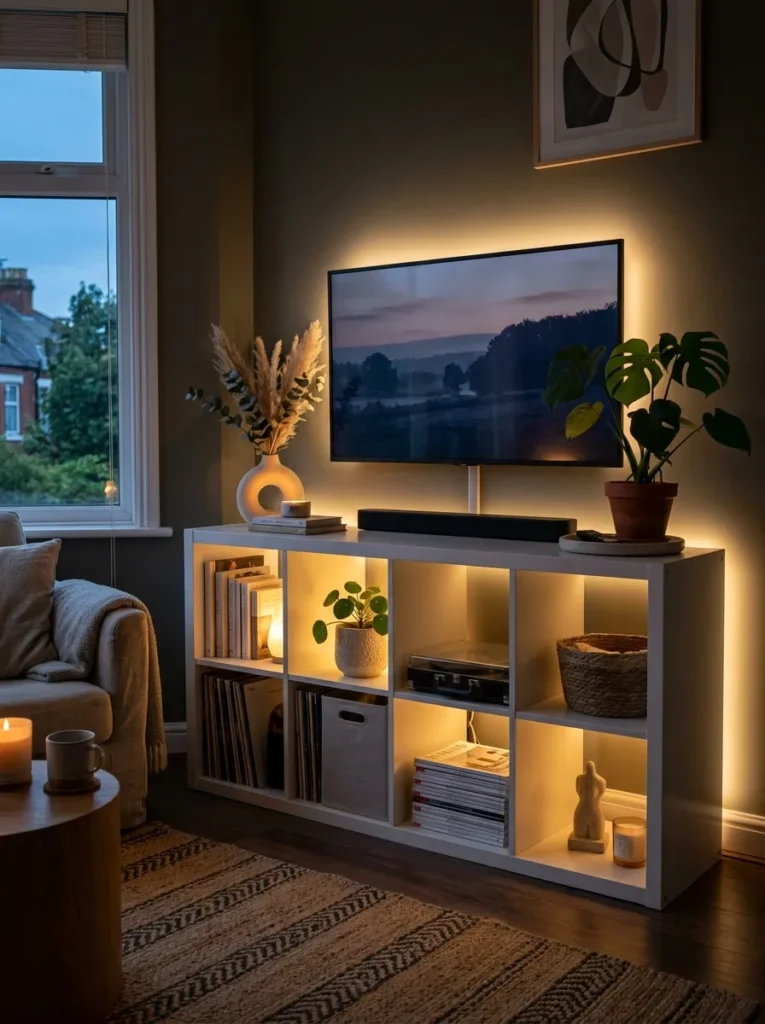
Vibe: The unit at dusk feels genuinely atmospheric — the LEDs transforming a functional media console into the room’s warm focal point.
Why it works: LED strip lighting installed in KALLAX TV unit cubbies and behind the unit applies the hospitality lighting principle of multi-source ambient illumination — light emerging from within and behind a piece of furniture creates the warm, enveloping quality associated with hotels and bars that single-source overhead lighting cannot replicate in a domestic setting. Warm-white LED strips (2700K) in the display cubbies create the appearance of internally illuminated display niches, giving each styled object within them the visual weight of a gallery installation. The halo light behind the unit (a technique called bias lighting in AV installation) also has a documented benefit for television viewing: the soft backlight reduces eye strain during extended viewing by decreasing the contrast between the bright TV screen and the dark surrounding wall.
How to get it: Install warm-white LED strip tape (2700K, CRI 90+) inside each display cubby you wish to illuminate — position the strip at the top inner edge of each cubby directed downward for the most natural object illumination. Run a second LED strip along the top back edge of the KALLAX unit, between the unit and the wall (there is typically a 2–3cm gap between the KALLAX’s back panel and the wall, sufficient for the LED strip and its wire routing). Connect all strips to a single smart plug or dimmer switch for unified control from one switch point.
Shop The Look
| Product |
|---|
| LED strip warm white 2700K CRI90 5m |
| Aluminium LED channel profile slim |
| Smart plug single outlet app control |
| Inline LED dimmer switch small |
| LED strip connector joining piece |
14. KALLAX TV Unit Gallery Wall Integration for a Composed Media Wall
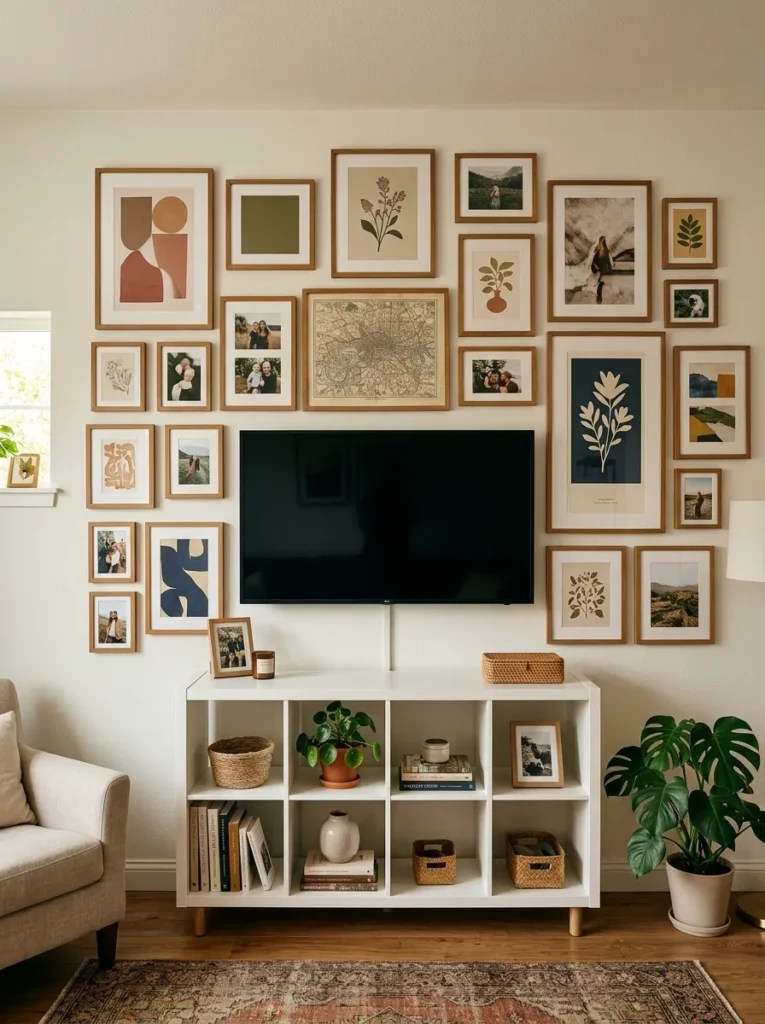
Vibe: The media wall feels personal and designed — the TV demoted from dominant object to one element in a considered composition.
Why it works: Integrating the KALLAX TV unit into a larger gallery wall composition applies the interior design principle of focal point diffusion — rather than allowing the television to dominate the wall as a single black rectangle, surrounding it with a composed gallery arrangement of framed prints treats the TV as one element within a larger visual composition, reducing its visual dominance when off and making the wall interesting both with and without the screen active. The gallery wall frames the TV as a considered spatial decision rather than an appliance placement, and the KALLAX console below grounds the entire composition as a single designed moment rather than scattered wall objects.
How to get it: Plan the gallery arrangement on the floor first, using frames of varied sizes (5×7, 8×10, 11×14, and one 16×20 as an anchor) in a consistent warm oak finish. The TV is incorporated as a “frame” within the arrangement — position it centrally within the planned gallery composition, treating its black rectangle as a large-format frame. Transfer the arrangement to the wall starting with the TV at the correct viewing height and building the gallery outward from there, maintaining 2–3cm gaps between all elements (including between the gallery prints and the TV frame edges). Use picture-hanging strips for smaller prints to avoid permanent nail holes.
Shop The Look
| Product |
|---|
| Gallery print set warm neutral tones |
| Warm oak picture frame set assorted |
| Picture hanging strip set damage free |
| Measuring tape precision gallery hang |
| KALLAX horizontal 2×4 unit white |
How to Start Your KALLAX TV Unit Hack
The single best first move before purchasing paint, cladding, or any modification materials for a KALLAX TV unit hack is resolving the television’s position and mounting method before the unit is placed. Every KALLAX TV unit hack’s success depends on the TV being at the correct height for seated viewing — the screen center should sit at approximately 100–110cm from the floor for a standard sofa viewing position. If the TV is wall-mounted above the KALLAX (the most common and most visually resolved configuration), plan the wall-mounting height based on the KALLAX’s finished height (42cm for a horizontal 2×4) plus the desired clearance between the unit top and the TV’s base (typically 10–20cm) before installing a single cable or drilling a single wall-mount hole. Getting this height wrong is the most common and most irreversible mistake in a KALLAX TV unit setup.
The most common mistake in KALLAX TV unit paint modifications is applying paint directly to the factory finish without an adhesion-promoting primer. IKEA’s white lacquer surface resists standard water-based paint adhesion, causing paint to chip, peel, and lift within weeks of application regardless of how many coats are applied. The fix is a single coat of Zinsser BIN shellac-based primer applied before any color coat — shellac bonds to virtually any surface including IKEA’s factory lacquer and provides a keyed surface that any subsequent paint adheres to reliably. This single preparation step costs $15–20 in materials and takes under an hour; skipping it costs the entire time and material investment of the paint modification when the paint begins to fail.
Three specific items under $50 that immediately improve any KALLAX TV unit regardless of modification stage: a 5-metre roll of warm-white LED strip tape ($18–30) installed behind the unit for bias lighting that reduces eye strain and adds evening atmosphere; a set of four matching fabric bins in a single neutral tone ($6.99 each from IKEA, total $28 for four) replacing any mismatched storage inside the visible cubbies for immediate visual cohesion; and a pack of picture-hanging strips ($8–12) for composing a simple gallery arrangement above the TV unit without permanent wall damage, activating the wall above the console as a designed surface.
A simple KALLAX TV unit paint modification (priming, two color coats, hardware addition) takes one weekend including cure time and costs $35–85. A mid-range modification (fluted panel overlay, cane webbing inserts, continuous oak worktop across two units) takes two weekends and costs $120–280 in materials. A complex modification (barn door sliding inserts, full built-in with cornice and plinth, LED strip integration throughout) takes three to four weekends and costs $250–500. Every modification in this list is achievable by a maker with basic DIY competence — a drill, a jigsaw for any cutting, a paintbrush, and a foam roller cover the tool requirements for all ideas in this list except the staining project which requires only a cloth.
Frequently Asked Questions About IKEA KALLAX TV Unit Hacks
What KALLAX configuration works best as a TV unit?
The horizontal 2×4 KALLAX (four cubbies wide, two tall, oriented with the long dimension horizontal) is the most versatile TV unit configuration because its dimensions (147cm wide by 77cm tall) closely match purpose-built media consoles, its eight cubbies provide adequate storage volume for most living room needs, and its 42cm depth accommodates AV equipment with sufficient cable clearance behind. For smaller rooms, the horizontal 1×4 (77cm wide, 42cm tall) suits rooms under 3 metres wide where a full 147cm console would dominate the space. For larger rooms where a single 2×4 feels undersized relative to the wall width, two 2×4 units placed end-to-end create a 294cm wide console that spans a full living room wall — this configuration benefits most from the continuous oak worktop modification described in Idea 4.
How do you paint a KALLAX for a TV unit without the paint peeling?
Painting a KALLAX without peeling requires three steps in sequence: cleaning the surface with isopropyl alcohol to remove any wax, oil, or fingerprint residue; applying one coat of Zinsser BIN shellac primer (not standard water-based primer — shellac is specifically required for IKEA’s factory surface) and allowing to dry for two hours; and applying the chosen furniture paint in at least two thin coats with adequate drying time between coats. Any paint type applied over the Zinsser BIN primer will adhere reliably — chalk paint, furniture eggshell, and specialist furniture lacquers all perform well on this system. The most durable finishes for a TV unit (which receives daily contact from hands, remote controls, and equipment) are furniture eggshell or satin in a hard-wearing formulation, as these resist scuffs better than chalk paint without a protective topcoat.
Can you put a TV directly on top of a KALLAX unit?
Yes — a KALLAX in its standard configuration can support a television placed directly on top, within the unit’s stated load capacity. The KALLAX unit top is rated at 25kg distributed load, which exceeds the weight of most televisions up to approximately 65 inches (most 65-inch TVs weigh 20–25kg without a stand). For televisions over 65 inches or heavier models, wall-mounting the TV above the KALLAX (rather than placing it on top) is the safer configuration because it eliminates both the structural load on the unit top and the stability risk of a large, heavy television sitting on a piece of furniture that must remain accessible for loading and unloading storage cubbies. When placing a TV on top of a KALLAX, ensure the unit is secured to the wall using the included anti-tip hardware before placing any load on top.
How do you manage cables in a KALLAX TV unit?
Cable management in a KALLAX TV unit works most effectively through a combination of three approaches: routing cables through the KALLAX’s own structure (the unit’s back panel can be drilled with a 25–30mm cable pass hole at the appropriate position to allow cables from wall sockets to pass through the unit interior without appearing at the front face); consolidating cables using a short cable tidy (a fabric or plastic cable sleeve that bundles multiple cables between the wall socket and the equipment positions into a single visual unit); and using a single smart power strip inside the unit that provides sufficient sockets for all connected equipment, accessible through a single cable from the wall, rather than multiple cables snaking from individual devices to individual wall sockets. A cordless HDMI transmitter (replacing the physical HDMI cable between a wall-mounted TV and a streaming device inside the KALLAX with a wireless signal) eliminates the most problematic cable of all — the one that must travel from the KALLAX on the floor to the TV on the wall.
What is the maximum TV size that works visually above a KALLAX TV unit?
The maximum television size that reads as proportionally correct above a KALLAX TV unit depends on the unit configuration. Above a horizontal 2×4 KALLAX (147cm wide), a television of 65–75 inches reads as appropriately proportioned — the screen’s width at these sizes (approximately 144–166cm) closely matches or slightly exceeds the console width, which is the standard proportion of purpose-built media furniture to screen size. A television significantly wider than the console beneath it (an 85-inch TV, approximately 188cm wide, above a 147cm KALLAX) reads as visually imbalanced — the unit appears undersized relative to the screen. If a very large screen is required, consider two 2×4 KALLAX units placed end-to-end (creating a 294cm combined width) as the console base, which provides appropriate visual proportions for screen sizes up to 85 inches.
Ready to Build Your Dream KALLAX TV Unit?
These 14 ideas move through every dimension of what makes a KALLAX TV unit hack genuinely successful in a modern home — from the foundational color transformation of warm charcoal paint and forest green chalk finishes, to the material sophistication of fluted oak overlays and dark stained birch veneer, to the atmospheric intelligence of LED backlighting and gallery wall integration, to the spatial cleverness of hairpin leg elevation and built-in cornice compositions. Starting with the primer and the anti-tip hardware — priming before any paint, anchoring before any weight — is not a cautious beginning. It is the correct beginning, because both elements determine whether the finished unit holds together in the years after the modification is complete rather than only in the photographs taken the weekend it was built. Order the Zinsser primer and the wall anchors today, resolve the television height before a single shelf is moved, and the KALLAX TV unit hack has already begun at its two most important moments. Pin the configuration and material ideas that match your room’s wall width and your design direction, and return to the built-in and sliding door modifications when the simpler transformations have proven the unit’s potential. When the charcoal paint has cured and the LED strips are running warm and the television disappears into a composition rather than dominating a wall, the room will have the media wall it deserved all along.