15 DIY Halloween Book Page Crafts for Home Decor
DIY Halloween Book Page Crafts are creative, sustainable projects that repurpose the yellowed, foxed, or simply well-read pages of discarded books into spooky, atmospheric, and genuinely beautiful Halloween decorations — using the inherent warmth of aged paper, the texture of printed text, and the visual interest of old typography and illustrations as design elements rather than backgrounds to be concealed. This article gives you exactly 15 Halloween crafts made with old book pages, spanning every skill level from absolute beginner to confident crafter, with step-by-step guidance and curated product tables for every project.
There is something specifically perfect about old book pages as a Halloween craft material — the yellowed, slightly musty quality of aged paper carries the atmosphere of Gothic libraries, ancient manuscripts, and Victorian ghost stories that sits at the very heart of classic Halloween aesthetic. A spider made from rolled book page cones, a crow perched on a book page wreath, a garland of folded paper bats: each of these transforms the printed word into decoration, giving new purpose to books that would otherwise be recycled or discarded, and creating Halloween decorations of genuine warmth and character that no mass-produced plastic alternative can approach. Here are 15 ideas worth making — and saving
Why Halloween Crafts Made with Old Book Pages Work So Well
Paper craft as a Halloween tradition has roots in the Victorian era, when elaborate paper decorations — paper chains, paper lanterns, honeycomb paper ornaments — were the primary decorative medium for seasonal celebrations before the mass production of plastic novelty goods in the mid-20th century. The contemporary revival of paper-based Halloween crafting reflects the maker movement’s rejection of disposable, mass-produced seasonal decorations in favor of handmade, sustainable, and genuinely atmospheric alternatives. Old book page crafts occupy a specific and culturally resonant position within this revival: they use a material — the printed book page — that carries its own cultural associations with knowledge, narrative, and the Victorian literary tradition that produced so many of Halloween’s most enduring images (Frankenstein, Dracula, The Strange Case of Dr. Jekyll and Mr. Hyde were all published in the era when paper was Halloween’s primary decorative medium).
The materials that make old book page Halloween crafts most successful share specific qualities: the paper has sufficient weight to hold three-dimensional forms without collapsing (most book pages are 60–80 gsm, adequate for rolling, folding, and coning but benefiting from occasional glue or wire reinforcement for more ambitious structures); the printed text provides visual texture and detail that makes the finished objects interesting at close viewing distance as well as from across the room; and the natural yellowing and aging of old paper creates a warm, sepia-toned aesthetic that reads as inherently atmospheric in Halloween styling contexts. The color palette that book page Halloween crafts produce — warm ivory, aged yellow, sepia brown, with occasional black ink accents — is one of the most effective and most sophisticated Halloween palettes available, avoiding the visual garishness of bright orange and purple Halloween product aesthetics entirely.
Book page Halloween crafts are among the most consistently popular content in the seasonal DIY craft category, combining the appeal of sustainable making (repurposing discarded books) with the Halloween aesthetic’s specific fascination with the old, the literary, the Gothic, and the textured. Pinterest data shows book page Halloween content consistently generating high save rates throughout September and October, with folded paper projects and three-dimensional paper constructions generating the strongest engagement.
Beginners benefit specifically from book page Halloween crafts because the material’s inherent character — the warmth of aged paper, the visual interest of printed text — makes even simple, beginner-appropriate projects look sophisticated and intentional. A single cone of rolled book page paper already looks more considered than an equivalent structure made from blank white paper or commercially produced orange card.
Style at a Glance
| Element | Trait 1 | Trait 2 |
|---|---|---|
| Philosophy | Sustainable repurposing over disposable decoration | Gothic literary atmosphere over commercial Halloween |
| Materials | Old book pages, craft wire, black paint | Twine, hot glue, spray paint, dried botanicals |
| Color Palette | Aged ivory, warm sepia, matte black | Warm yellow, foxed brown, ink accent |
15 Halloween Book Page Crafts for Home Decor
1. Rolled Paper Cone Spider
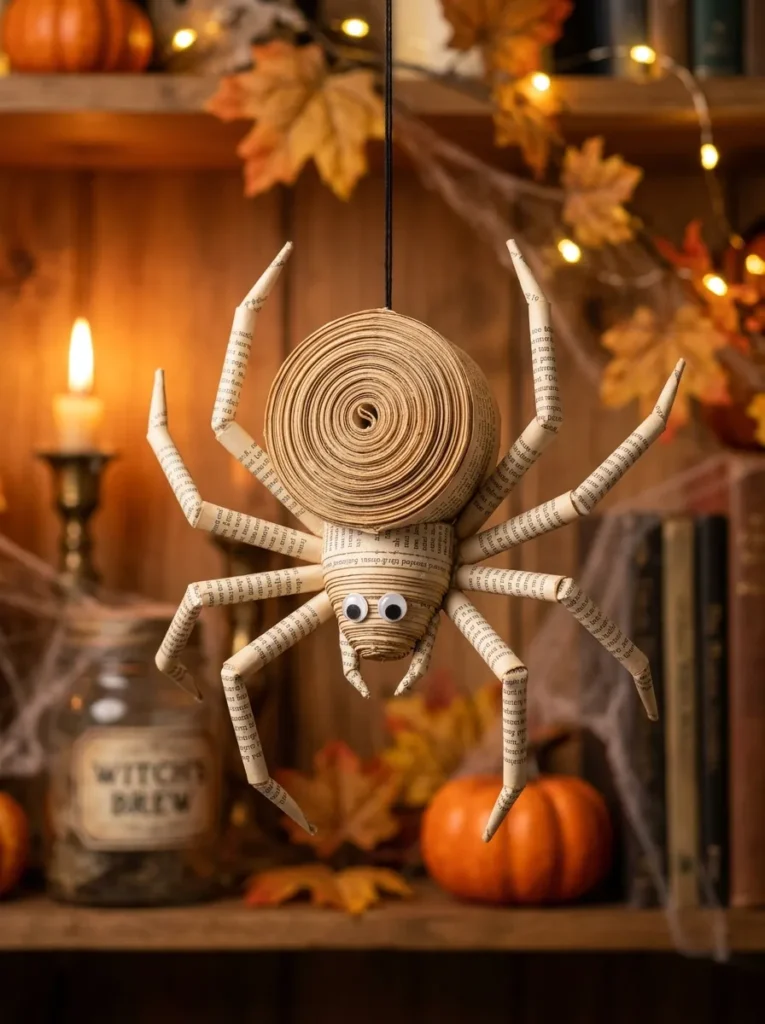
Vibe: The book page cone spider feels warmly spooky and genuinely charming — the Halloween decoration that makes adults smile while still looking properly creepy.
Why it works: A book page cone spider is the beginner Halloween craft that produces the most rewarding result for the least technical skill because the cone-rolling technique — the foundation of the project — is inherently forgiving, with slight imperfections in the cone’s tightness or diameter reading as organic rather than erroneous. The design principle is textural character: the visible spiral of rolled book page text on each cone surface creates an organic, insectoid quality that perfectly suits the spider subject — the printed text on the cone’s surface creates the visual impression of a chitinous exoskeleton pattern at normal viewing distance.
How to get it: Roll a sheet of book page into a tight cone for the body, securing with hot glue at the seam. For legs, cut book pages into 3cm wide strips and roll each into a narrow 12cm cone with a wire running through the center to allow bending. Attach eight leg cones to the body using hot glue at the correct angular positions. Bend each wire-reinforced leg at the joint position (approximately one-third from the body attachment point) to create the natural spider leg angle. Add button eyes using a dab of hot glue and draw a black dot in the button center with a marker.
Quick Win: A cluster of three spider sizes — large (8cm body), medium (5cm body), and small (3cm body) — hanging at different heights from black thread creates a genuinely atmospheric Halloween display that takes under 90 minutes for all three and costs less than $5 in additional materials beyond the free book pages.
Shop The Look
| Product |
|---|
| Hot glue gun craft low temperature sticks |
| Craft wire 28 gauge silver flexible |
| White button set small 2-hole craft |
| Black thread spool fine sewing craft |
| Black marker pen fine tip permanent |
Also view: 14 Cozy DIY Christmas Wreath Ideas for Your Door
2. Book Page Bat Garland (LAYOUT / ACCESSORIES)
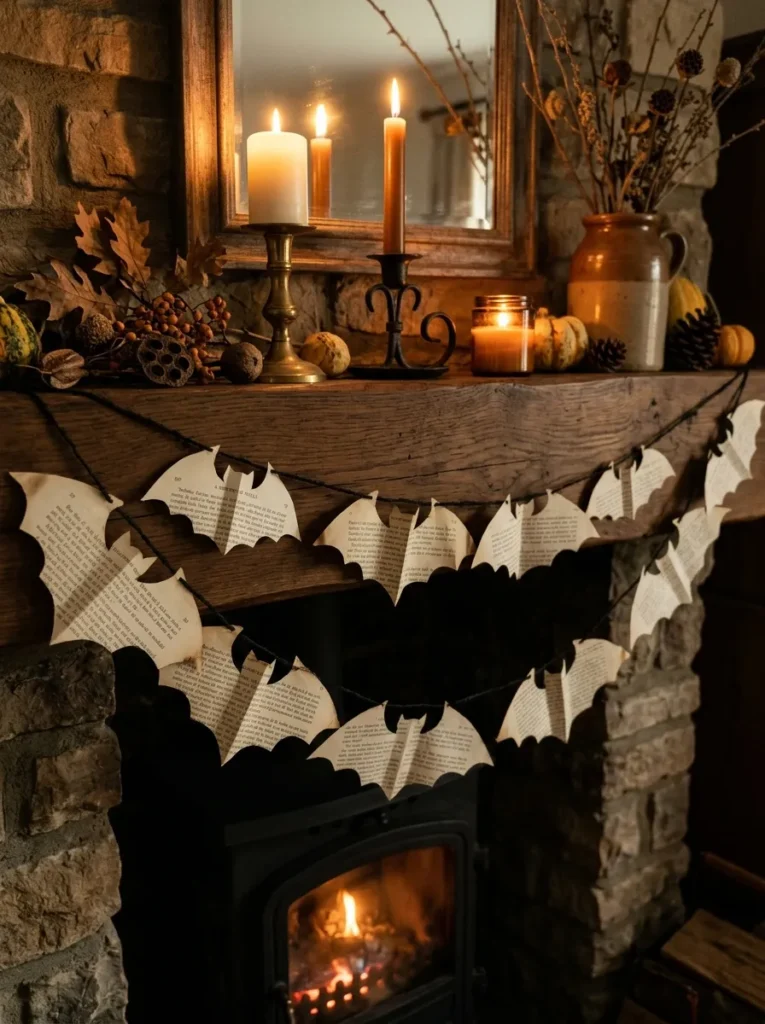
Vibe: The bat garland feels warmly festive and genuinely seasonal — the Halloween mantelpiece decoration that looks like someone made it with love rather than bought it in a bag.
Why it works: A book page bat garland is the Halloween craft that most effectively creates large-scale impact from minimal material and skill investment — 15 bat shapes cut from book pages and strung on twine creates a garland of genuine decorative presence in under an hour. The design principle is silhouette power: the bat silhouette is one of the most immediately recognizable Halloween forms, and cutting it from aged book pages rather than black card creates a version that is simultaneously spooky (correct silhouette) and sophisticated (warm paper tone rather than flat black), with the printed text visible across each wing adding visual detail at close range.
How to get it: Create a bat wing template from cardboard — two symmetrical wing lobes connected at a central body with a characteristic pointed ear peak at the body center top. Trace onto book pages and cut 15 bats in three sizes (8cm, 12cm, 15cm wingspan). Score and fold each bat at the center body fold line for a three-dimensional quality. Pierce a small hole through the body fold of each bat with a needle and thread onto black jute twine at 15–20cm intervals, tying a small knot on each side of the bat to fix its position. Alternate flat and three-dimensional bats along the garland for varied visual interest.
Shop The Look
| Product |
|---|
| Black jute twine roll thin craft natural |
| Craft scissors precision sharp cutting |
| Cardboard template material bat wing |
| Bone folder scoring tool fold paper |
| Needle set threading punch hole craft |
Also view: 16 Chic IKEA KALLAX Bedroom Ideas for Small Spaces
3. Folded Book Page Pumpkin (COLOR / MATERIAL)
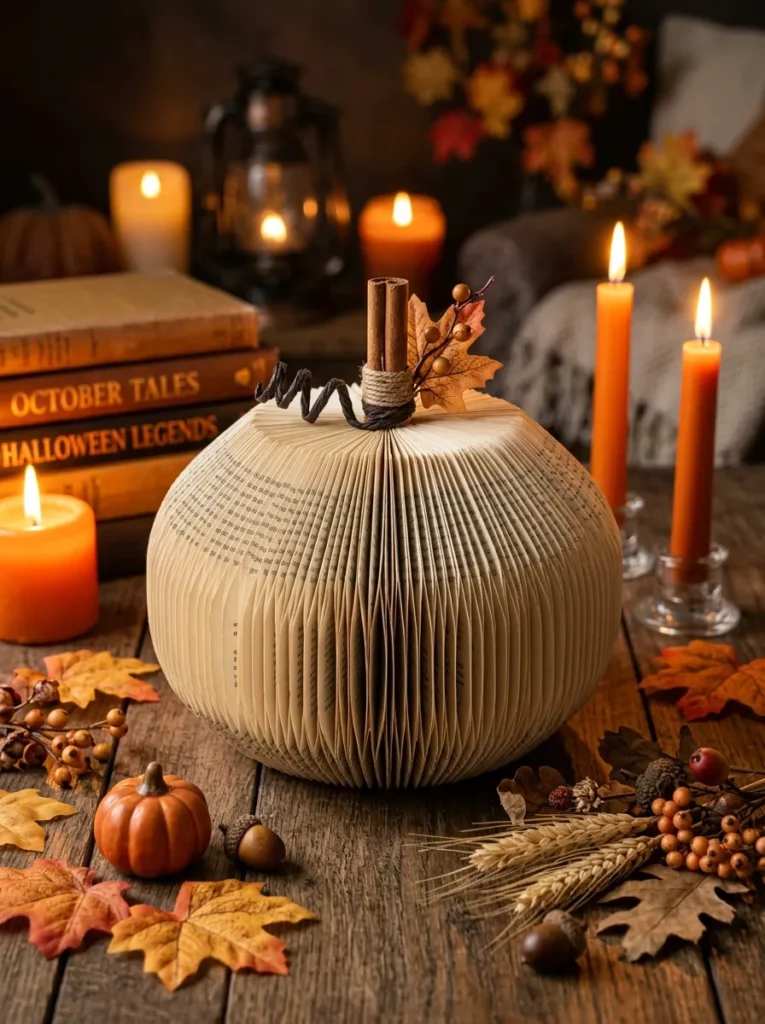
Vibe: The folded book pumpkin feels warmly autumnal and genuinely artisanal — the Halloween decoration that is beautiful from any angle and rewards close inspection with the visible detail of its folded page construction.
Why it works: A folded book page pumpkin uses a specific paper folding technique applied to a hardcover book to create a three-dimensional pumpkin silhouette from the folded pages themselves — no cutting, no gluing, just strategic folding that creates the characteristic ribbed, rounded form of a pumpkin through the accumulation of 200–400 identical page folds. The design principle is accumulative transformation: each individual page fold is a simple, beginner-appropriate action, but the accumulation of many identical folds across a full book produces a complex three-dimensional form that looks far more technically sophisticated than any individual fold suggests.
How to get it: Remove the book’s covers, leaving the bound page block. For each page: fold the top corner down to the spine, fold the bottom corner up to the spine, then fold the remaining outer edge upward — this three-fold sequence is repeated identically for every page in the book. After all pages are folded, the book naturally forms a rounded pumpkin shape through the geometric properties of the repeated fold. The more pages, the rounder and more complete the pumpkin form. Insert a cinnamon stick through the top of the spine as the stem and arrange artificial autumn leaves around the base.
Shop The Look
| Product |
|---|
| Cinnamon stick bundle stem pumpkin |
| Artificial autumn leaf set craft |
| Book folding guide pattern pumpkin |
| Hardback book old spare craft |
| Bone folder scoring paper fold |
4. Book Page Crow or Raven Figure (MATERIAL)
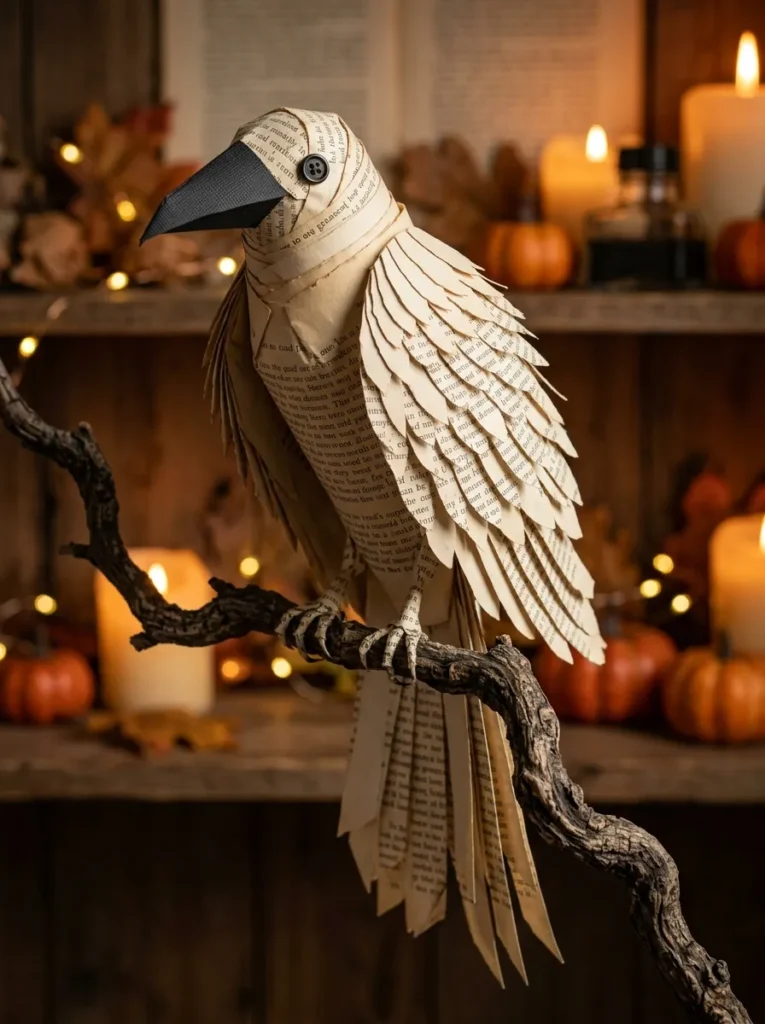
Vibe: The book page crow feels atmospherically Gothic — the Halloween decoration with the most literary and ornithological character of any paper craft project.
Why it works: A book page crow figure is the Halloween paper craft that most directly references the Gothic literary and artistic tradition — crows and ravens are among the most enduring symbols in Halloween and Gothic iconography (Poe’s The Raven, Gothic Revival art’s preoccupation with black birds as harbingers) — and creating one from the pages of an old book creates a genuinely layered object: literary material (book pages) shaped into a literary symbol (the raven). The design principle is symbolic material resonance: when the material of a craft object carries cultural associations that reinforce the object’s symbolic meaning, the finished piece achieves a depth of meaning that transcends its physical construction quality.
How to get it: Roll a book page into a tapered cone approximately 12cm long and 5cm wide at the base for the body. Cut wing shapes from full book pages — a large primary wing shape with individually cut feather points along the trailing edge. Layer four or five wing pieces over the body cone, securing with hot glue, building from the innermost (shortest) wing layer to the outermost (longest) for a natural feather layering effect. Fold a triangle of black card into a small pointed beak and glue to the narrow cone end. Cut and layer 6–8 narrow book page strips for the tail feathers, securing in a fan arrangement at the cone’s base. Perch on a gnarled natural twig secured to a small weighted base.
Shop The Look
| Product |
|---|
| Black card stock thin folded beak |
| Black button set small round eyes |
| Gnarled twig branch natural display |
| Hot glue gun craft sticks feather |
| Wire gauge 24 figure internal support |
5. Book Page Skull Wall Art (COLOR)
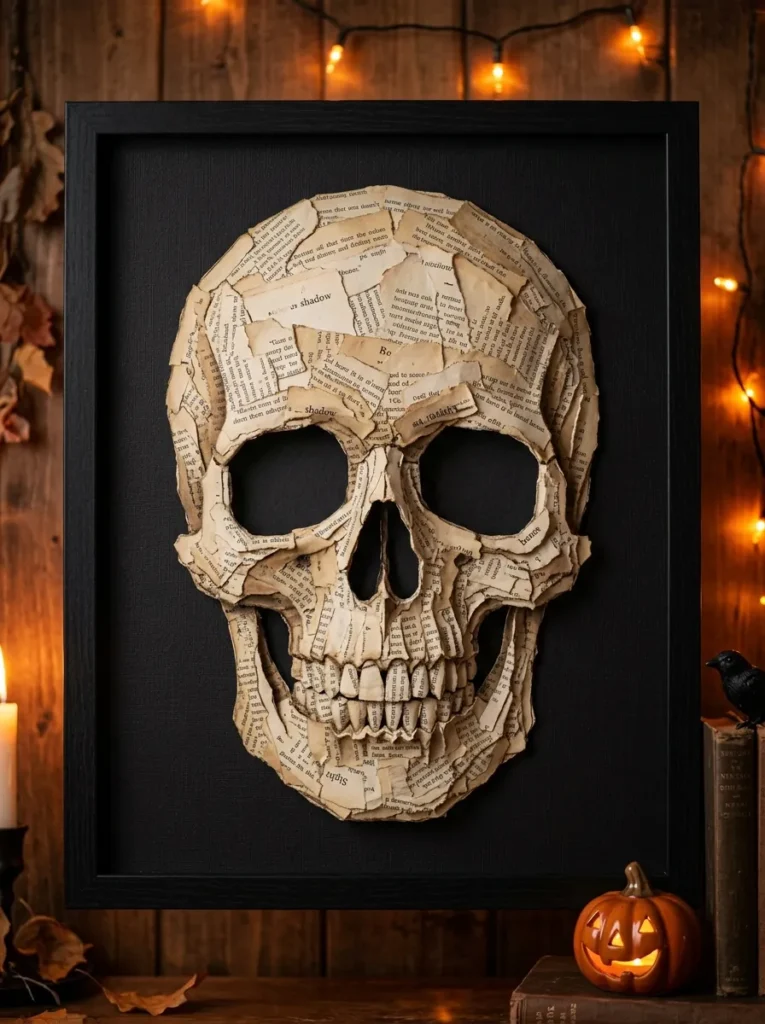
Vibe: The book page skull art feels warmly macabre and genuinely sophisticated — the Halloween wall art that reads as considered craft rather than seasonal decoration.
Why it works: A collaged book page skull is the Halloween paper craft that creates the most gallery-quality visual result because the collage technique — torn paper pieces overlapping to build form — is legitimately a fine art technique with a respected tradition (Picasso, Braque, and the Dada movement all used torn paper collage as a primary medium), meaning the finished book page skull inherits the visual authority of that tradition while remaining accessible to a complete beginner. The design principle is void as focal point: by leaving the eye sockets empty (revealing the dark backing behind the paper collage), the skull’s most expressively spooky feature is created through absence rather than addition — the dark voids draw the eye more powerfully than any painted eye socket could.
How to get it: Trace a skull template onto black card backing and cut out — or use the backing card as the ground and draw the skull outline directly onto its surface. Tear book pages into irregular 2–5cm pieces — torn rather than cut edges create the organic, overlapping quality that makes the collage surface interesting. Apply torn pieces with PVA glue inside the skull outline, overlapping and varying direction, leaving the eye socket areas empty. Build up 2–3 layers around the cheekbones and brow for subtle dimensional relief. Mount behind a simple black frame once dried completely. The skull reads most powerfully when the printed text on the book page pieces is visible as fine detail across the skull’s surface.
Shop The Look
| Product |
|---|
| Black card stock backing skull mount |
| PVA craft glue white multi-purpose |
| Simple black picture frame A3 art |
| Foam brush PVA application decoupage |
| Skull template printable cut guide |
6. Book Page Witch Hat Tower (LAYOUT / SMALL SPACE)
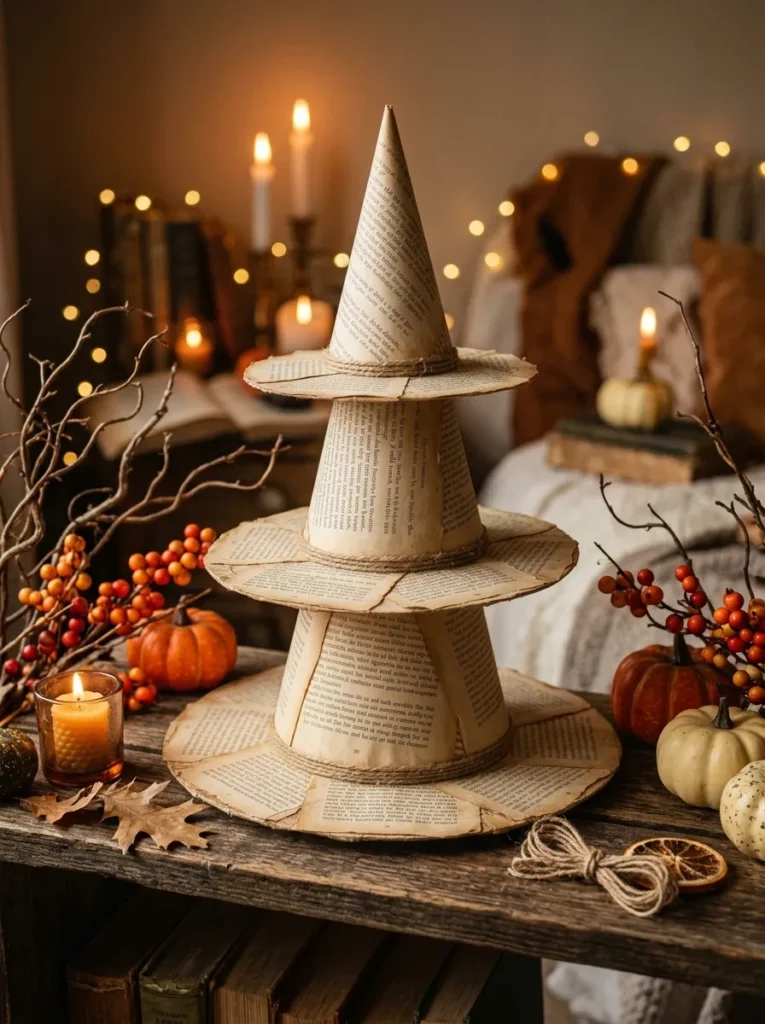
Vibe: The witch hat tower feels warmly festive and whimsically witchy — the Halloween table or shelf display that works as a centerpiece from any angle.
Why it works: A graduated tower of book page witch hats is the Halloween display craft that creates the most architectural visual composition from the simplest construction technique — a cone and a circle. Stacking three hats of progressively increasing size creates a tower composition with visual hierarchy (the eye moves naturally from bottom-largest to top-smallest), while the warm aged paper tone of all three hats creates a unified, sophisticated Halloween palette that coordinates with autumn botanical elements. The design principle is scale variation as interest: three identical objects of the same size would read as a simple group; three of the same form at three different scales creates a visual sequence that implies narrative and variety.
How to get it: For each hat: roll a book page into a cone of the desired height, securing the seam with hot glue and trimming the base to sit flat. Cut a circle of book pages for the brim with an inner circle (matching the cone base diameter) and an outer circle approximately 4cm larger than the inner diameter — cut tabs into the inner circle edge and fold up, applying hot glue to attach the cone. Stack the three completed hats smallest-to-largest from top to base of the tower. A thin strip of black card tied around the base of each cone where it meets the brim creates a hat band detail that elevates the finished look.
Shop The Look
| Product |
|---|
| Hot glue gun sticks craft cone form |
| Black card strip hat band detail |
| Dried branch set display autumn |
| Orange berry sprig decoration autumn |
| Small decorative pumpkin set craft |
7. Book Page Ghost Hanging Decorations (ACCESSORIES)
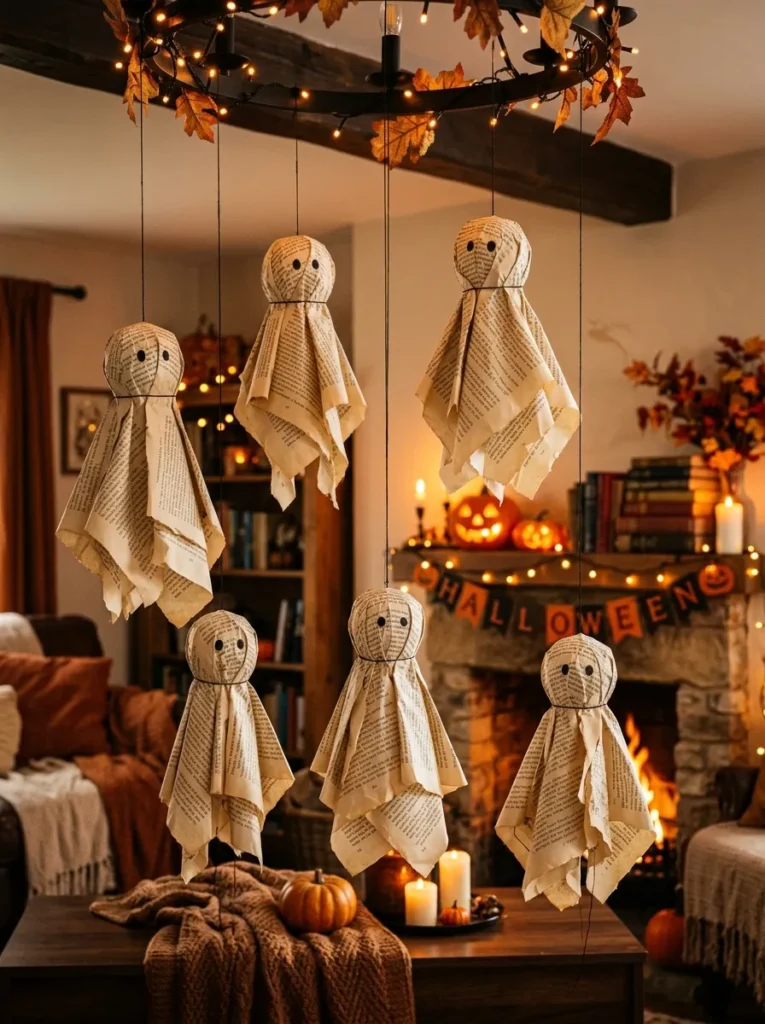
Vibe: The hanging book page ghosts feel warmly playful and genuinely festive — the aerial Halloween decoration that transforms any room’s ceiling zone into a spooky, atmospheric space.
Why it works: Hanging book page ghosts are the Halloween craft that delivers the most atmospheric impact per minute of making time — each ghost takes under 10 minutes to construct from a ball of crumpled paper and a draped sheet, yet a collection of six hanging at varied heights creates a genuinely atmospheric aerial display that significantly changes the feeling of any room. The design principle is ceiling zone activation: most Halloween decorating focuses on horizontal surfaces (mantels, shelves, tables) and leaves the ceiling zone empty — hanging decorations that occupy the vertical air space create a three-dimensional Halloween environment that surrounding-only decoration cannot achieve.
How to get it: Crumple 5–7 book pages into a tight ball of approximately 8cm diameter for the ghost head. Place the ball at the center of 3–4 larger book pages laid flat, then gather the surrounding pages up around the ball and allow them to drape naturally downward in flowing folds — the natural drape of the pages creates the ghost’s flowing shape without any shaping or pinching. Tie a length of thin black thread around the neck of the gathered pages (just below the ball head) and draw two small black dots for eyes on the head section using a black marker. Trim any draped pages to a natural irregular hem at the base for a flowing ghost quality.
Shop The Look
| Product |
|---|
| Black thread fine spool hanging craft |
| Black marker pen eyes dot permanent |
| Removable ceiling hook adhesive craft |
| Varied height hanging hook set display |
| Craft scissors trim ghost hem base |
8. Book Page Wreath with Dried Botanicals (ACCESSORIES / MATERIAL)
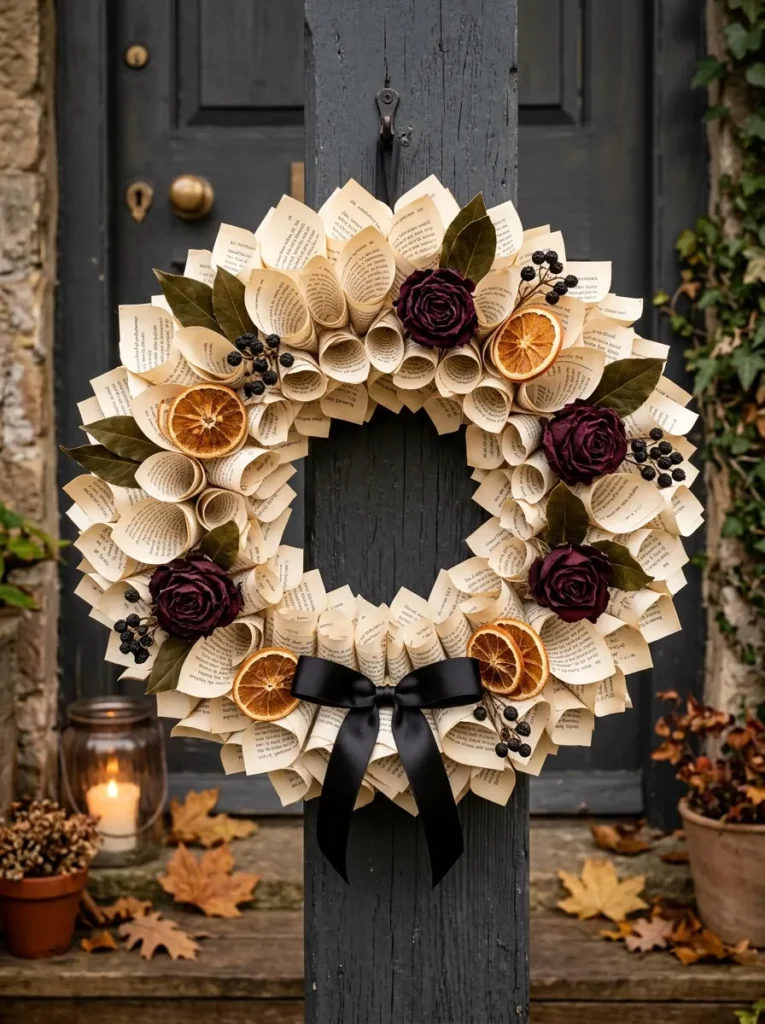
Vibe: The book page botanical wreath feels Gothic-botanically beautiful — the Halloween wreath that looks as much at home in November as in October, transcending seasonal novelty through genuine botanical elegance.
Why it works: A book page wreath with dried botanicals is the Halloween craft that most successfully creates a decoration of year-round visual quality — the combination of aged paper cones and dark dried botanicals (dark roses, dried berries, dried orange) produces a wreath in the Gothic botanical aesthetic that reads as sophisticated home decor rather than seasonal novelty Halloween decoration. The design principle is botanical sophistication: incorporating genuine dried botanical elements (dark dried roses in particular carry the aesthetic weight of the Gothic tradition) transforms a paper craft project into something of considerable visual seriousness that functions as Halloween decoration without being limited to it.
How to get it: Roll book pages into small cones (approximately 4cm long, 2cm wide at the base) and hot glue them point-outward across the full surface of a 35cm wire wreath ring — this requires approximately 80–100 small cones and 2–3 hours of rolling and gluing. Fill the full ring surface completely before adding botanical elements. Hot glue dried roses (spray dark roses black if fresh-dried roses are not dark enough), dried bay leaves, dried orange slices, and dried berry clusters into the cone surface at natural intervals around the ring. Tie a black satin ribbon bow at the base position as the wreath’s visual anchor.
Shop The Look
| Product |
|---|
| Wire wreath ring 35cm base frame |
| Dried rose bunch dark natural |
| Black satin ribbon 4cm wide bow |
| Dried orange slice pack natural |
| Dried bay leaf bunch natural craft |
9. Book Page Origami Bat Mobile (LAYOUT / SMALL SPACE)
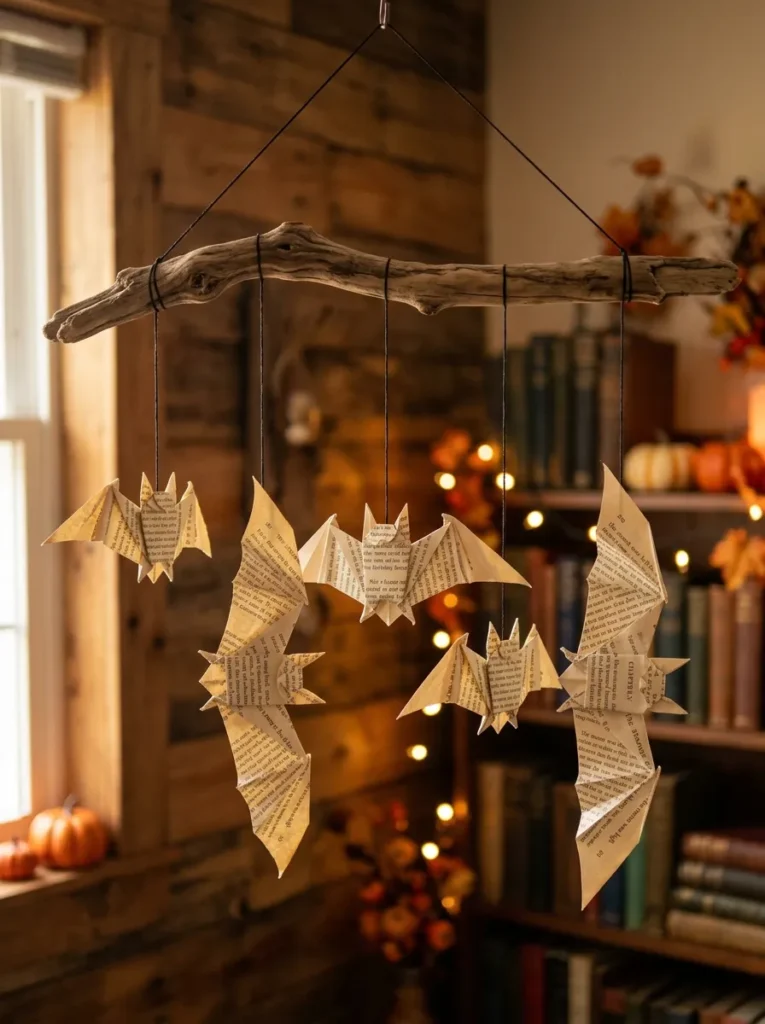
Vibe: The origami bat mobile feels kinetically atmospheric — the Halloween decoration that is most alive, most dynamic, and most beautiful when the air moves.
Why it works: An origami bat mobile is the Halloween craft that introduces movement — the most enriching quality in any decoration — into the Halloween display without electricity or batteries. The gentle spinning of individual origami bats on their thread, and the subtle lateral movement of the suspended driftwood branch, create a continuously changing composition that is never the same for more than a few seconds. The design principle is kinetic decoration: moving decorations create an atmospheric quality that static arrangements cannot — the movement creates the impression of creatures that are alive rather than objects that are displayed, which is the specific atmospheric quality that Halloween decoration most aspires to achieve.
How to get it: The origami bat fold begins with a square sheet of book page (cut from a standard book page to achieve a square). The classic origami bat requires approximately 15 sequential folds — numerous free video tutorials demonstrate the specific fold sequence for this traditional origami subject. Attach a length of black thread to the completed bat’s back fold point. Suspend the driftwood branch from two ceiling hooks at equal heights using black thread, then attach the five bats at varied thread lengths (15cm, 20cm, 25cm, 30cm, 35cm) at natural intervals along the branch. Balance the branch by adjusting the attachment position of the hanging threads.
Shop The Look
| Product |
|---|
| Driftwood branch 50cm natural mobile arm |
| Black thread fine craft hanging bat |
| Ceiling hook adhesive removable craft |
| Bone folder precision origami fold |
| Craft scissors square cut book page |
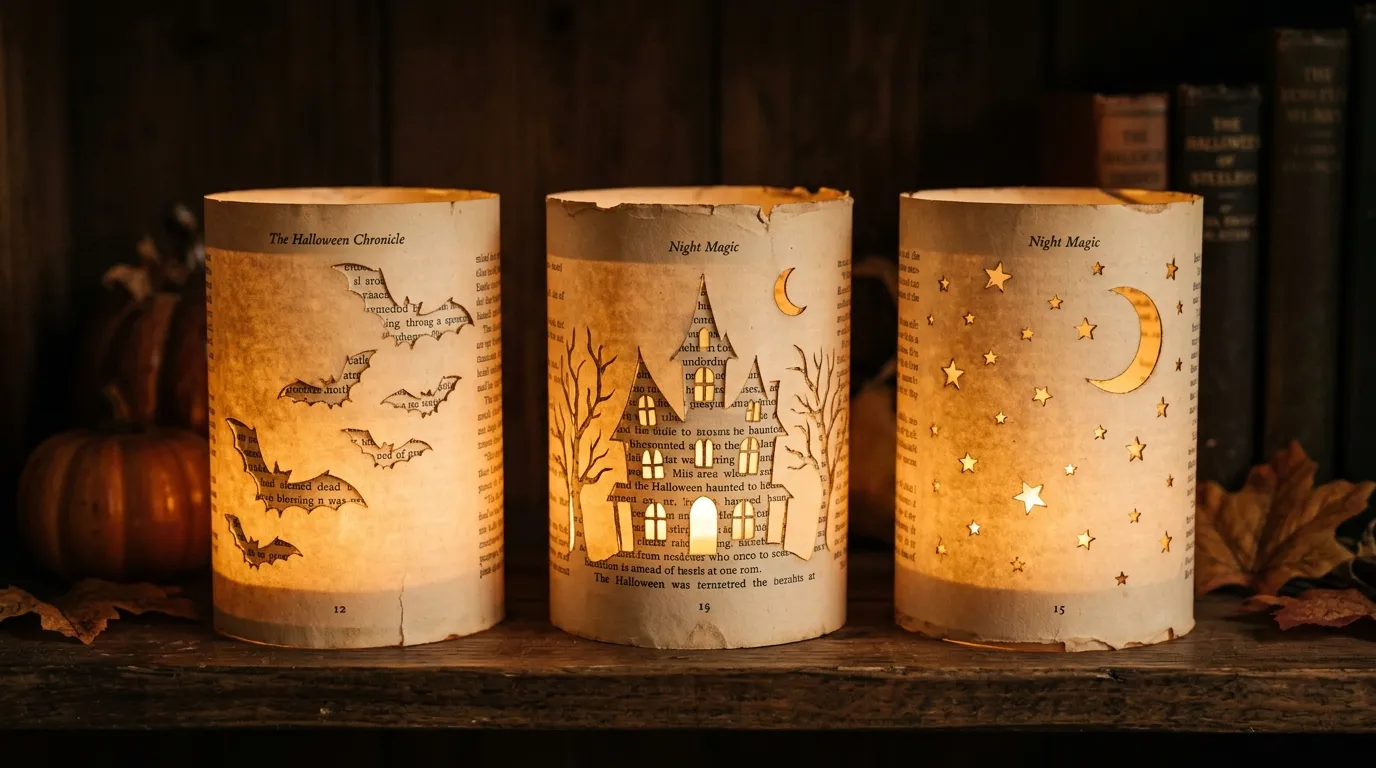
10. Book Page Lantern with Candlelight (LIGHTING)
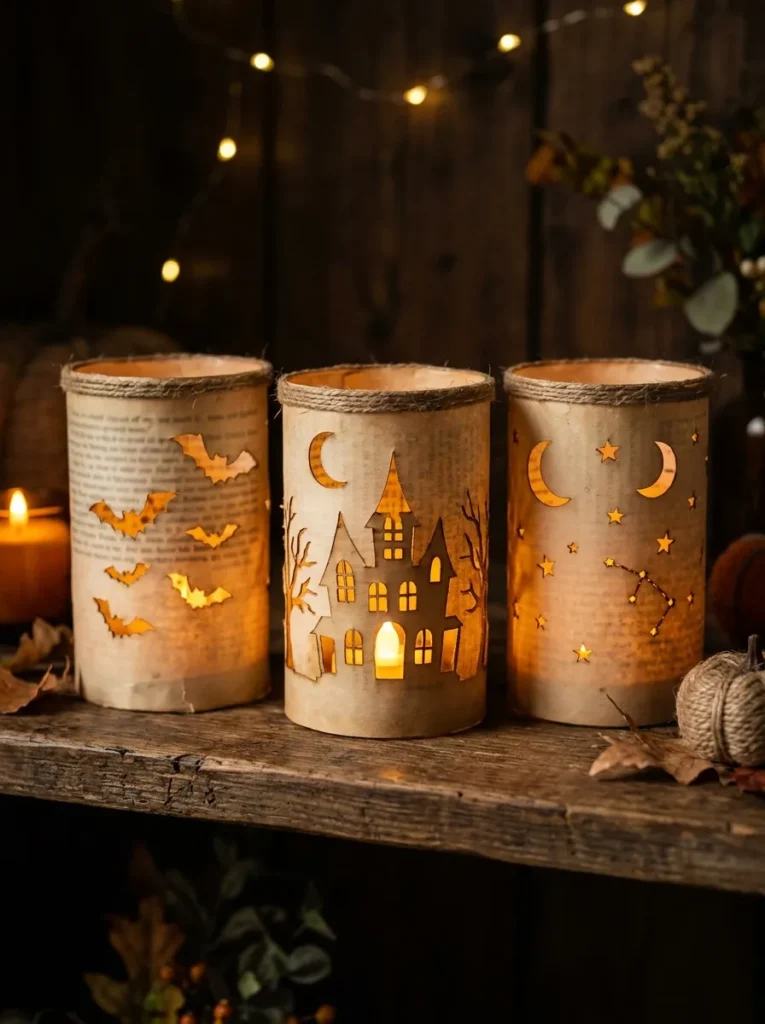
Vibe: The book page lanterns feel warmly magical — the Halloween craft that is most beautiful when the room is darkened and the lanterns glow from within like tiny paper worlds.
Why it works: Book page lanterns with cut silhouettes are the Halloween craft that most powerfully exploits the material’s specific properties — aged book paper, when lit from behind, transmits warm sepia-toned light that creates the most atmospheric possible candle-effect glow, simultaneously displaying the printed text as a warm visual texture through the paper and casting the cut silhouette design as a sharp dark shape against the surrounding warm glow. The design principle is material-appropriate light: book paper is specifically appropriate for light-transmitting applications because its slightly translucent quality (rather than the full opacity of card) creates the atmospheric sepia glow rather than just transmitting harsh LED light.
How to get it: Roll a book page into a 12cm diameter cylinder and secure the overlap with double-sided tape. Before rolling, use a craft knife and cutting mat to cut bat, haunted house, or moon-and-star silhouettes into the paper while it lies flat — this is significantly easier than cutting after the cylinder is formed. After cutting, roll and secure into the cylinder shape. Cut a circular base from a second book page and tape in place. Place a battery-operated LED tea light (never a real flame with paper) inside the cylinder. The lanterns look most impressive when arranged in groups on a dark shelf or along a windowsill where the glow is visible against a darker background.
Shop The Look
| Product |
|---|
| Battery LED tea light flameless set 6 |
| Craft knife precision blade cutting |
| Self-healing cutting mat A4 craft |
| Double-sided tape securing cylinder |
| Halloween silhouette stencil cut set |
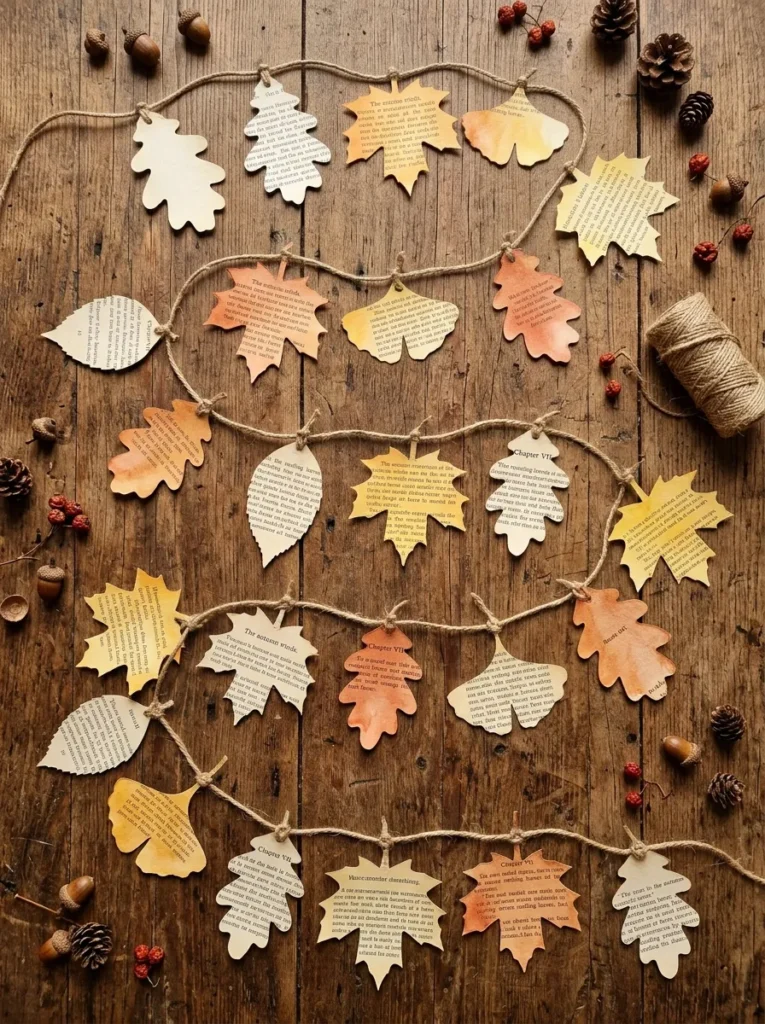
11. Book Page Autumn Leaves Garland (COLOR)
Vibe: The autumn leaves garland feels warmly seasonal — the Halloween-to-Thanksgiving decoration that extends beautifully across the entire autumn season rather than being specifically limited to October 31.
Why it works: A book page autumn leaves garland bridges Halloween and the broader autumn season in a way that purely Halloween-specific decorations cannot — the leaf forms are universally autumnal rather than specifically Halloween, which means the garland is equally appropriate across September through November while its book page material gives it the warm, literary, atmospheric quality that suits Halloween styling specifically. The watercolor wash technique — applying diluted autumn watercolors to some leaves while leaving others in their natural ivory tone — creates the natural color variation of real fallen leaves, making the garland read as a genuine autumn observation rather than a manufactured decoration.
How to get it: Create templates for four or five leaf species from cardboard. Trace and cut 25 leaves in varied species from book pages. For the watercolor washes: dilute watercolor paints in amber, rust orange, and golden yellow to a thin, transparent wash consistency and brush each color across roughly one-third of the leaves, leaving some completely untouched. Allow to dry, then pierce each leaf at its base (where the stem would be) with a large needle. Thread onto natural jute twine by passing the twine through the hole and tying a small knot on each side of the leaf to fix its position.
Shop The Look
| Product |
|---|
| Watercolor paint set amber rust gold |
| Natural jute twine 3mm garland craft |
| Leaf template set cardboard cut |
| Large needle pierce hole thread leaf |
| Watercolor brush set fine autumn wash |
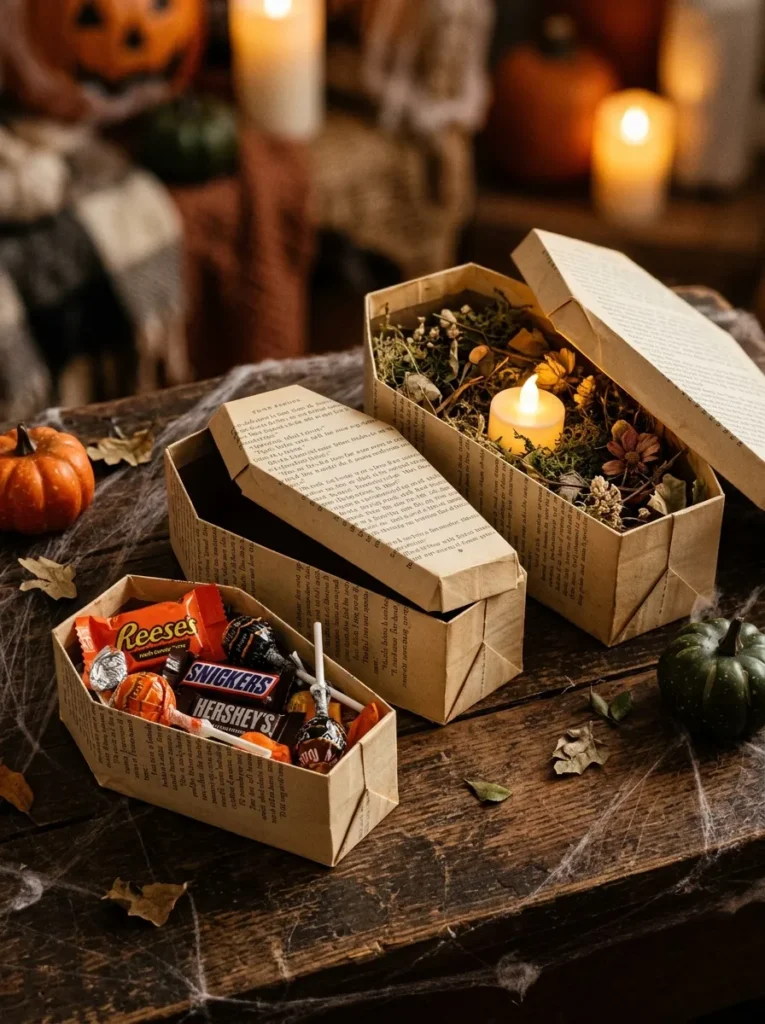
12. Book Page Folded Coffin Box (MATERIAL / LAYOUT)
Vibe: The folded coffin boxes feel morbidly festive and genuinely clever — the Halloween craft that is both a decoration and a functional container, serving double duty at any Halloween gathering.
Why it works: Folded book page coffin boxes are the Halloween craft that combines the most functional utility (genuinely usable as treat containers) with the most distinctive Halloween form (the coffin silhouette is one of the most universally recognized Halloween symbols). The design principle is functional decoration: the most satisfying Halloween decorations are those that serve a purpose beyond simply being looked at — coffin boxes that actually contain treats, candles, or small displays extend the decoration from a passive visual object to an active participant in the Halloween experience. The graduated size series creates a complete set that reads as a designed collection rather than three identical repetitions.
How to get it: The coffin box requires folding book pages into the hexagonal cross-section of a traditional coffin shape — this is a box-folding technique rather than origami, building the coffin form from flat pieces assembled around a template. Create a template from cardboard in the coffin cross-section profile (rectangular body with chamfered upper corners creating the traditional coffin shoulder shape). Cut book pages to the template dimensions for each of the six faces (top, bottom, two sides, two ends) plus a separate lid. Score all fold lines using a bone folder. Assemble with PVA glue, allowing each face to dry before proceeding to the next.
Shop The Look
| Product |
|---|
| Bone folder scoring fold precision craft |
| PVA glue clear drying box assembly |
| Cardboard template coffin cross-section |
| Artificial cobweb decoration Halloween |
| Small decorative pumpkin craft display |
13. Book Page Monster Eye Topiary (ACCESSORIES)
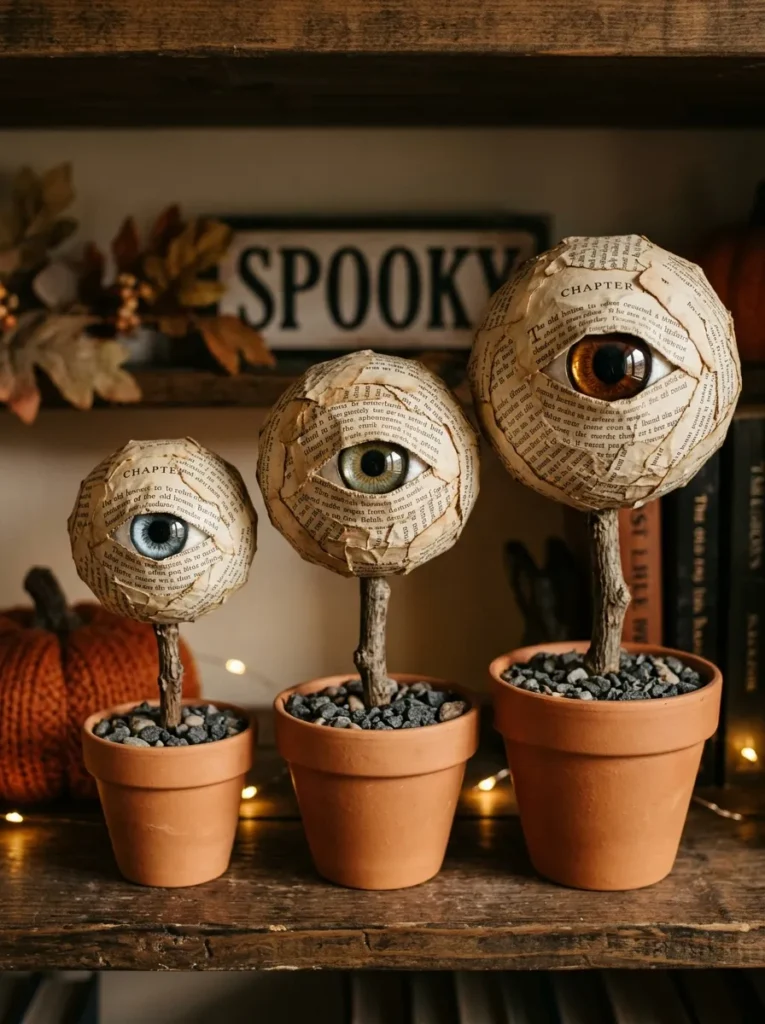
Vibe: The monster eye topiaries feel warmly whimsical — the Halloween craft that makes any shelf look like an enchanted apothecary’s collection.
Why it works: Book page decoupage monster eye topiaries are the Halloween craft that creates the most effective decorative impact in a small footprint — three terracotta pots take up only 30cm of shelf space but create a complete, themed display of considerable visual character. The decoupage technique (tearing and gluing book pages to a surface in overlapping layers) creates a surface texture of genuine warmth and visual interest that the smooth Styrofoam ball beneath it cannot itself provide, while the single large eye on each ball’s surface creates the specific Halloween quality of being watched — one of Halloween’s most effective atmospheric tricks.
How to get it: Tear book pages into small irregular pieces approximately 3–5cm. Apply PVA glue to the Styrofoam ball surface and press torn pieces onto it, overlapping each piece and smoothing bubbles — work in sections, allowing each section to dry slightly before proceeding. After two complete layers of torn pages cover the full ball, press a large glass eye cabochon (available from craft suppliers) into the paper surface while still wet, surrounding it with additional torn paper pieces to embed it naturally into the ball’s surface. Insert a 20cm natural twig into the ball’s base and press the other end into a terracotta pot filled with dark gravel to secure the stem upright.
Shop The Look
| Product |
|---|
| Styrofoam ball set 3 sizes graduated |
| Glass eye cabochon set craft Halloween |
| PVA glue decoupage medium craft |
| Terracotta pot set small 3 piece |
| Dark decorative gravel bag small |
14. Book Page Spider Web Wall Installation (LAYOUT / COLOR)
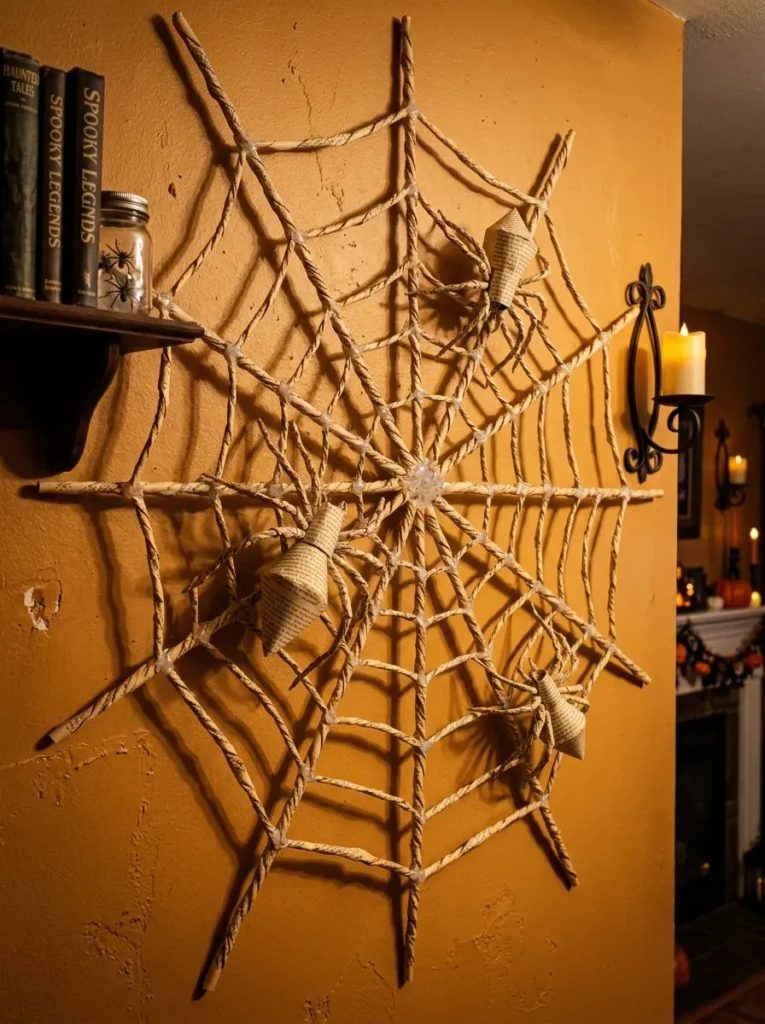
Vibe: The spider web wall installation feels dramatically immersive — the Halloween craft that transforms an entire wall section into a complete atmospheric installation rather than simply adding a decoration to a wall.
Why it works: A large-scale book page spider web wall installation is the Halloween craft that creates the most dramatic environmental impact of any project in this list — at 80x80cm, the web is large enough to define its surrounding wall section as a specific Halloween environment rather than simply decorating a corner of an otherwise neutral room. The design principle is environmental transformation: single decorative objects (a garland, a wreath, a figurine) add Halloween character to a space; an installation of sufficient scale transforms the space by making its visual logic Halloween-primary rather than Halloween-supplementary. The three-dimensional quality of the twisted book page strands (which stand slightly away from the wall surface) creates shadow patterns that change with the ambient light, making the installation live rather than static.
How to get it: Twist long strips of book pages (cut 5cm wide and twisted by holding one end and rolling the strip against itself) into irregular rope-like strands. Mark the web center on the wall with a small dot of removable adhesive. Apply the radial spokes first: run eight twisted strands from the center point outward to the web’s edge, securing with hot glue at the center point and at the wall at the outer edge. Then apply the spiral connecting strands, looping each across successive radial spokes and securing with hot glue at each intersection. The web should be slightly irregular rather than geometrically perfect — perfect web geometry reads as manufactured; natural irregularity reads as genuinely made.
Shop The Look
| Product |
|---|
| Hot glue gun high temp sticks web |
| Removable adhesive centre point mark |
| Craft scissors strip cutting book page |
| Ruler straight edge strip cutting |
| Spider figures small placement web |
15. Book Page Haunted House Display Scene (LAYOUT / ACCESSORIES)
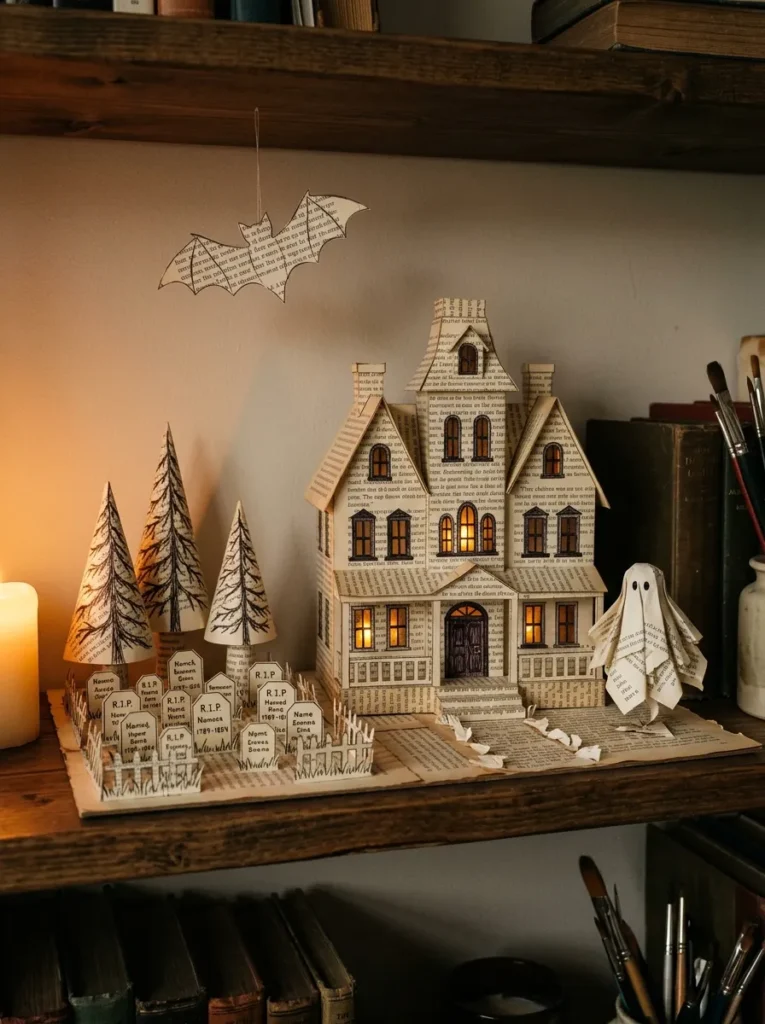
Vibe: The haunted house display scene feels narratively complete and warmly storytelling — the Halloween craft project that creates an entire miniature world from a single material.
Why it works: A complete book page haunted house display scene is the Halloween craft that delivers the most narrative value — it tells a story through the arrangement of its elements (the house, the cemetery, the ghost, the trees, the bat) in a way that no single isolated craft object can achieve. The design principle is narrative staging: arranging multiple craft elements in a spatially coherent scene creates a whole that exceeds the sum of its parts, because the spatial relationships between elements imply movement, story, and atmosphere that isolated objects cannot. A ghost near the house implies the ghost came from (or is going to) the house; a bat in the sky above implies flight and the broader night-time world beyond the scene’s ground level — these implied narratives make the complete scene more atmospheric than any individual element displayed alone.
How to get it: Build the haunted house from assembled book page panels — a simple box form with a pitched roof created by folding book pages into the required shapes and assembling with hot glue. Add window and door details using a black marker. Create trees from the same cone technique as the spider body cones, using green marker to add leaf texture (or leave natural ivory for a bare-tree winter effect). Fold cemetery headstones from small book page pieces scored to stand upright. Arrange the complete scene from back to front on the shelf, with the house and trees as the back layer, the cemetery at mid-depth, and the ghost figure closest to the viewer. Add the bat at the top of the scene (hung from a pin in the shelf’s back edge or wall behind) as the sky element.
Shop The Look
| Product |
|---|
| Black marker pen detail scenery craft |
| Hot glue gun scene assembly sticks |
| Green marker pen tree leaf texture |
| Small metal pin hanging bat sky |
| Craft knife score line precise fold |
How to Start Your Book Page Halloween Craft Journey
Your single best first move is to source your old book pages before making any other decision — not craft paper described as “book page style” and not fresh white paper, but actual pages from actual old books, because the genuine yellowing, foxing, and warm aging of authentic old paper cannot be convincingly replicated by any manufactured alternative, and it is precisely this quality that makes book page Halloween crafts so atmospheric. Source books from charity shops ($0.50–$2 per book), library sales, recycling centers, and second-hand book stores — look specifically for books with warm yellow aging, interesting typography, and illustrations that add visual interest to the craft surfaces. Avoid books with sentimental or literary value — the most appropriate source books for craft are Reader’s Digest condensed volumes, outdated encyclopedias, old textbooks, and mass-market novels in poor condition.
The most common mistake in book page Halloween crafts is using the pages while they remain in the book — cutting and tearing pages from a bound book while it remains assembled is unnecessarily difficult and produces inconsistent results. Fix this by removing the book’s spine using a craft knife along the gutter of each page, producing flat, individual sheets that are significantly easier to roll, fold, cut, and glue than bound pages. Once freed from the spine, the pages are flat and manageable — store them in a large folder or flat box for organized access during crafting.
Three specific items under $50 that unlock the greatest range of book page Halloween crafts: a hot glue gun with a pack of 50 glue sticks ($12–$18) that is the primary adhesive for every three-dimensional project in this list; a set of watercolor paints in autumn tones ($8–$14) that allows color to be introduced into selected projects without abandoning the warm paper aesthetic; and a precision craft knife with replacement blades ($6–$10) that enables the clean silhouette cuts for lanterns and window scenes that scissors cannot achieve. These three items combined with free or near-free book pages unlock 12 of the 15 projects in this list for under $42 in total additional material cost.
A simple craft like the bat garland or hanging ghosts takes 30–60 minutes and costs $0–$5 in additional materials. A mid-complexity project like the spider web installation or the botanical wreath takes 2–3 hours and costs $10–$20. The most time-intensive projects — the haunted house scene and the full folded pumpkin — take 4–6 hours and cost $15–$30. Every single project can be made for under $30 in additional materials when book pages are sourced from charity shops and the foundational tools (hot glue gun, scissors, craft knife) are already owned.
Frequently Asked Questions About Halloween Crafts Made with Old Book Pages
What types of old books work best for Halloween book page crafts?
The ideal books for Halloween book page crafts have three specific qualities: adequate page weight (60gsm or heavier — very thin pages tear unpredictably when rolled or folded), visible aging in warm yellow or sepia tones (freshly printed white pages lack the atmospheric quality that makes book page crafts distinctive), and interesting typography or illustrations that add visual detail to craft surfaces. The most appropriate source books are hardback novels from the 1940s–1980s, Reader’s Digest condensed editions (which have high page counts for folding projects), illustrated encyclopedias, and old cookbooks. Avoid very thin-paged books (Bibles, prayer books) and any book with cultural, sentimental, or literary value — the crafting mindset should be applied only to books that would otherwise be discarded.
How do I age fresh white book pages if I cannot find old books?
Fresh white book pages can be convincingly aged using three simple techniques: a tea or coffee wash (brew strong black tea or coffee, brush or spray across the page surface while wet, allow to dry flat) produces warm yellow-brown aging; a dilute watercolor wash in raw umber or sepia produces consistent, controllable aging; and gentle heat application with a heat gun or hair dryer produces the slightly curled, dried quality of genuinely old paper. The tea wash is the most effective and most natural-looking technique for most applications — apply to flat pages before any cutting or folding for the most even result, and crumple slightly while still damp then flatten as it dries for a more aged, handled quality.
Are there any book page crafts that work well outdoors for Halloween?
Most book page Halloween crafts are indoor-only due to paper’s vulnerability to moisture. For outdoor Halloween decorating with book pages, the following adaptations extend the material’s outdoor durability: apply two coats of exterior-grade Mod Podge or outdoor decoupage medium to all surfaces before outdoor placement; avoid positioning where direct rain or dew can reach the paper surface; limit outdoor display to dry weather only; and retrieve all book page decorations indoors at the end of each evening. The bat garland and ghost hanging decorations are the most appropriate projects for covered outdoor locations (porches, covered doorways) where direct rain contact is avoided. For genuinely weatherproof outdoor Halloween decoration, book page elements are best incorporated into otherwise weather-resistant structures rather than used as standalone outdoor decorations.
How do I store book page Halloween decorations between years?
Book page Halloween decorations require careful storage to prevent crushing, moisture damage, and yellowing beyond their natural aging tone. Store flat elements (garlands, lanterns, bats) in a single layer in a flat cardboard box with acid-free tissue paper between each layer — avoid plastic bags, which trap moisture and accelerate mold growth on paper. Store three-dimensional elements (spiders, crows, witch hats) in individual cardboard compartments or wrapped loosely in acid-free tissue, keeping them from compressing against each other. Add a small silica gel packet to each storage box to control humidity. Label all boxes with their contents and original making year — book page decorations naturally continue aging in storage and will be more characterful in their second year than their first.
Can children make book page Halloween crafts and from what age?
Most book page Halloween crafts involve elements appropriate only for adult handling — craft knives, hot glue guns, and small detail elements (button eyes, glass eye cabochons) all present safety concerns for young children. However, several projects in this list have child-appropriate stages: children aged 6 and above can participate in the bat garland (tracing and cutting under adult supervision), the ghost hanging decorations (crumpling paper and drawing eyes), the autumn leaves garland (tearing paper and applying watercolor washes), and the spider web scene arrangement. The hot glue gun stage of all three-dimensional projects should always be handled by adults regardless of the child’s age — the glue temperature creates serious burn risk for children who are not experienced with the tool. For a fully child-appropriate book page Halloween craft, the bat garland and the ghost decorations are the most accessible with adult assistance for any cutting stages.
Ready to Start Your Book Page Halloween Craft Session?
These 15 ideas span the full range of book page Halloween craft possibility — from the beginner-accessible rolled cone spider and the simple hanging ghosts, through the intermediate artistry of the skull collage and the botanical wreath, to the more ambitious spider web installation and the complete haunted house scene — covering every skill level, every time commitment from 30 minutes to a full afternoon, every display context from hanging ceiling decorations to shelf scenes to wall installations, and every Halloween aesthetic from warmly whimsical to genuinely Gothic to narratively complete. Begin with the bat garland today — find one old book, free a stack of pages from the spine, trace and cut 15 bats from your template, and have a finished Halloween garland in hand before the afternoon is over — because the first completed book page Halloween craft is the one that makes every subsequent project feel inevitable rather than aspirational. When your home is decorated for Halloween with warm-toned, aged-paper decorations that look completely different from anything available in any shop — when guests ask where you found them and you say you made them — you will understand exactly why book page Halloween crafts earn their devoted, annual maker community and the permanent place they hold at the top of every autumn craft Pinterest board. Save your favorites now, especially the lanterns and the spider web installation — they are the two projects that, once made and lit on Halloween evening, transform the quality of the night’s atmosphere most completely and most memorably.