18 Creative Book DIY Ideas for Every Season
Book DIY projects are creative applications of books — whether vintage hardcovers, paperback novels, obsolete encyclopedias, or purpose-grown seed-paper books — as the primary material or structural component of handmade objects, decorative installations, and functional household items. This article gives you 18 genuinely creative, achievable book DIY ideas that span every skill level from beginner to experienced crafter, every season from the fresh botanicals of spring to the warmth of a winter reading nook, and every design aesthetic from Japandi minimal to maximalist vintage.
Most book DIY projects default to the obvious — a hollowed-out storage book, a simple paper flower, a book page garland. The projects in this list reach further: they treat the book as a design material with specific qualities (its weight, its page texture, its typographic history, its accumulated reading life) that make it uniquely suited to creative applications that no other material can replicate. Here are 18 ideas worth saving — and making.
Why Creative Book DIY Projects Work So Well
The book as a DIY material occupies a unique position in the craft world because it simultaneously carries visual richness, material quality, and cultural resonance that most raw craft materials cannot replicate. The aged paper of a vintage encyclopedia, the specific typographic character of a 1950s novel, the gold-tooled spine of a leather-bound classic — all of these carry the accumulated visual history of a specific literary and printing tradition that can be accessed for DIY purposes at negligible cost from charity shops, secondhand bookstores, and estate sales. This material richness is the foundation of the best book DIY projects: they are not merely using paper as a craft medium but specifically exploiting the book’s own visual and cultural character as a design asset.
The specific material properties of the book that make it so versatile as a DIY material are: the page’s natural off-white color that ages to warm ivory and coordinates with almost every warm neutral palette, the variety of typographic layouts that create visual texture when pages are used as surface coverings or paper elements, the structural integrity of the hardcover that provides a rigid substrate for transformed art projects, and the accumulated physical character of old books — the slight yellowing, the foxing, the pencil notes in margins — that gives book-based DIY projects an authenticity and warmth that purpose-bought craft paper cannot achieve.
The seasonal application of book DIY projects is a natural development of the craft tradition — different seasons call for different book project types based on the season’s specific aesthetic character and the materials most naturally available. Spring’s projects celebrate freshness and botanical life: origami flowers from book pages, pressed flower bookmarks, seed paper plantable cards. Summer projects use books’ warmth outdoors: painted book planters, coastal book art, book page bunting for outdoor celebrations. Autumn’s projects embrace the book’s natural warmth and darkness: altered book journals, book page wreaths, cozy reading nook book shelving. Winter projects use the book’s warmth and cultural depth: book page gift wrapping, literary advent calendars, book spine Christmas trees, candlelit paper sculpture.
Style at a Glance
| Element | Detail |
|---|---|
| Philosophy | The book is a design material with specific visual and cultural qualities — its best DIY applications exploit those qualities deliberately rather than treating it as generic paper |
| Key Materials | Vintage hardcovers, encyclopedia pages, aged paperbacks, book spines, seed paper, book page print fabric |
| Skill Range | Beginner (folded page art, bookmarks) through intermediate (altered books, paper wreaths) to experienced (origami sculpture, book carving) |
Spring Book DIY Ideas
1. Pressed Wildflower Bookmarks from Book Pages
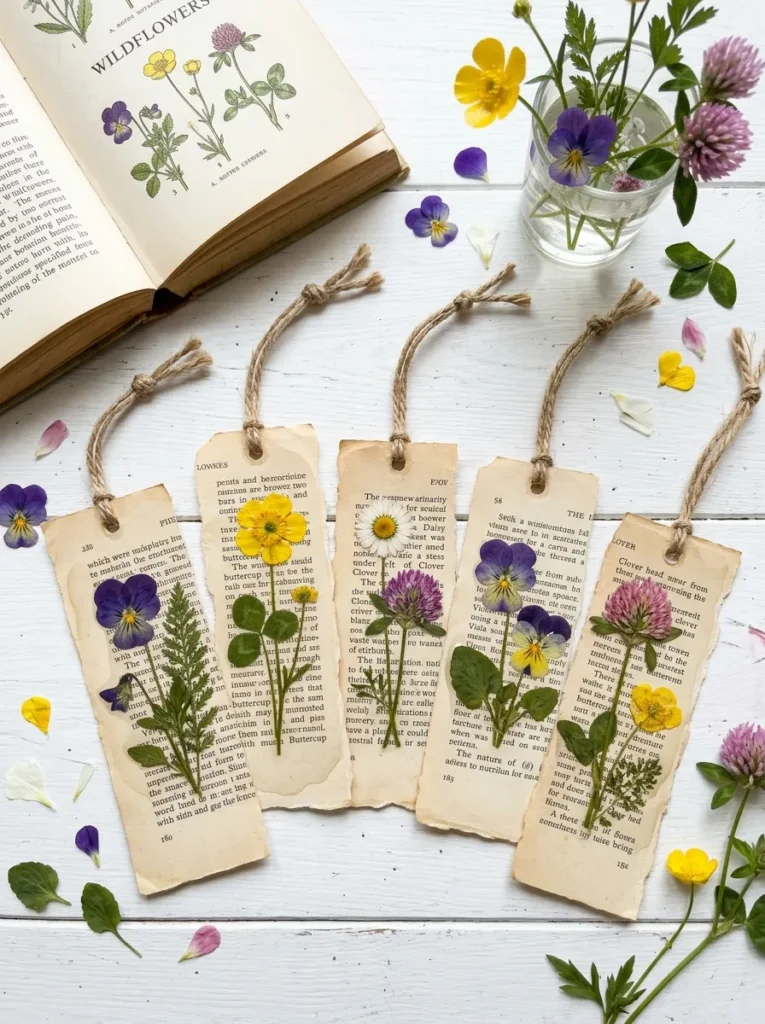
Vibe: Fresh and botanical — the craft project that transforms an afternoon of wildflower gathering into a season of beautifully marked reading.
Why it works: The pressed wildflower bookmark is the book DIY project that most naturally and most beautifully uses the book page as a material — the aged ivory of the book page serves as the warm ground that most authentically references the herbarium tradition of botanical specimen preservation, where dried plant specimens are mounted on aged paper for permanent display. The typographic text of the book page beneath the pressed flower creates the specific layered quality — plant pressing over printed text — that references the Victorian botanical illustration tradition of annotated specimen collection. The pressed flowers’ colors, preserved through the Mod Podge or resin layer, coordinate naturally with the warm ivory of the aged book page in a way that they would not coordinate with a bright white or colored craft paper ground.
How to get it: Press wildflowers between heavy books for minimum 2–3 weeks before use — incomplete pressing produces flowers that shrink and curl after mounting, breaking the adhesive layer. Tear rather than cut the bookmark strips from the book page — the torn edge creates the ragged, organic border that coordinates most naturally with the wildflower’s own organic quality. Apply Mod Podge to the back of the pressed flower, position on the book page strip, and apply a thin layer over the top — allow to dry completely flat under a heavy book for 24 hours before adding the punched hole and twine.
How long it takes: 30 minutes active time plus 2–3 weeks pressing time.
Cost: $3–8 for a set of eight bookmarks.
Shop the Look
| Product |
|---|
| Mod Podge decoupage medium |
| Hole punch small |
| Natural linen twine |
| Wildflower seed mix for gathering |
| Vintage book secondhand |
Also view: 14 Cozy DIY Christmas Wreath Ideas for Your Door
2. Book Page Origami Flower Arrangement
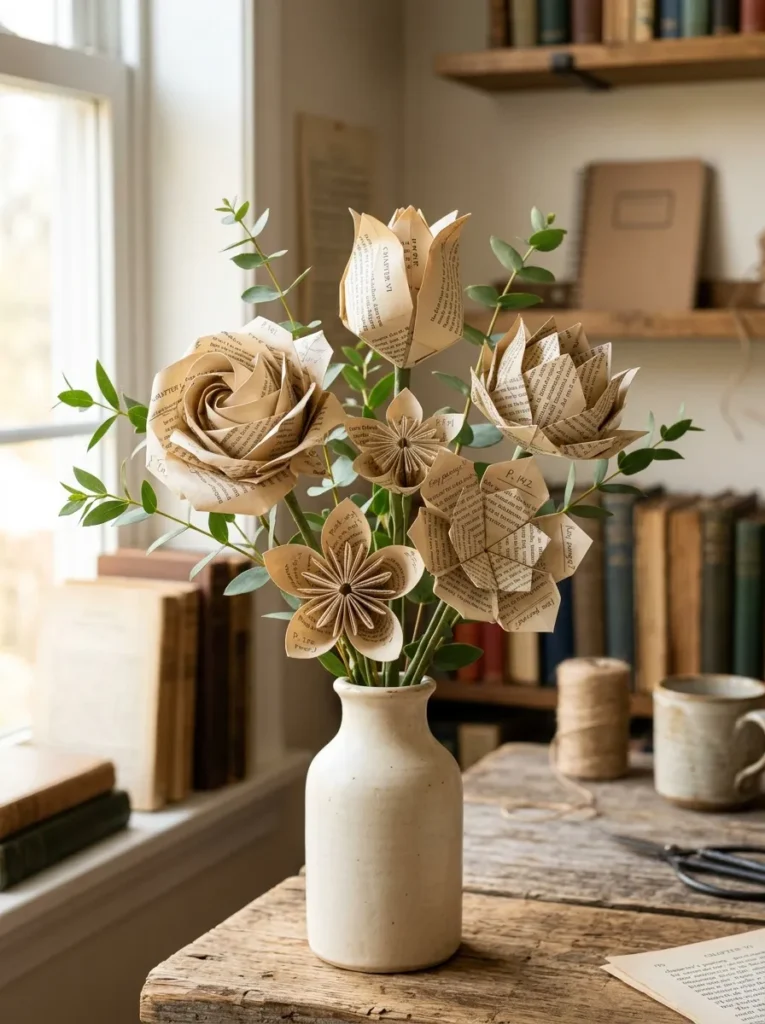
Vibe: Fresh and creative — the floral arrangement that makes reading’s material residue into something as beautiful as the reading itself.
Why it works: Book page origami flowers are the book DIY project that most powerfully transforms the page’s two-dimensional quality into a three-dimensional form of genuine visual beauty — the folded origami structure catches light across multiple angled surfaces simultaneously, creating the specific luminous quality of a petaled flower from the same aged paper that reads as flat and undistinguished in its original unfolded state. The visible book text in the flower’s folds is the design quality that most distinguishes a book page origami flower from a plain paper origami flower — the typographic texture provides the visual interest that plain paper lacks, making each fold’s face a small typographic composition in its own right.
How to get it: Cut or tear pages to square format (150mm × 150mm for a medium flower) before folding — the square format is the foundation of most origami flower forms. Use a bone folder for crisp folds — soft paper like aged book pages responds better to bone folder scoring than finger-pressing alone. Attach folded flowers to natural wire stems (florist’s wire at 0.8mm gauge) using a small amount of hot glue at the flower’s base, and wrap the wire with green florist’s tape for the most botanically convincing stem.
How long it takes: 3–4 hours for a full vase arrangement of eight flowers.
Cost: $8–15 for materials.
Shop the Look
| Product |
|---|
| Florist wire 0.8mm green |
| Florist tape green |
| Bone folder tool |
| Hot glue gun |
| Origami instruction book |
Also view: 15 IKEA KALLAX Makeover Ideas for Stylish Homes
3. Seed Paper Plantable Gift Cards
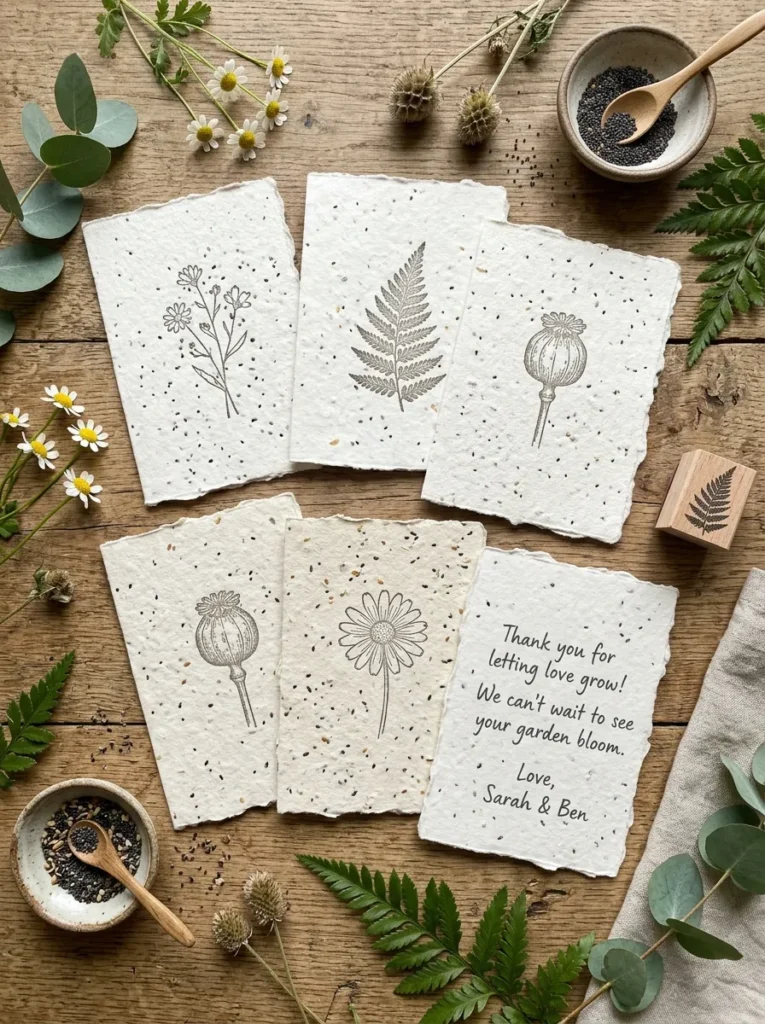
Vibe: Fresh and botanical — the card that keeps giving after the message has been read, growing into flowers that mark the season of its receipt.
Why it works: Seed paper cards made from blended book pages are the book DIY project that most completely realizes the book’s transformative potential — taking the book’s most fundamental material (wood-pulp paper) back to its pre-book state, embedding seeds within it, and creating an entirely new object whose beauty and function are entirely different from either the original book or standard craft paper. The book page’s existing text and typography becomes part of the seed paper’s fiber matrix, creating a paper that carries the visual history of the book’s printed surface in its embedded fiber texture — visible as subtle typographic ghosting in the finished handmade paper.
How to get it: Tear book pages into small pieces (approximately 25mm × 25mm) and soak in warm water for 1 hour to break down the paper fibers. Blend the soaked paper in a blender with additional water until a smooth pulp forms. Spread the pulp on a mesh screen, sprinkle wildflower or poppy seeds evenly across the surface, and press with a second mesh screen to compress the paper and embed the seeds. Allow to dry flat for 24–48 hours, then cut or tear to card size. Seeds embedded in damp paper retain their viability for up to 12 months when the paper is stored dry — advise the recipient to plant the card in moist soil in spring.
How long it takes: 2 hours active time, 24–48 hours drying.
Cost: $15–25 for materials to make 20 cards.
Shop the Look
| Product |
|---|
| Mesh screen papermaking |
| Wildflower seed mix small |
| Blender designated craft |
| Botanical stamp set |
| Warm grey ink pad |
4. Decoupage Terracotta Pot with Botanical Book Pages
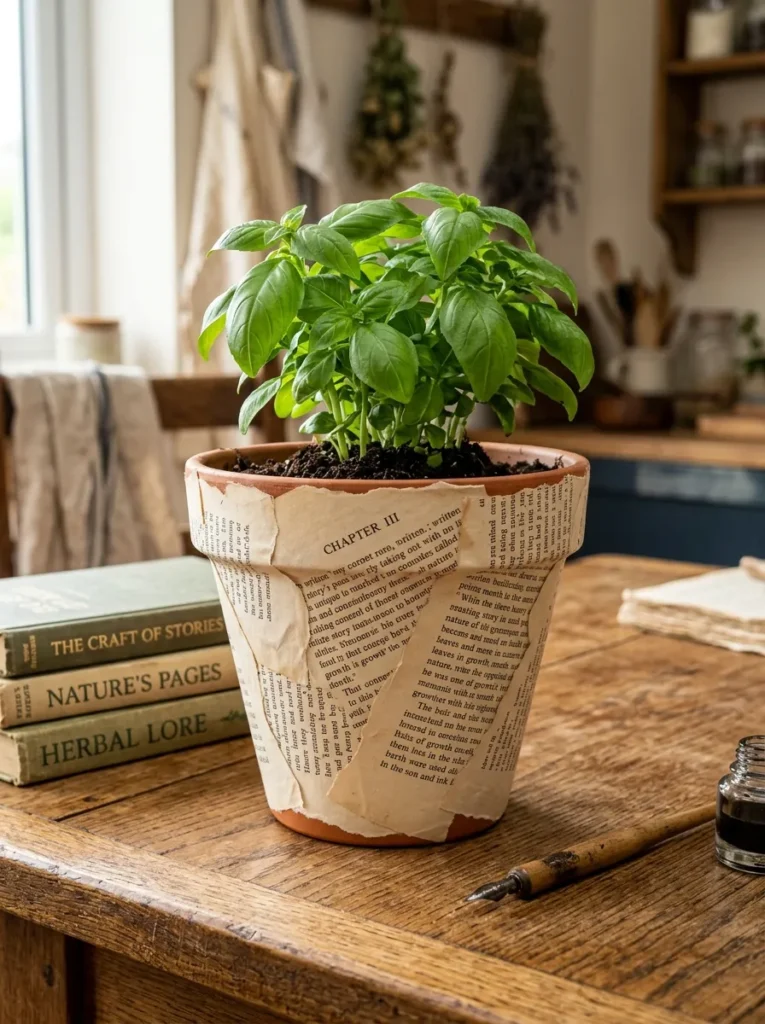
Vibe: Warm and creative — the plant pot that makes the garden’s most ordinary vessel into a literary object.
Why it works: Decoupage terracotta with book pages is the book DIY project that most naturally and most practically combines the book’s material qualities with the warm, earthy character of terracotta — both materials are warm in tone, both have an organic surface texture, and both carry a sense of age and use that synthetic materials do not. The book page’s typography, visible through the Mod Podge adhesive, creates a continuous text-pattern surface that references the Victorian decoupage tradition of decorating domestic objects with printed ephemera. The terracotta beneath the page sections shows warmly at the torn-edge overlaps, creating the specific layered color quality where warm orange-brown terracotta appears through the warm ivory of the page — a combination that reads as naturally harmonious.
How to get it: Tear book pages into irregular sections of approximately 50–80mm and apply to the terracotta surface using diluted Mod Podge (3:1 Mod Podge to water) as both adhesive and first coat. Apply sections overlapping by 10–15mm, smoothing bubbles with a soft brush as each section is applied. Allow to dry between each of three total Mod Podge coats. Seal with a final coat of matte Mod Podge or a dedicated outdoor sealer if the pot will be used outdoors — untreated decoupage on terracotta is not water-resistant and will delaminate in rain.
How long it takes: 2–3 hours plus drying time.
Cost: $5–10 per pot.
Shop the Look
| Product |
|---|
| Mod Podge matte finish |
| Terracotta pot 150mm |
| Foam brush set |
| Vintage book pages |
| Outdoor sealer spray |
5. Book Page Paper Bunting for Spring Celebrations
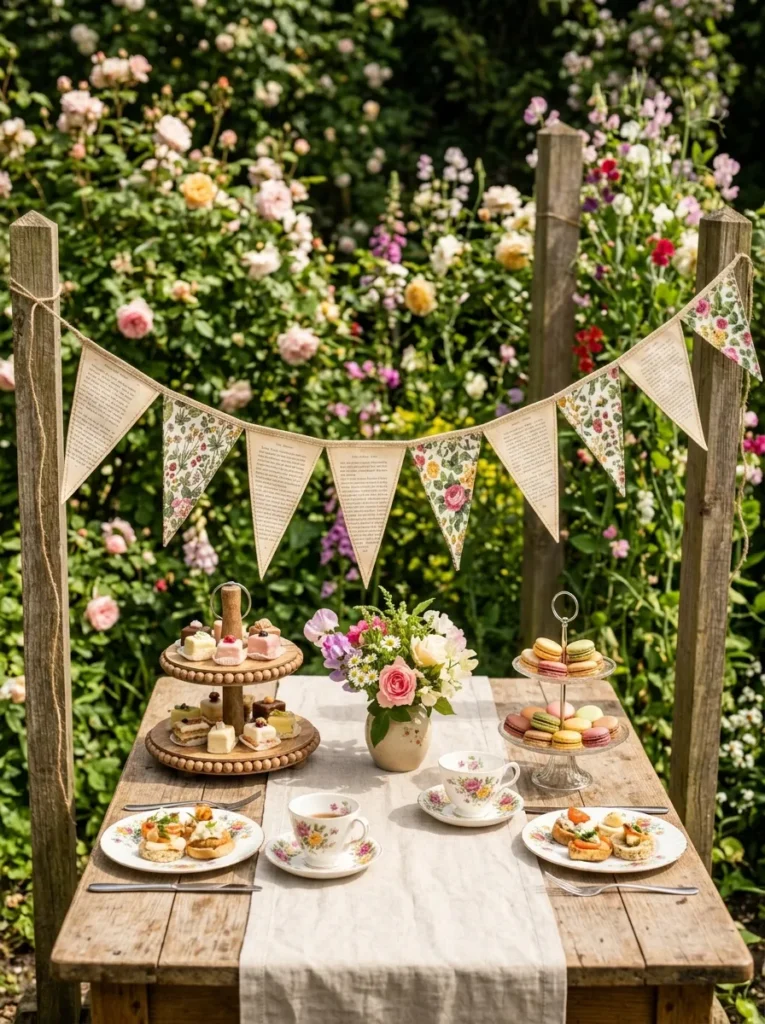
Vibe: Celebratory and botanical — the decoration that makes any outdoor gathering feel like it was planned by someone with genuine handcraft sensibility.
Why it works: Book page bunting is the book DIY project that most effectively translates the book’s visual qualities into an outdoor celebration decoration — the aged ivory of the page pennants reads as warm and natural in outdoor light rather than as plain white, and the typographic texture of the pages creates visual interest across the bunting’s full length without the visual complexity of colored or patterned paper. The alternation between pure book page pennants and book-page-plus-botanical-fabric pennants creates the compositional rhythm that makes the bunting read as designed rather than repetitively uniform. The jute twine attachment is the string material that most naturally coordinates with the aged page’s warm tone and the garden party context — synthetic ribbon or bright cotton string would introduce a material conflict with the organic quality of the book page pennants.
How to get it: Cut triangular pennants using a template (equilateral triangle at 150mm base width) from book pages, and cut matching fabric triangles for every second pennant. Fold the top 15mm of each pennant over the jute twine and secure with a hot glue bead or sewing — the fold creates the clean top edge that prevents the pennant from tearing at the attachment point. Space pennants at 50mm intervals for the density that reads as deliberately festive rather than sparsely strung.
How long it takes: 2 hours for a 3-meter bunting string.
Cost: $12–20 for materials.
Shop the Look
| Product |
|---|
| Jute twine natural |
| Botanical print fabric small |
| Pinking shears fabric |
| Hot glue gun |
| Triangle template cardboard |
Summer Book DIY Ideas
6. Upcycled Hardcover Book Planter
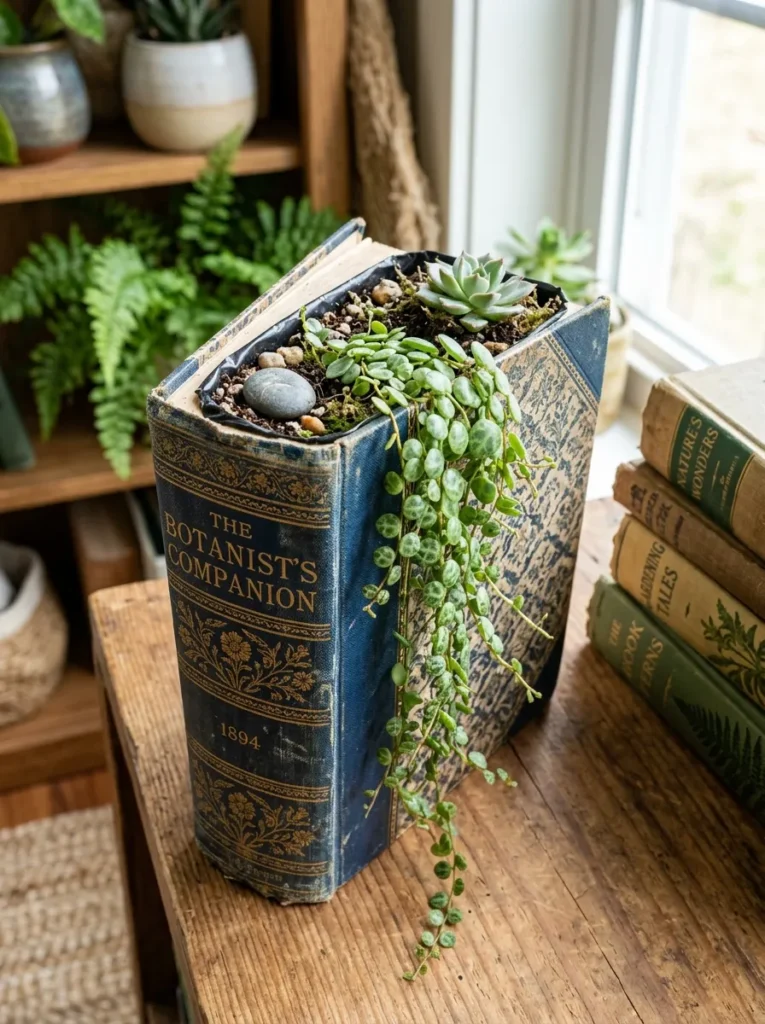
Vibe: Creative and warm — the planter that makes literary and botanical sensibilities coexist in a single object.
Why it works: The hollowed hardcover book planter is the book DIY project that most playfully exploits the irony of the book as a plant container — the vessel that holds the mind’s growth in one cultural tradition becomes a vessel for organic growth in another. The decorative hardcover spine visible when the book-planter is placed among other books creates the specific visual surprise of a planting where no planting would be expected. The best hardcover book planters use books with genuinely decorative spines — illustrated covers, embossed leather spines, or ornate gilt lettering — because the decorative exterior quality creates the contrast between the book’s cultural sophistication and the organic soil-and-plant interior that makes the planter most visually interesting.
How to get it: Use a craft knife to cut through the pages approximately 20mm inside the perimeter of each page, removing the page centers in sections of 30–40 pages at a time to create the hollow. Apply PVA glue to the exterior page edges and the inner walls of the hollow, clamping overnight to consolidate the pages into a rigid structure. Line the hollow with a plastic bag cut from a grocery bag, piercing several small drainage holes in the base. Fill with cactus mix potting soil and plant a small succulent — the drought-tolerant succulent’s minimal watering requirements prevent the soil from remaining wet long enough to damage the book’s structure.
How long it takes: 3–4 hours plus overnight drying.
Cost: $5–15 depending on plant selection.
Shop the Look
| Product |
|---|
| Craft knife and cutting mat |
| PVA wood glue |
| Cactus succulent potting mix |
| Small succulent plant |
| Clamp set |
7. Beach Read — Coastal Watercolor Book Page Art
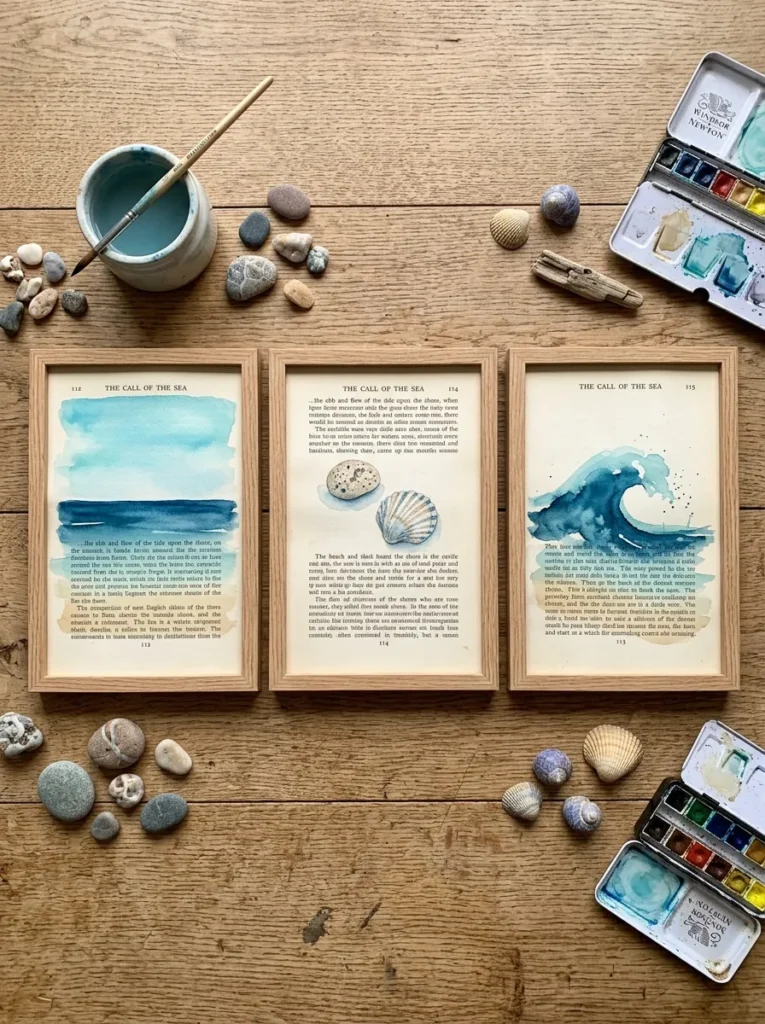
Vibe: Coastal and creative — the summer wall art that costs almost nothing and reads as a genuine artistic decision.
Why it works: Watercolor paintings on book pages are the book DIY project that most beautifully exploits the page’s typography as a design element of the artwork itself — the translucent watercolor wash allows the underlying text to remain visible through the color, creating a layered composition of printed word and painted image that is the specific quality of this art form’s most compelling examples. The text beneath the coastal scene adds a literary resonance to the visual content: a watercolor wave washing over the printed text of a novel creates the metaphor of the visual and the literary coexisting in the same surface. The book page’s warm ivory tone is the most naturally sympathetic watercolor ground for coastal palettes — the warm ivory base warms the aqua and blue washes, preventing them from reading as cold.
How to get it: Remove pages from a vintage paperback or hardcover using a craft knife along the spine — pages removed cleanly from the spine can be framed without any additional preparation. Stretch the page by wetting briefly and taping to a flat surface before painting — book pages are not designed as watercolor paper and will buckle if wet without stretching. Paint simple, loosely rendered coastal scenes using highly diluted watercolor so the underlying text remains clearly visible. Frame in slim natural timber frames for the gallery-quality presentation that most effectively elevates the book page artwork beyond its craft origin.
How long it takes: 30 minutes per artwork.
Cost: $20–40 for three framed artworks.
Shop the Look
| Product |
|---|
| Watercolor set quality |
| Slim natural timber frame small |
| Masking tape page stretching |
| Watercolor brush fine |
| Vintage book paperback |
8. DIY Book Page Gift Wrapping
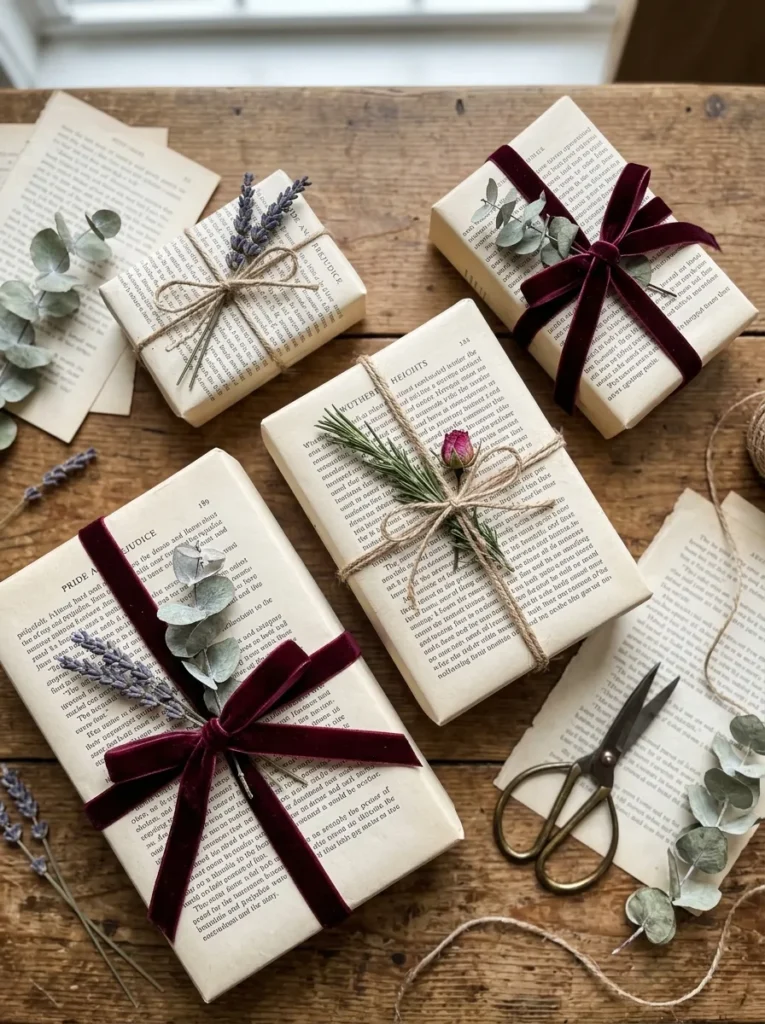
Vibe: Warm and literary — the gift wrapping that makes the presentation itself feel like a considered gift before the interior is revealed.
Why it works: Book page gift wrapping is the book DIY project that most accessibly and most immediately demonstrates the book page’s value as a design material — it requires no special skills, no additional tools, and no significant preparation, yet it immediately transforms the standard gift presentation into something that reads as deliberate, personal, and aesthetically considered. The book page’s typographic pattern creates the specific visual quality of a sophisticated wrapping paper (pattern, texture, visual interest) using the book’s own design rather than a manufactured pattern. The botanical tuck-in under the ribbon bow — a sprig of eucalyptus, a small bundle of lavender, or a rosemary stem — adds the sensory dimension (fragrance) that elevates book page wrapping beyond visual appeal.
How to get it: Use large-format book pages (from encyclopedias or large-format illustrated books) for larger gifts — standard paperback pages provide sufficient coverage for gift boxes up to approximately 200mm × 150mm. Double-wrap for larger gifts by overlapping two page sections. The botanical tuck-in should be the last element added — slip the stem under the ribbon loop before tightening the bow to secure it in place at the ribbon junction.
How long it takes: 10–15 minutes per package.
Cost: Nearly zero — uses books already owned.
Shop the Look
| Product |
|---|
| Natural jute twine |
| Deep burgundy velvet ribbon |
| Dried eucalyptus stems |
| Large format encyclopedia |
| Vintage scissors decorative |
9. Outdoor Reading Nook Sign — Book Quote on Reclaimed Timber
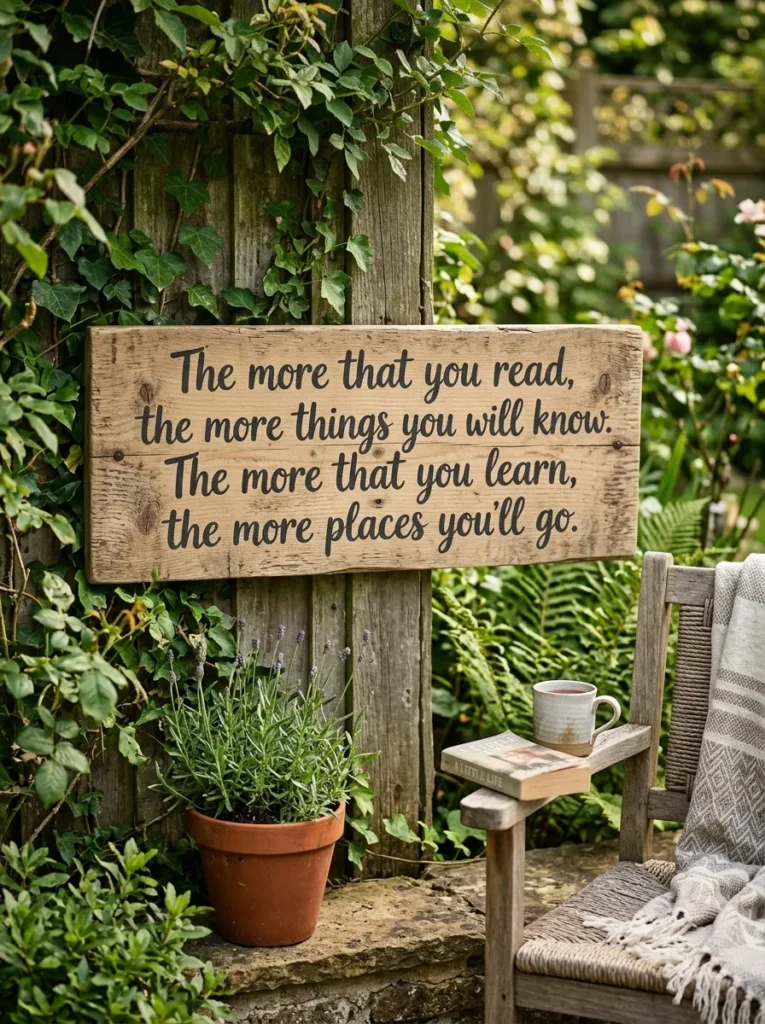
Vibe: Warm and literary — the outdoor reading corner feature that names the space with a quote that belongs to it.
Why it works: A book quote sign on reclaimed timber is the book DIY project that most effectively extends the literary world of the book into the physical space of the reading environment — it is the specific decorating gesture that names the outdoor reading nook as a reading space rather than merely a garden corner with a chair. The reclaimed timber is the correct material for the outdoor quote sign because its rough-sawn surface texture provides the natural, aged backdrop that coordinates with the worn, well-read character of the books it references. The chalk paint lettering is the most accessible lettering medium for a smooth, legible result on rough timber — its thick, pigment-rich formulation covers the grain texture without requiring the multiple thin coats that acrylic craft paint needs for opacity on rough wood.
How to get it: Source reclaimed timber from a demolition salvage yard, a timber merchant’s offcuts, or old floorboards — a section of approximately 400mm × 150mm with interesting grain and saw marks is the ideal canvas. Print the selected quote at the desired size and trace onto the timber using graphite transfer paper before painting the lettering. Seal with an outdoor matte sealer to protect the chalk paint from weather — chalk paint without a sealer will mark and fade within weeks of outdoor exposure.
How long it takes: 2–3 hours including drying time.
Cost: $10–20.
Shop the Look
| Product |
|---|
| Chalk paint charcoal |
| Reclaimed timber section |
| Graphite transfer paper |
| Outdoor matte sealer |
| Lettering brush set |
Autumn Book DIY Ideas
10. Altered Book Autumn Journal
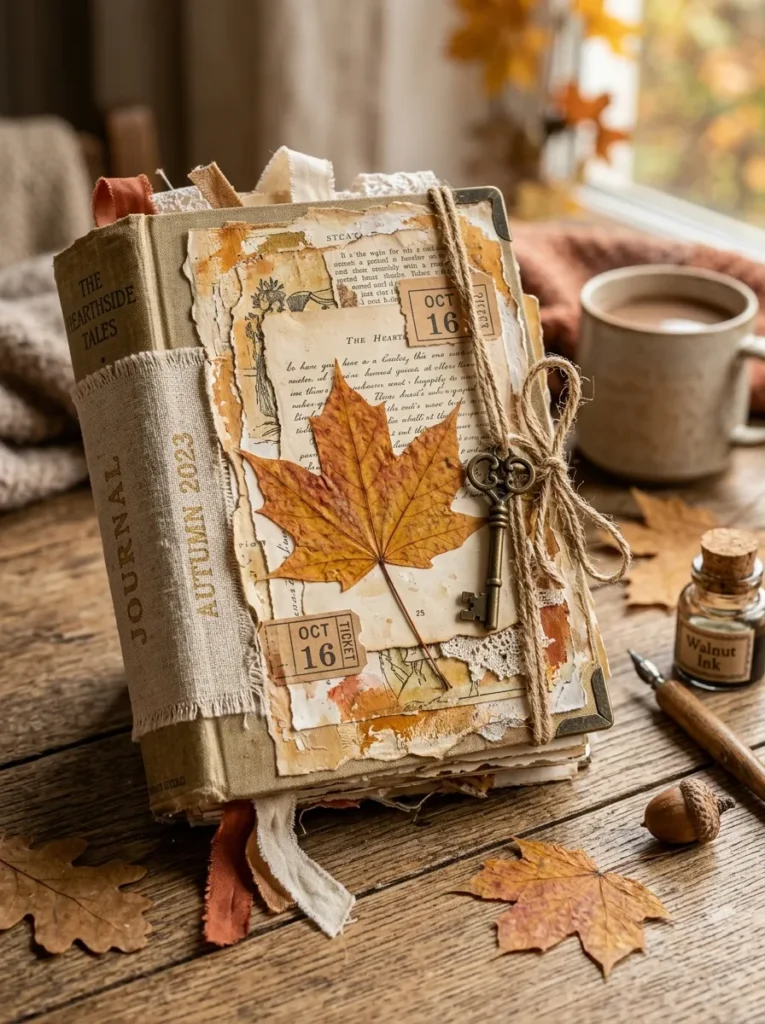
Vibe: Warm and personal — the journal that looks as though it has already been kept for a decade before the first word is written.
Why it works: The altered book journal is the book DIY project that most completely realizes the transformative potential of the book as a creative medium — it takes the original book’s structure, materials, and cultural identity and overlays a new personal narrative, creating an object that simultaneously carries the book’s accumulated history and the maker’s current creative expression. The autumn application of the altered book journal is the most naturally suited seasonal variation because autumn’s characteristic aesthetic (warm amber, dried botanicals, the sense of gathering and reflecting before winter) aligns perfectly with the journal’s function as a personal record and the altered book’s material warmth. The pressed amber leaf on the cover is the botanical element that most specifically marks the journal as an autumn creation.
How to get it: Use a vintage hardcover at minimum 200 pages — enough page depth to create altered interior pages while retaining sufficient structural integrity. Adhere groups of 10–15 pages together using PVA glue to create thick, stable pages suitable for collaging and painting. Cover the exterior surfaces with a combination of book page sections (torn and overlapping), linen fabric adhesive-backed sections, and autumn botanical elements sealed with Mod Podge. The antique key tied with jute twine is a final touch that gives the journal the specific personal-archive quality that makes altered journals most compelling.
How long it takes: 4–6 hours for the cover; the interior is ongoing.
Cost: $15–25.
Shop the Look
| Product |
|---|
| PVA glue strong |
| Mod Podge matte |
| Linen fabric small piece |
| Antique key set |
| Pressed autumn leaf collection |
11. Book Page Autumn Wreath
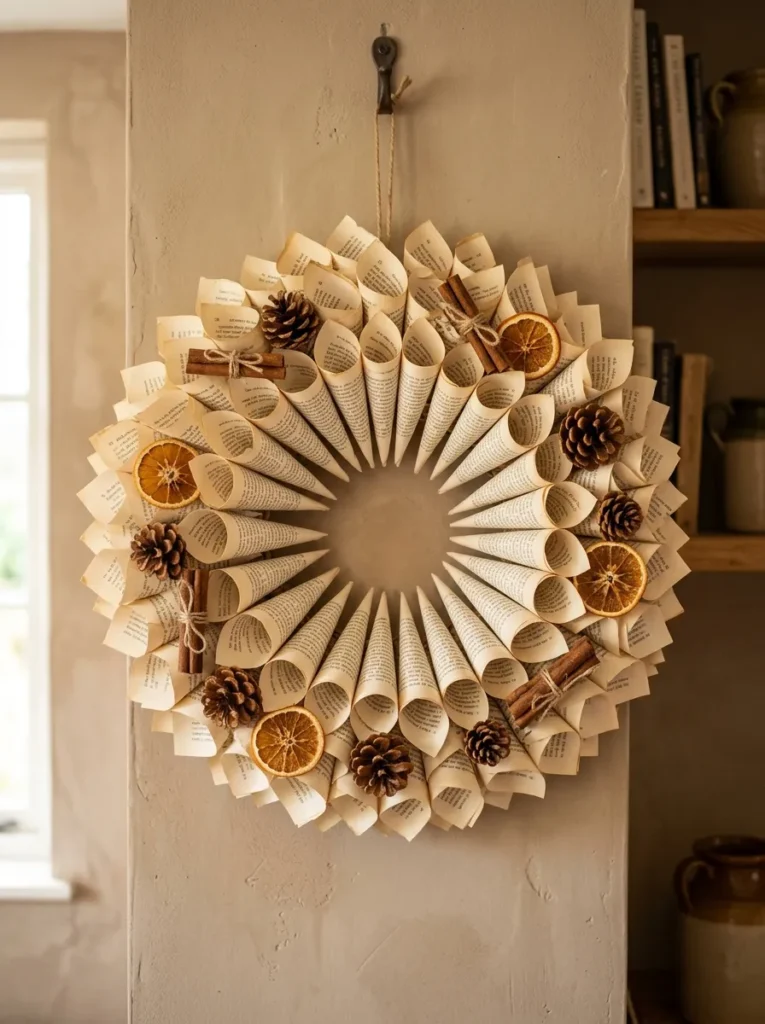
Vibe: Warm and autumnal — the wreath that costs a few dollars in materials and reads as a seasonal installation of genuine visual richness.
Why it works: The book page cone wreath is the book DIY project that most effectively uses the repetition of a simple unit — the rolled page cone — to create a large-scale decorative object whose visual richness is the product of the number and density of its repeated elements rather than the complexity of any individual element. A single rolled book page cone is a simple, unprepossessing object; two hundred rolled cones arranged in an overlapping circle create a wreath of extraordinary warmth and texture. The book page’s off-white ivory tone reads as the warm neutral that makes the wreath work with any wall color and any autumn palette — it is the warm, aged version of white paper that coordinates with the harvest tones of the seasonal botanical additions.
How to get it: Roll triangular page sections (cut from the page diagonally to create a triangle approximately 200mm at the base) starting from the widest end, rolling toward the point and securing with a hot glue bead at the tip. Attach the cones to a 350mm wire wreath frame using hot glue, starting at the inner edge and working outward in concentric circles with each cone overlapping the previous. Press dried pine cones, cinnamon sticks, and dried orange slices into gaps in the cone coverage while the hot glue is still warm.
How long it takes: 4–5 hours.
Cost: $15–25.
Shop the Look
| Product |
|---|
| Wire wreath frame 350mm |
| Hot glue gun and sticks |
| Dried pine cone collection |
| Dried orange slice pack |
| Cinnamon stick bundle |
12. Stacked Book Pumpkin Table Centerpiece
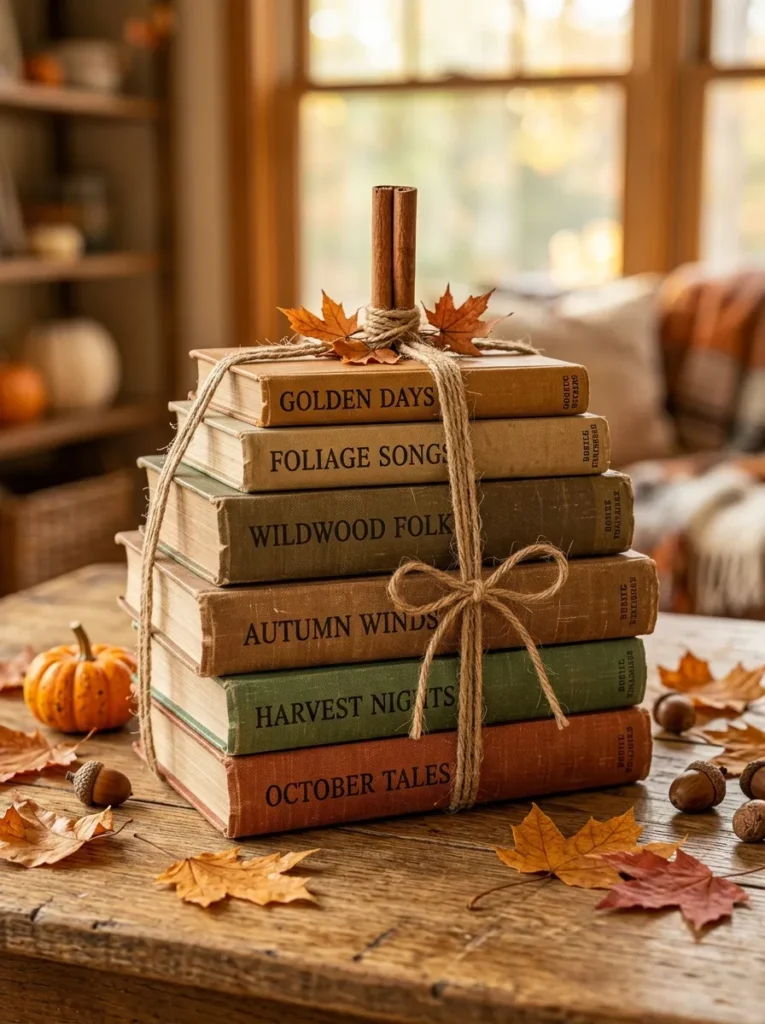
Vibe: Warm and playful — the autumn centerpiece that reveals itself as a pumpkin made of books only on close inspection.
Why it works: The stacked book pumpkin is the book DIY project that most cleverly uses the book stack’s natural visual qualities — the graduated height of differently sized books, the visible spines creating vertical segments, the overall rounded form of a tall book stack — to suggest the pumpkin’s characteristic silhouette through material illusion rather than direct imitation. The project requires no modification to the books themselves, no adhesive, and no irreversible transformation — it is a purely compositional book DIY that can be assembled and disassembled each autumn without any permanent change to the books used. The cinnamon stick stem is the one small added element that most powerfully completes the pumpkin reading — without the stem, the book stack is merely a stack; with the stem, the visual pun is complete.
How to get it: Select books with the widest books in the center of the stack and narrower books at the top and bottom to create the pumpkin’s wider-at-middle silhouette. Remove the dust jackets from hardcovers for the most authentic vintage spine appearance. Wind natural twine around the stack’s circumference at three horizontal positions (top, middle, and bottom) and tie off at the back — the twine creates the visual suggestion of pumpkin segment divisions without permanently affecting the books.
How long it takes: 20 minutes.
Cost: Zero — uses books already owned.
Shop the Look
| Product |
|---|
| Natural twine |
| Cinnamon sticks |
| Dried twig natural |
| Vintage hardcover collection |
| Autumn leaf scatter |
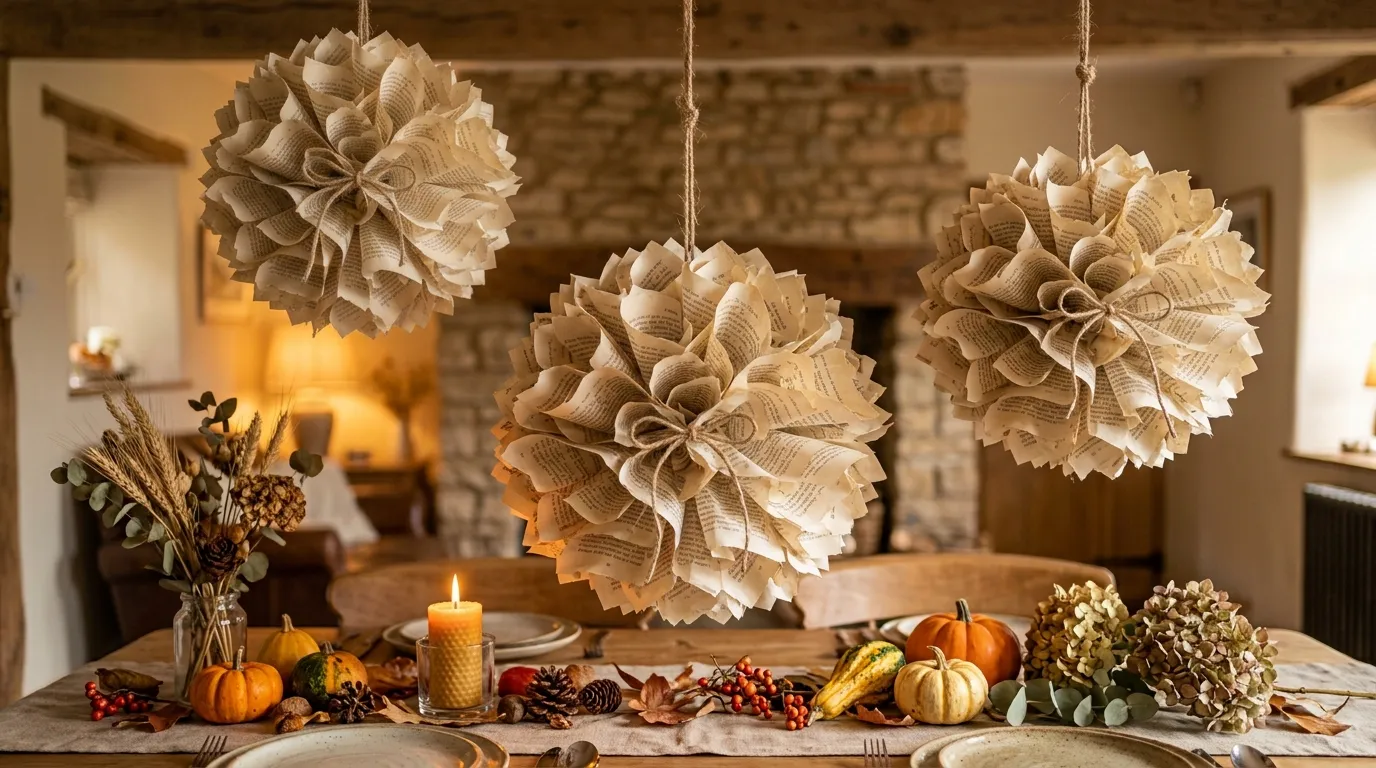
13. Book Page Tissue Paper Pompoms for Autumn Parties
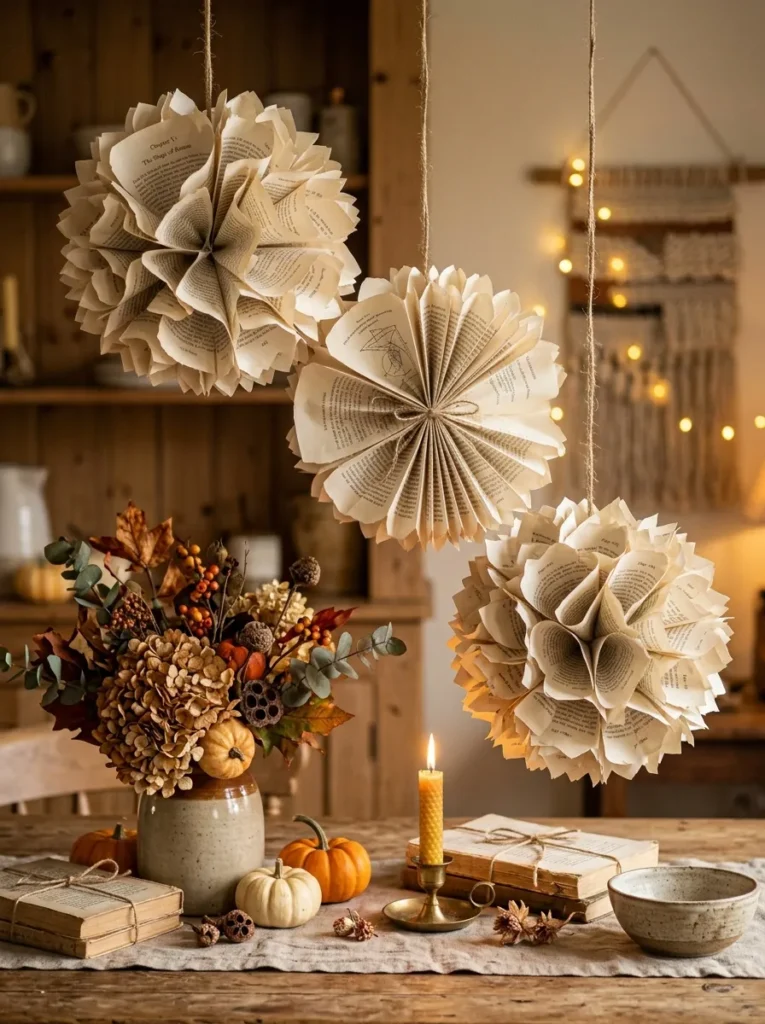
Vibe: Festive and warm — the party decoration that reads as handmade, personal, and exactly right for an autumn celebration.
Why it works: Book page pompoms are the book DIY project that most effectively scales the book page’s visual qualities to a room-scale decoration — a single book page is a small, undistinguished surface; fifteen book pages accordion-folded and gathered into a pompom become a warm, textured, room-scale decorative object whose ivory tone and typographic texture read as specifically sophisticated compared to colored tissue paper alternatives. The book page pompom’s warm ivory color works as a party decoration in a way that plain white tissue pompoms do not — the warmth of the aged page coordinates naturally with autumn’s warm palette of amber, terracotta, and deep burgundy, while pure white would create a temperature conflict with the autumn aesthetic.
How to get it: Stack 12–15 book pages in a uniform pile and accordion-fold the entire stack in 35–40mm folds. Tie a length of natural twine around the stack’s center, leaving a long hanging length above. Cut the fold ends into a rounded or pointed petal shape with scissors. Gently separate the individual page layers on each side of the center gathering, working one layer at a time, until the full pompom sphere is formed. Hang at varied lengths using the twine attached at the center gathering point.
How long it takes: 20–30 minutes per pompom.
Cost: $3–5 per pompom.
Shop the Look
| Product |
|---|
| Natural twine for hanging |
| Scissors sharp |
| Vintage book page supply |
| Command hook ceiling |
| Autumn table decoration set |
Winter Book DIY Ideas
14. Book Spine Christmas Tree
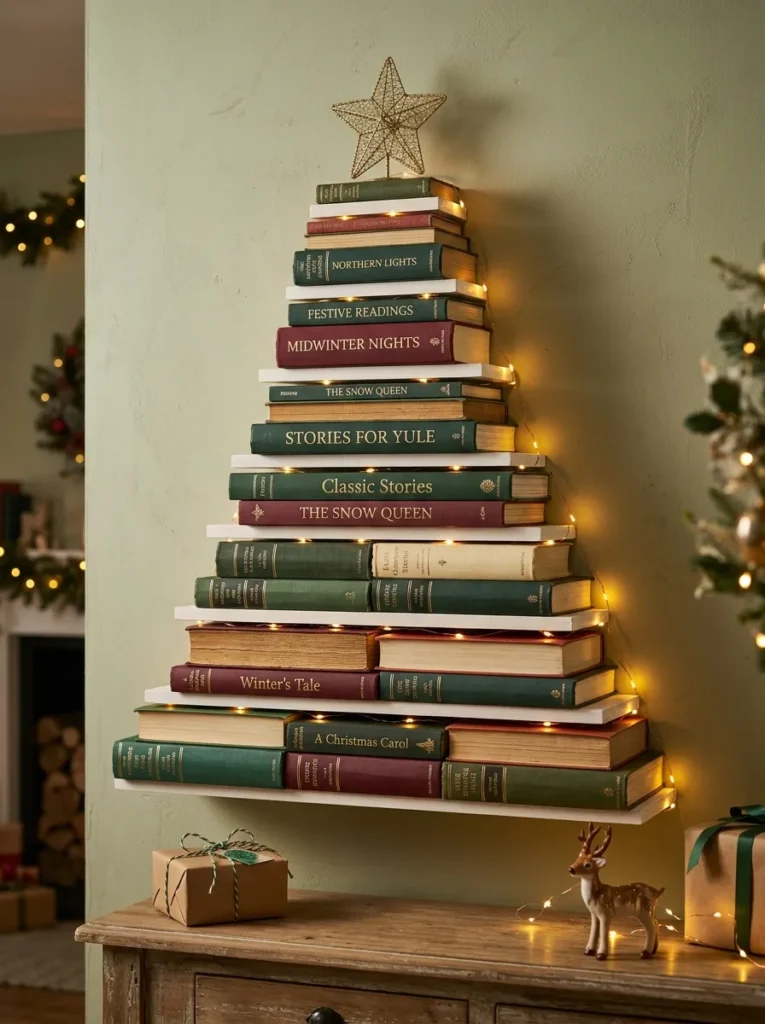
Vibe: Warm and literary — the Christmas tree for the book lover’s home that makes the book collection into the decoration.
Why it works: The book spine Christmas tree is the book DIY project that most cleverly uses the existing visual qualities of a book collection — the varied colors of the spines, the varied widths of the books, the graduated heights achievable by stacking — to create a seasonal decoration whose design content is the books themselves rather than anything applied to them. This zero-modification approach is the most respectful treatment of the books as objects in their own right: the books are not altered, not damaged, and not used as mere craft material — they are displayed in a designed composition that honors their character as books while exploiting that character for seasonal effect. The book collection’s naturally occurring color variation typically includes sufficient deep green, burgundy, and warm ivory to create an authentically Christmas palette without any color selection beyond the arrangement of existing shelved books.
How to get it: Install three to five picture ledges on the wall in a triangular arrangement — the bottom ledge at 800mm height accommodating the widest books (600mm of books), each subsequent ledge 200mm higher and 80mm narrower than the one below. Arrange books on each ledge spine-outward, selecting the widest books for the base ledge and progressively narrower books for each level above. Weave warm copper fairy lights between the ledges. Attach a star ornament to the wall at the tree’s apex using a small Command hook.
How long it takes: 2 hours including ledge installation.
Cost: $30–50 for picture ledges plus fairy lights.
Shop the Look
| Product |
|---|
| Picture ledge set natural timber |
| Copper fairy lights warm |
| Christmas star ornament |
| Command hooks ceiling |
| Book collection warm spines |
15. Literary Advent Calendar with Book Recommendations
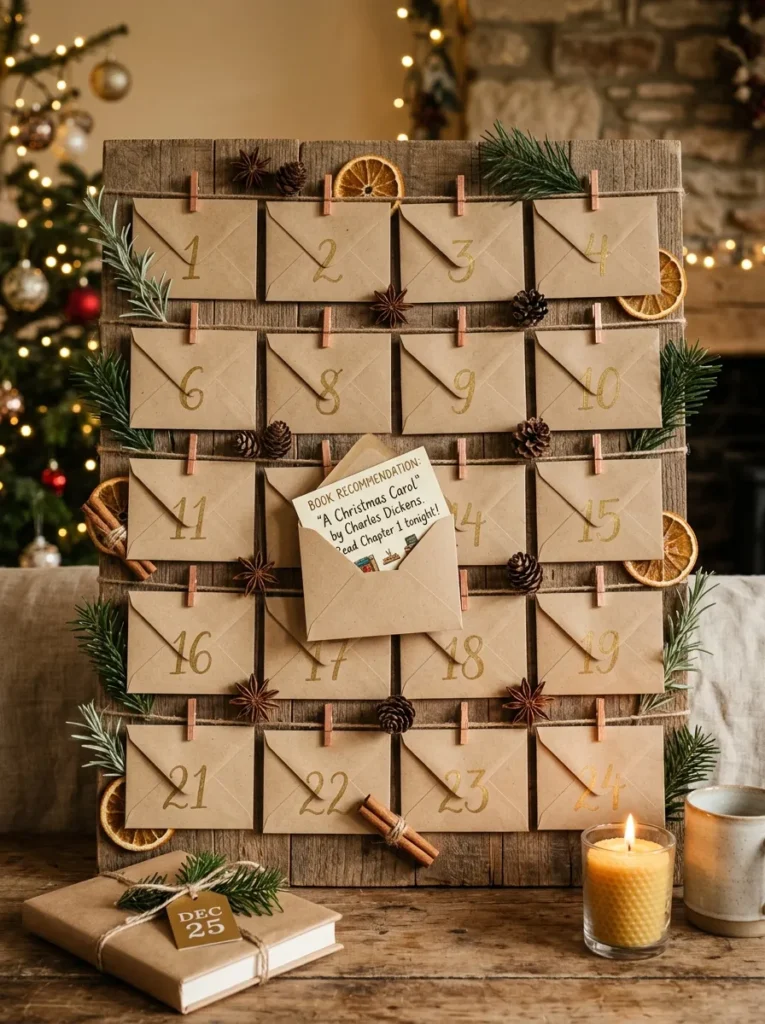
Vibe: Warm and anticipatory — the advent calendar that makes December’s daily ritual a reading discovery rather than a chocolate consumption.
Why it works: The literary advent calendar is the book DIY project that most completely makes the book’s content — its literary world, its reading recommendations, its quotes and passages — into the primary design material rather than using the book’s physical material. Each card within the numbered envelope carries a specific book recommendation suited to that day’s place in the seasonal countdown, a meaningful passage from a winter-appropriate text, or a reading-related activity (a bookshop visit, a rereading of a childhood favorite, a library card application). The advent calendar format’s daily revelation structure makes the reading recommendations feel like genuine gifts received progressively across the month rather than a single reading list provided all at once.
How to get it: Fill each of the 24 envelopes with one of: a book recommendation card (book title, author, and three reasons to read it written on a small card), a short extracted passage from a seasonal literary text, a reading-related activity card (visit a specific bookshop, reread one chapter of a specific book, write a letter), or a small gift for readers (a handmade bookmark, a tea bag for reading accompaniment, a book token). Number each envelope 1–24 in gold ink before sealing and arrange in the 4×6 grid.
How long it takes: 3–4 hours for preparation of all 24 cards.
Cost: $20–35.
Shop the Look
| Product |
|---|
| Kraft paper envelope small set |
| Gold ink pen number |
| Copper miniature peg set |
| Linen backing board small |
| Dried rosemary stems |
16. Folded Book Page Angel or Star Ornament
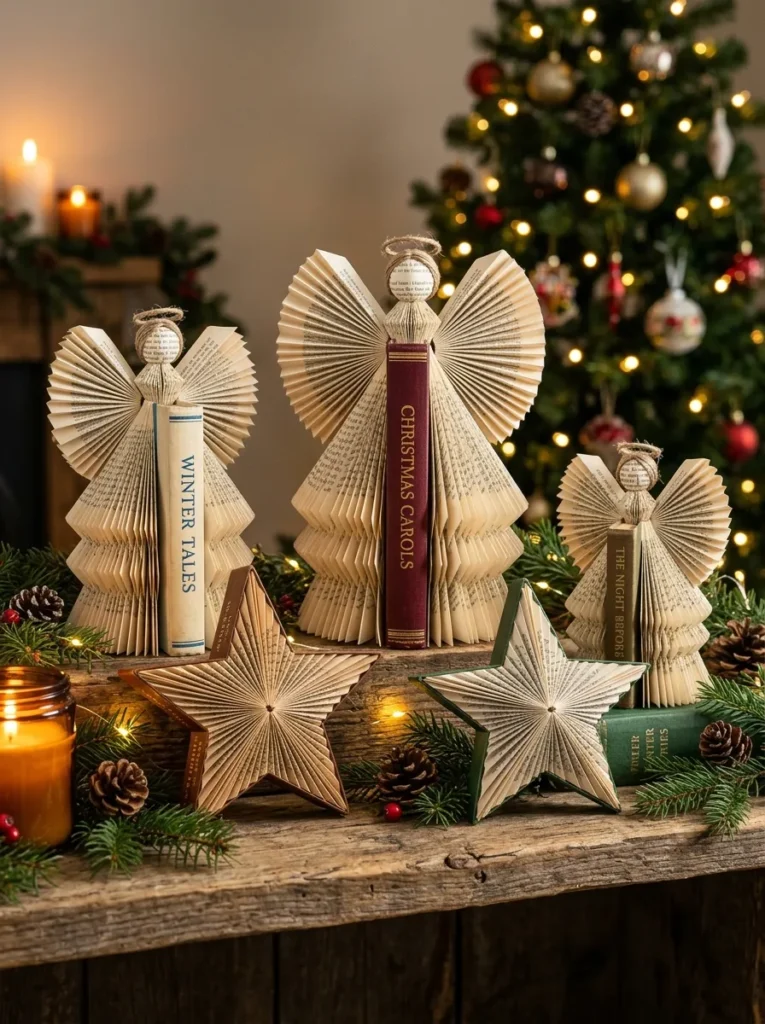
Vibe: Warm and handcrafted — the Christmas ornament that takes the book as its complete structural form and transforms it into a seasonal sculpture.
Why it works: The folded book angel or star is the book DIY project that most dramatically demonstrates the structural transformation possible from a single intact book — by folding every page of a standard hardcover to a precise angle, the book transforms from a flat stack of pages into a three-dimensional sculptural form whose silhouette is immediately recognizable (as an angel figure or a five-pointed star) while remaining entirely composed of the book’s own pages. The book spine serves as the angel’s body (the dress visible from the front) while the folded pages create the wing and skirt forms — this specific use of the spine’s position and visual character as the angel’s central vertical element is the design decision that most cleverly coordinates the book’s existing structure with the intended sculptural form.
How to get it: Use a hardcover book of minimum 200 pages — below this page count, the folded form lacks sufficient material to complete the full three-dimensional figure. For the angel, fold each page in two steps: fold the top corner down to the spine, then fold the resulting triangle down again to create a sharper downward point. For the star, fold each page in a different pattern that creates an outward-pointing point — the specific fold pattern determines the star’s proportions and requires a folding template or diagram. Both forms require precise, consistent folding across all pages — inconsistent fold depths create an irregular, unresolved form.
How long it takes: 2–3 hours per figure.
Cost: $0 using books already owned.
Shop the Look
| Product |
|---|
| Hardcover book 200+ pages |
| Bone folder tool |
| Folding pattern diagram |
| Evergreen sprig display |
| Clear acrylic spray sealer |
17. Book Page Gift Tags with Wax Seal
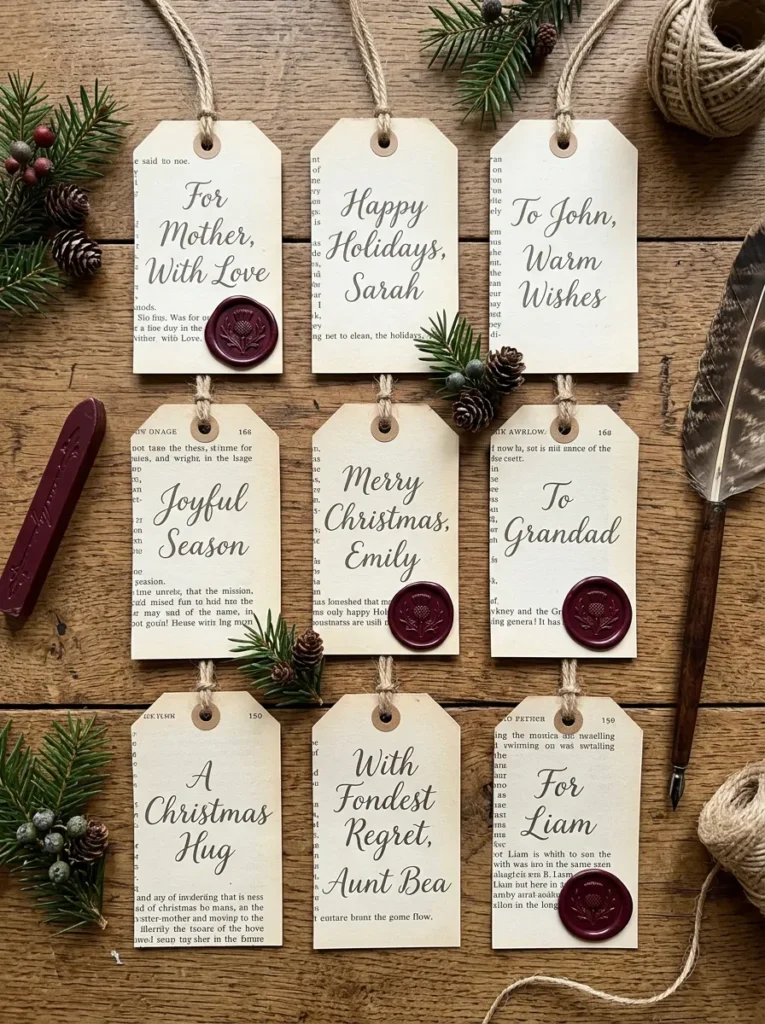
Vibe: Warm and formal — the gift tag that makes every gift it labels feel like it was chosen with exceptional care and presented with exceptional thought.
Why it works: Book page gift tags with wax seals are the book DIY project that most elegantly combines two historical traditions of printed and handwritten communication — the printed book page and the sealed correspondence — into a single gift presentation object. The wax seal’s formality is the specific design element that elevates the torn book page tag from a craft project into something that reads as both personal (the book page’s literary character) and ceremonial (the wax seal’s traditional formality). The burgundy or forest green sealing wax coordinates naturally with the book page’s warm ivory in the Christmas color palette, creating the specific combination of warmth and elegance that the Christmas gift presentation tradition aspires to.
How to get it: Cut or tear book page sections to tag size (60mm × 100mm rectangle with a rounded or pointed bottom edge). Punch a 4mm hole at the top center and thread with 150mm of natural twine, knotting at the back. Write the gift message in the lower half of the tag in a fine-tip pen. Apply the wax seal to the upper section of the tag: heat the sealing wax stick with a flame until a coin-sized drop forms on the paper surface, press the seal stamp into the wax, hold for 10 seconds, and lift directly upward. The seal impression should be sharp and complete — practice on scrap paper first.
How long it takes: 5–8 minutes per tag.
Cost: $20–30 for a sealing wax kit that produces 50+ tags.
Shop the Look
| Product |
|---|
| Sealing wax stick burgundy |
| Wax seal stamp set |
| Natural twine |
| Bone folder creasing |
| Vintage pen writing |
18. Cozy Reading Nook with DIY Book-Lined Canopy

Vibe: Deeply cozy and enclosed — the reading nook that answers every human desire for a sheltered, warm, book-surrounded place to sit with a long novel on the coldest evening of the year.
Why it works: The DIY book-lined reading nook canopy is the book DIY project that most ambitiously uses the book collection itself as the primary architectural material of a designed domestic space — the bookshelves are not background storage for the reading nook but the nook’s defining structural and atmospheric element, creating the enclosed, sheltered quality that makes a reading nook feel fundamentally different from a chair placed in an open room. The fairy lights woven between the book spines are the specific lighting element that transforms the bookshelves from daytime book storage to evening warm-glow canopy — the fairy light points visible between the books and behind the spine gaps create the specific quality of warm light emerging from within the books themselves, which is the most atmospherically cozy lighting effect available in any domestic environment.
How to get it: Position two tall bookshelves (minimum 1800mm tall) at a 90-degree angle, creating an interior corner space of approximately 900mm × 900mm — sufficient for a standard armchair with minimal clearance. Install a simple bridge shelf at the same height as the top of both bookshelves, spanning the corner gap and creating the overhead element that completes the nook’s enclosure. Mount a warm LED strip along the bridge shelf’s front edge and route the power cable down the back of one bookshelf. Weave 20 meters of copper wire fairy lights through the books on all three surrounding shelves, concealing the battery pack behind one shelf’s books.
How long it takes: 3–4 hours to set up.
Cost: $40–80 for LED strip and fairy lights (assuming bookshelves already owned).
Shop the Look
| Product |
|---|
| Copper wire fairy lights 20m |
| Warm LED strip front edge |
| Bridge shelf timber |
| Thick wool throw deep cream |
| Beeswax candle pillar |
How to Start Your Book DIY Practice
Your single first move is to visit a charity shop, secondhand bookstore, or estate sale with the specific intention of sourcing books not for reading but for making — selecting two or three vintage encyclopedias, aged hardcovers with decorative spines, or paperback collections whose visual and material qualities make them excellent DIY material rather than reading candidates. This sourcing exercise should be guided by three criteria: the book’s paper quality (thick, aged, warm-ivory paper is more versatile and more beautiful as a DIY material than thin, bright-white modern paper), the book’s cover visual quality (a decorative hardcover spine provides more design content for projects than a plain paperback), and the book’s age (books published before 1980 typically have the warm, aged page quality that most effectively reads as a premium craft material). Most books meeting these criteria cost $0.50–2.00 from charity shops, making book DIY the most cost-effective craft material available at any quality level.
The most common book DIY mistake is using books that are too valuable — either financially or emotionally — as craft material. The ethical principle of book DIY is a simple one: use books that have reached the end of their reading life rather than books whose reading life is ongoing or whose specific copy has irreplaceable sentimental value. Obsolete encyclopedias, multiple copies of the same title, water-damaged books that are unreadable, and books with no likely second reader are all appropriate DIY material; first editions, inscribed family copies, and currently in-print books with active reading lives are not. The secondhand market provides a continuous supply of appropriate book DIY material at negligible cost without requiring the sacrifice of any book that is valued as a book.
Three specific investments under $30 that most significantly expand the range of book DIY projects available: (1) A sealing wax kit with three to four colored wax sticks and two stamp designs ($15–25) opens the entire category of book page gift presentation projects (Ideas 17 and 8) and provides a high-quality finishing detail that elevates any book paper craft; (2) A quality hot glue gun ($15–20) is the construction tool that most enables the assembly-based book DIY projects (Ideas 11, 5, and 16) whose completion speed and structural reliability depends entirely on hot glue’s immediate bond; (3) A bone folder ($5–10) is the single tool that most improves the quality of any folded book page project (Ideas 2, 16, and 13), producing crisp, precise folds that finger-pressing cannot achieve on thick aged paper.
Realistically, a complete seasonal book DIY practice — one significant project per season, using secondhand book material sourced for $5–10 per season — costs approximately $50–100 annually in craft materials (glue, wire, stamps, ribbon, pots) beyond the near-zero cost of the book material itself. Individual projects range from the nearly zero-cost (stacked book pumpkin, book page gift wrapping, literary advent calendar) to the more materially invested (book spine Christmas tree with purchased picture ledges, reading nook canopy with LED and fairy lights). Most people begin with a single project that matches their existing skill level — the pressed wildflower bookmark for beginners, the decoupage terracotta pot for intermediate crafters, and the folded book page angel or altered book journal for more experienced makers — and discover in the making of that first project the specific quality of the book as a DIY material that makes all subsequent projects worth attempting.
Frequently Asked Questions About Book DIY Projects
Which books are best for DIY craft projects?
The books best suited to DIY craft projects are those whose physical properties and cultural status make them appropriate for transformation rather than preservation. Obsolete encyclopedias and reference books (pre-1990 editions of general encyclopedias, out-of-date medical or legal references, superseded travel guides) are the most suitable because they are simultaneously abundant, inexpensive, and without active reading value; their large format and thick, warm-toned pages make them excellent material for large-scale projects like wreaths, pompoms, and bunting. Old hardcovers with decorative spines are the best material for projects that exploit the spine’s visual quality (book spine Christmas tree, stacked book pumpkin). Thin-paged paperbacks from the 1950s–1970s produce the warmest, most aged-appearing page tone for flat projects like gift wrapping, bookmarks, and decoupage.
How do I source books for DIY without spending much money?
The most cost-effective book DIY material sources are: charity shops and op-shops ($0.50–2.00 per book, with regular turnover of fresh stock), library book sales (annual events where libraries sell withdrawn stock at $0.50 or less per book), estate sales and deceased estate auctions (bulk lots of books available at very low per-book prices), and family and neighborhood book exchanges (free from neighbors and friends clearing book collections). Online platforms including local Facebook groups and community Buy Nothing groups provide free books from local households that have completed their reading life. Avoid purchasing books specifically for crafting from full-price booksellers — the purpose of sourcing from secondhand channels is both the negligible cost and the ethical appropriateness of using books that have genuinely reached the end of their active reading life.
Are any book DIY projects suitable for children?
Several book DIY projects are directly suitable for children, depending on age and supervision level. The pressed wildflower bookmark (Idea 1) is appropriate for children aged 6+ with adult supervision of the Mod Podge application step. The book page gift wrapping (Idea 8) is appropriate for children aged 4+ as a wrapping-paper activity with minimal craft skill required. The stacked book pumpkin (Idea 12) requires no tools and no materials beyond the books themselves, making it appropriate for any age as a stacking and arranging activity. The seed paper card-making (Idea 3) is appropriate for children aged 8+ with adult supervision of the blending step. The folded page projects (Ideas 16 and 11) are appropriate for older children aged 12+ with patience for repetitive precise folding. Safety considerations: projects involving heat (hot glue, sealing wax) and cutting tools (craft knives) require adult supervision or adult operation for all age groups.
How do I make book DIY projects look professional rather than homemade?
The three qualities that most consistently distinguish professionally executed book DIY projects from amateur ones are: material quality (using genuinely aged, warm-toned vintage book pages rather than new bright-white copy paper, even when the project specification allows any paper), finishing precision (applying Mod Podge or adhesive in thin, even coats rather than thick, uneven applications that create bubbles and wrinkles), and compositional restraint (resisting the temptation to add more elements than the project’s composition requires — a bookmark with one pressed flower reads as curated; a bookmark with six pressed flowers reads as overcrowded). The bone folder is the single tool that most improves the professional quality of any folded paper project by producing the crisp, precise fold that distinguishes a professional paper craft from an amateur one.
Can book DIY projects be made as gifts?
Yes — many book DIY projects are the most personally meaningful gifts available in the handmade category precisely because they combine the maker’s time investment with the book’s specific cultural resonance. The most successful book DIY gifts are those that are specifically matched to the recipient’s reading interests: a pressed flower bookmark made from the pages of the recipient’s favorite book, a seed paper card embedded with the seeds of a plant significant to the recipient, or an altered book journal based on a book the recipient loves are all gifts that communicate genuine personal knowledge of the recipient as a reader and as a person. The literary advent calendar (Idea 15) is one of the most beloved book DIY gifts available because its 24 daily revelations each communicate a specific reading recommendation that reflects the maker’s knowledge of and care for the recipient’s literary taste.
Ready to Start Your Book DIY Practice?
These 18 ideas span every season and every skill level — from a spring afternoon pressing wildflowers into bookmark form and a summer evening painting coastal watercolors onto aged encyclopedia pages, to an autumn gathering of pine cones and cinnamon for a book page wreath and a winter evening folding an entire hardcover into an angel silhouette that will stand on the mantelpiece until the Christmas crates are packed away — so whether you are a first-time crafter whose only tool is a pair of scissors and a jar of Mod Podge, or an experienced maker looking for a creative project that uses the specific material richness of aged paper and vintage printing, there is a genuinely achievable, genuinely beautiful book DIY idea here for your specific skill level, your specific season, and the specific books that have been waiting in your home’s surplus collection for a second life as beautiful things. The practice begins not with a skill or a tool but with a visit to the nearest charity shop, a shelf of obsolete encyclopedias at $1.50 each, and the recognition that the most beautiful craft material available in any price range is one that already holds the accumulated warmth of every reading life it has touched. Today’s specific action: identify three books in your home that have genuinely reached the end of their reading life — books that will not be read again, that hold no irreplaceable sentimental value, and that are too worn or outdated for donation — and place them on your craft table as the beginning of your book DIY material supply. Those three books are the start of a seasonal practice that costs almost nothing, produces genuinely beautiful things, and treats the book’s material richness with exactly the creative respect it deserves.