17 Button Crafts for Adults You’ll Love to Make
Button crafts for adults are creative projects that use buttons — vintage, new, mismatched, or curated by color and size — as a primary or accent material in handmade objects ranging from jewelry and home decor to textile art, framed compositions, and functional accessories. This article gives you exactly 17 ideas spanning jewelry, wall art, home accents, textile projects, gift ideas, and seasonal makes so every crafter finds a project that fits their skill level, material collection, and creative sensibility.
There is a particular pleasure in a button — the weight of it in the palm, the variety of its form (shank or flat, two-hole or four), the way a glass button from 1940 catches light differently than a plastic one from a pound store, and the accumulated domestic history that a jar of inherited buttons carries without needing to explain itself. Button crafts give all of that pleasure a direction and a result. Here are 17 ideas worth saving — and making.
Why Button Crafts for Adults Work So Well
Buttons as a craft material have an unusually long history in decorative and functional making — carved shell, bone, and ivory buttons appear in archaeological records dating to the Indus Valley civilization (approximately 2000 BCE), and their use as decorative rather than purely functional objects is documented continuously from medieval European garments through Victorian mourning jewelry through the domestic sewing rooms of the 20th century. The contemporary button craft revival sits within the broader handmade and slow-craft movement but has a specific material advantage that most craft categories lack: the raw material — buttons — is abundantly and freely available through inherited sewing boxes, charity shops, estate sales, vintage markets, and the haberdashery sections of fabric stores, meaning the starting collection for most button crafters costs nothing or very little.
The design potential of buttons as a craft material is significantly broader than their functional origin suggests. Buttons function simultaneously as color swatches (a collection of blue buttons in varied tones is a more textural and dimensional color field than any paint), as textural elements (flat buttons read as graphic; domed buttons cast small shadows; shank buttons stand proud of a surface), as pattern elements (concentric rings of buttons in graduated sizes read as a target; rows of uniform flat buttons read as tile; random mixed-size arrangements read as terrazzo), and as material references (vintage pearl buttons carry historical weight; bright primary-color plastic buttons carry mid-century domestic associations; natural shell buttons carry coastal material resonance). The crafts that use buttons most successfully exploit one or more of these properties deliberately rather than treating buttons as interchangeable decorative dots.
Button crafts have maintained consistent presence in adult craft publications and online communities — on Pinterest, the “button crafts” category generates tens of millions of annual views, with adult-oriented projects (jewelry, framed art, home accessories) consistently outperforming the children’s project category in saves and shares. The cultural context is the broader resurgence of slow making as an antidote to mass-production and digital saturation — button crafts specifically attract makers interested in the tactile, the vintage, and the material specificity of found objects, as well as those motivated by the sustainability impulse of repurposing and reusing existing materials rather than purchasing new ones.
Small workspaces and limited tool requirements make button crafts particularly accessible — the majority of the projects in this list require no specialist equipment beyond basic jewelry-making tools (wire cutters, round-nose pliers), standard adhesives (strong clear-drying craft glue, E6000), and household materials (picture frames, cork board, foam board, canvas). Most projects can be completed at a kitchen table in a single session of two to four hours. The honest consideration for very fine or intricate work: button jewelry involving wire wrapping or beading requires adequate lighting and reasonable manual dexterity — if fine detail work is challenging, the larger-format projects (mosaic frames, button trees, textile additions) offer the same creative satisfaction at a more accessible physical scale.
Style at a Glance
| Element | Craft Function | Design Edge |
|---|---|---|
| Philosophy | Found material given new purpose | Color, texture, and history in one object |
| Materials | Vintage buttons, wire, glue, thread | Shell, glass, pearl, fabric-covered |
| Color Palette | Curated monochrome, rainbow sorted, natural neutral |
1. Vintage Button Brooch with Wire-Wrapped Stack
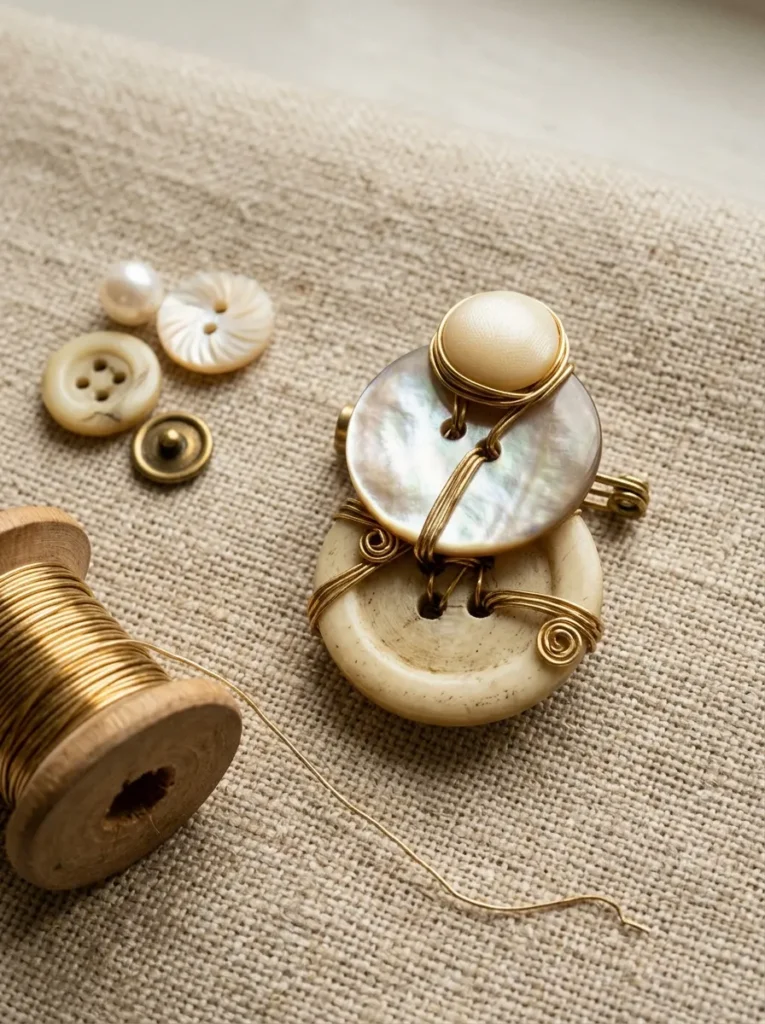
Vibe: The brooch feels quietly luxurious — the kind of thing found in a velvet box at an estate sale rather than in a craft shop.
Why it works: A stacked button brooch applies the jewelry design principle of size graduation — arranging three or more buttons from largest at the base to smallest at the top creates the visual hierarchy of a sculptural object rather than a flat decorative element, and the small shadow cast by each button’s edge on the one below adds dimensional quality. Wire wrapping serves the dual function of securing the stack and adding a decorative metallic element that elevates the material quality of the buttons it holds — thin gold craft wire suggests traditional metalwork techniques at a fraction of the skill requirement. Vintage pearl and ivory buttons are the most brooch-appropriate material in the button crafting canon because their surface quality (slight translucency, natural sheen) reads as genuinely jewelry-like rather than decorative.
How to get it: Select three buttons in the same color family but graduated sizes (approximately 30mm, 20mm, and 12mm). Thread thin 28-gauge gold craft wire through one hole of the largest button, up through the corresponding hole of the medium button, then through the small button, and wrap the wire ends tightly around all three layers at the center point between the holes. Continue wrapping in a figure-eight pattern between and around the stack until secure, then coil the wire end tightly and tuck it beneath the base button. Glue a flat-back bar pin brooch finding to the back of the largest button using E6000 adhesive. Allow 24 hours to cure before wearing.
Quick Win: A pack of 50 assorted vintage-style pearl and ivory buttons ($6–10) from a haberdashery or online button supplier provides enough material for five to six brooches — enough for personal use and gifts from a single inexpensive purchase.
Shop The Look
| Product |
|---|
| Vintage pearl button set assorted sizes cream |
| Gold craft wire 28 gauge thin jewelry |
| Bar pin brooch finding set jewelry |
| E6000 adhesive clear strong craft |
| Natural linen display fabric yard |
Also view: 24 Easy Book Page Crafts That Look Expensive
2. Button Mosaic Picture Fram
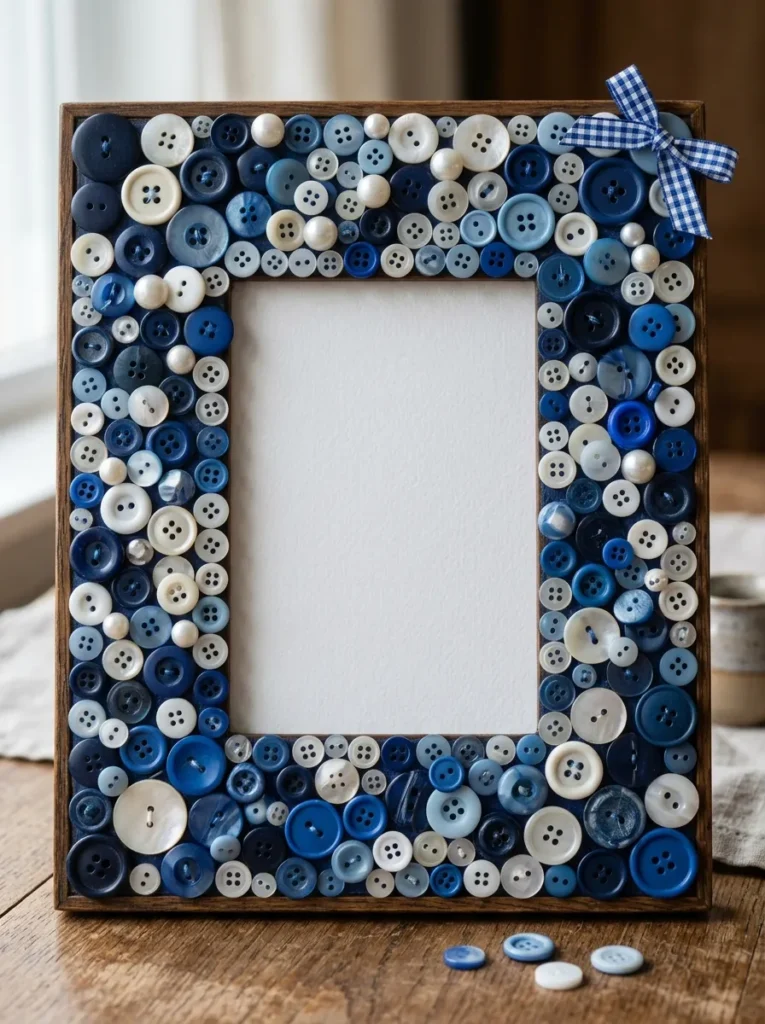
Vibe: The frame feels collected — as though someone spent years finding exactly these blue buttons for exactly this purpose.
Why it works: A button mosaic picture frame applies the visual art principle of tesserae arrangement — treating each button as a tile in a mosaic composition and arranging them for color flow, size balance, and visual rhythm across the frame surface. A monochromatic palette (all blues in varied tones and finishes, or all greens, or all warm neutrals) produces a more sophisticated result than a multicolor arrangement because the eye reads the subtle variations in tone and finish as richness rather than randomness. Varied button heights (flat versus domed versus shank) create the surface texture that catches light and shadow, making the frame visually dynamic at close range in a way that a flat decoupage surface cannot.
How to get it: Source a wide-profile wooden picture frame (minimum 4 cm frame width to accommodate button arrangement). Sort your button collection by color into the chosen palette. Working on one frame section at a time, apply strong craft glue (PVA or Mod Podge) to a 5 cm section of frame, then press buttons into the glue, filling every gap with smaller buttons or fragments. Work in from the outer edge and inner opening simultaneously to ensure clean lines at both boundaries. Allow to dry flat for 24 hours before standing upright.
Shop The Look
| Product |
|---|
| Wide profile wooden picture frame 8×10 |
| Blue button assortment set varied sizes |
| PVA craft glue white strong |
| Tweezers set craft precision |
| Mod Podge sealer gloss finish craft |
3. Button Bouquet in a Vase — Floral Wire Stem Display
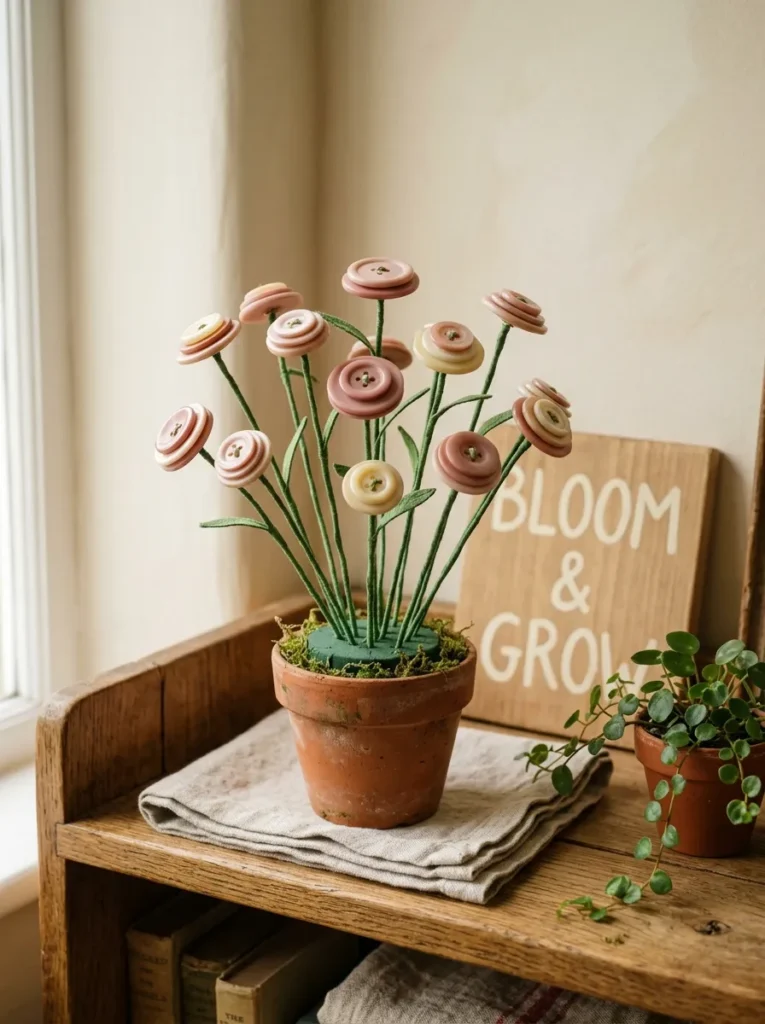
Vibe: The bouquet feels perpetually in bloom — a flower arrangement that never wilts and never needs water.
Why it works: A button flower bouquet applies the craft design principle of material substitution — using buttons as the flower heads in a stem-and-vase arrangement creates a playful reference to floral display while establishing the buttons’ own material identity as the primary aesthetic content. The stacked button flower head (two or three buttons of different sizes threaded onto the same wire stem) creates a center-and-petal visual reading when the smaller button sits concentric to the larger one below — a botanical reference achieved through pure geometry rather than any representational shaping. Varied stem heights (ranging from 15 to 30 cm) mimic the natural variation of a gathered wildflower bunch.
How to get it: For each flower, thread two or three buttons of graduated size onto a 30 cm length of 20-gauge green floral wire, with the smallest button on top. Bend the top 2 cm of wire into a small loop or coil to prevent the smallest button from sliding off. Twist the wire below the buttons tightly for 2–3 cm to secure the stack, then wrap the full stem length in green floral tape. Press a block of dried floral foam into the pot and arrange stems at varied heights, bending some stems slightly for a naturalistic lean. Seal the foam with a thin layer of reindeer moss or fine gravel for a finished pot surface.
Shop The Look
| Product |
|---|
| Assorted button set mixed colors 200 piece |
| Green floral wire 20 gauge 12 inch stems |
| Green floral tape roll self-adhesive |
| Terracotta pot small indoor craft |
| Dried floral foam block craft |
4. Button Alphabet Letters for Personalized Wall Art
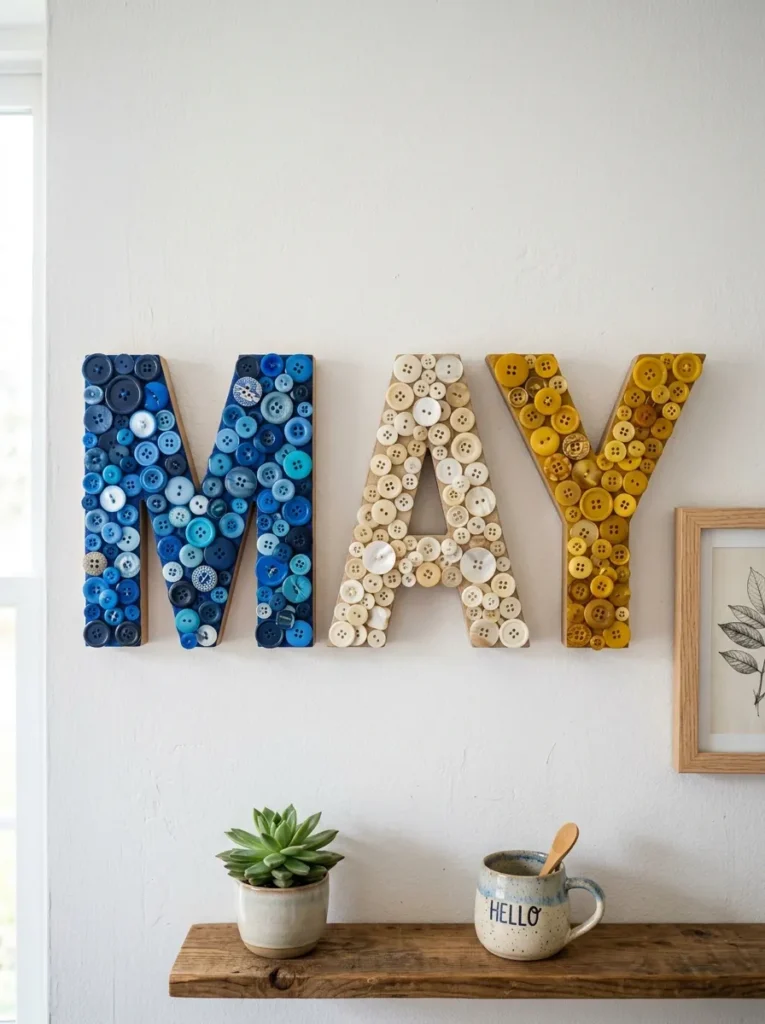
Vibe: The letters feel personal and considered — initials in a material as specific as a curated button collection.
Why it works: Button-covered alphabet letters apply the craft principle of surface transformation through collected material — the letter form provides the compositional structure while the button arrangement within it provides the color, texture, and material content. Each letter in a different color creates a tricolor composition that reads as playful yet designed, particularly when the colors are carefully chosen rather than random. Wooden letter forms provide a stable substrate for button adhesion and maintain the letter’s shape under the weight of multiple layers of buttons — foam letters compress and distort; paper mache letters absorb moisture from adhesive and warp; only wood provides the rigidity that a densely covered surface requires.
How to get it: Source unfinished wooden craft letters (available at most craft stores in sizes from 5 to 30 cm) in the desired initials. Sort buttons into color groups for each letter. Working outward from the letter’s center, apply strong craft adhesive and press buttons in, filling from the edges of the letter form inward. Use smaller buttons to fill the gaps between larger buttons — the goal is complete substrate coverage with no wood visible. Overlap buttons slightly at the letter edges for a clean boundary.
Quick Win: A single color-sorted button set in one dominant hue (100g of blue buttons in varied shades, $5–8) plus one 15cm wooden letter ($3–5) creates a complete personalized initial craft for under $15 that works as a gift or home accent.
Shop The Look
| Product |
|---|
| Unfinished wooden letter set craft 15cm |
| Blue button assortment 100g varied |
| Cream ivory button set 100g craft |
| Mustard yellow button set 100g craft |
| Strong clear craft adhesive gel set |
5. Button and Resin Jewelry — Pendant and Earring Set
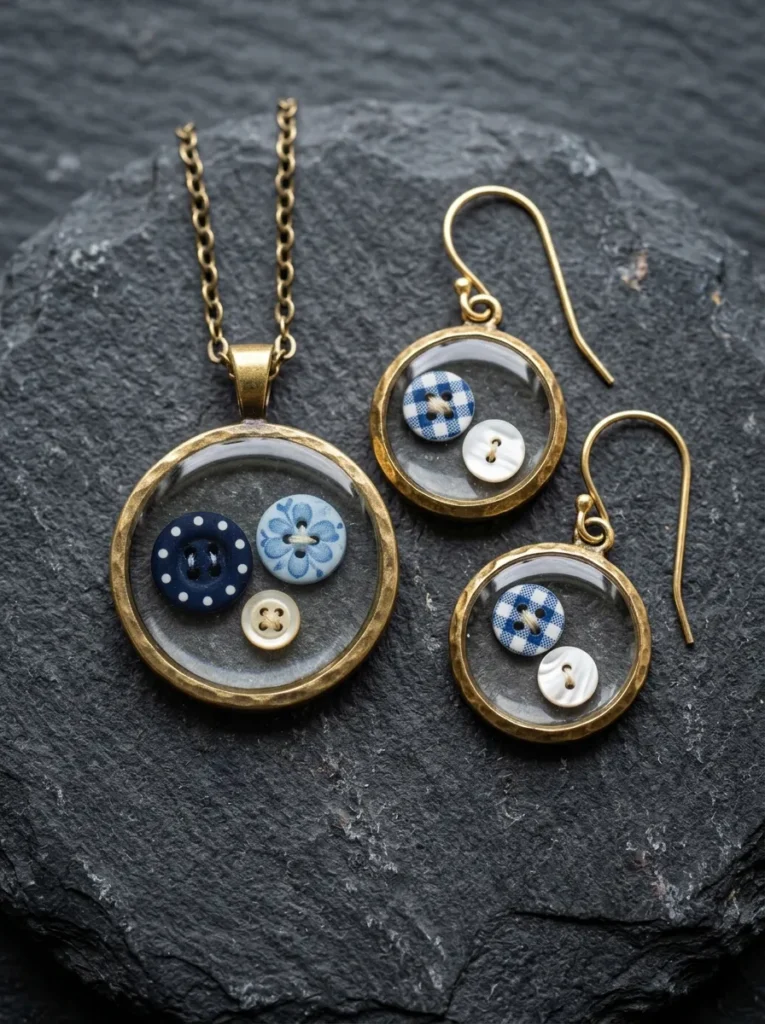
Vibe: The jewelry feels like a tiny aquarium — the buttons suspended in perfect clarity, permanently mid-float.
Why it works: Encasing buttons in clear resin within a bezel setting applies the jewelry design principle of material preservation and magnification — the resin both protects the buttons (which may be fragile antiques) and acts as a lens, making small buttons appear larger and their details more visible than they would be in an unencased state. Embedding buttons at varied depths within the resin creates a three-dimensional quality — the deepest button appears furthest away, creating a sense of spatial dimension in an object only a few millimeters thick. Brass bezels are the most complementary metal choice for vintage pearl and ceramic buttons because brass’s warm yellow tone references the aged hardware of the periods when the most interesting buttons were made.
How to get it: Select very small flat buttons (3–8mm, which fit within standard 20–25mm bezel settings). Place the bezel setting face-down on a silicone mat. Mix clear two-part resin according to the manufacturer’s instructions and pour a first thin layer into the bezel. Allow to partially cure for 20–30 minutes until tacky but not fully set. Place selected buttons face-down onto the tacky first layer at the desired depth positions. Pour a final filling layer of resin to the bezel’s top edge. Allow to cure fully for 24–48 hours before handling.
Shop The Look
| Product |
|---|
| Clear two-part resin kit craft jewelry |
| Round brass bezel setting 20mm 25mm set |
| Tiny vintage button set assorted small |
| Pendant bail finding set gold |
| Earring hook finding set gold craft |
6. Framed Button Rainbow Gradient Art
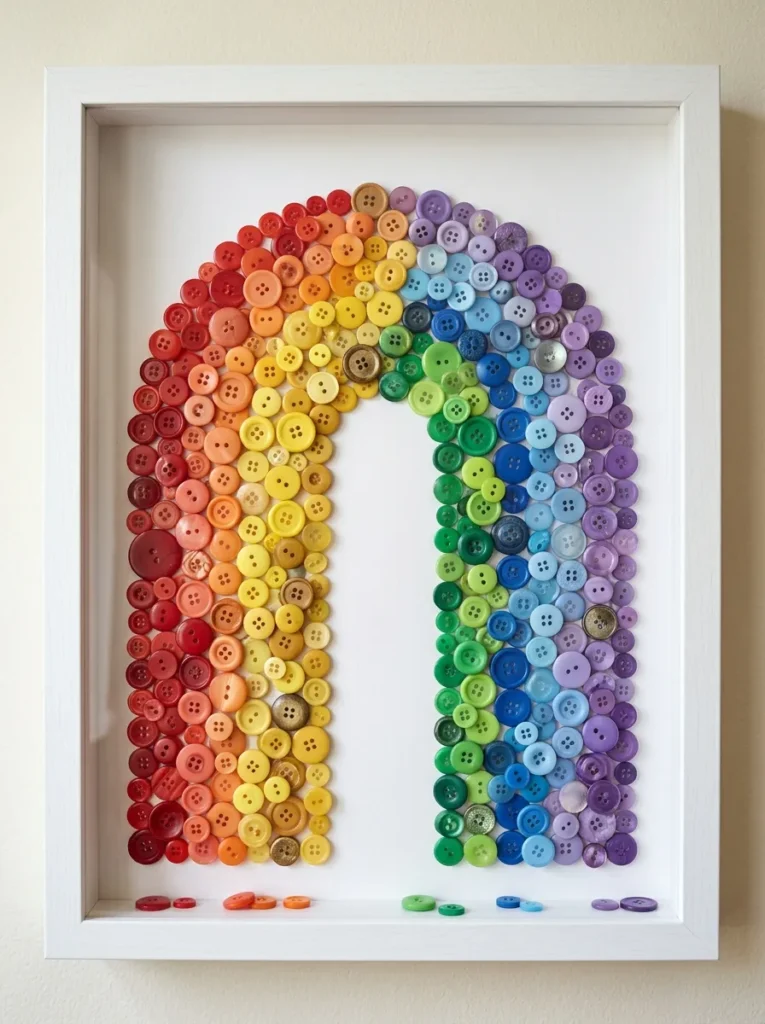
Vibe: The gradient feels organized joy — a rainbow that took weeks to sort and an hour to glue.
Why it works: A rainbow gradient button arrangement applies the visual art principle of chromatic sequence — arranging buttons from red through violet in the natural spectral order creates a composition that the human visual system finds inherently satisfying because it mirrors the sequence of natural light diffraction. Working within each color section with tonal variation (multiple shades and finishes of red in the red section, for instance) adds the richness that distinguishes a considered gradient from a simple color bar. A shadow box frame with significant depth (minimum 40mm) accommodates the varied button heights and creates the shadow depth between buttons that makes the arrangement read as three-dimensional rather than flat.
How to get it: Sort your entire button collection by color into the spectral sequence: red, red-orange, orange, yellow-orange, yellow, yellow-green, green, blue-green, blue, blue-violet, violet. Fill in any color gaps by purchasing small quantities of buttons in the missing hues — a rainbow requires broad coverage to read as complete. Sketch the rainbow arch shape onto the backing paper and work one color section at a time, gluing from the outer edge of the arch inward. Use different button sizes within each section — large buttons at the arch edges, progressively smaller toward the center — for a naturalistic density variation.
Shop The Look
| Product |
|---|
| Shadow box frame deep 30x40cm white |
| Button assortment rainbow 500 piece sorted |
| White mount board backing acid-free |
| PVA adhesive white strong craft |
| Spectral button set sorted by color pre-pack |
7. Button Tree of Life on Canvas
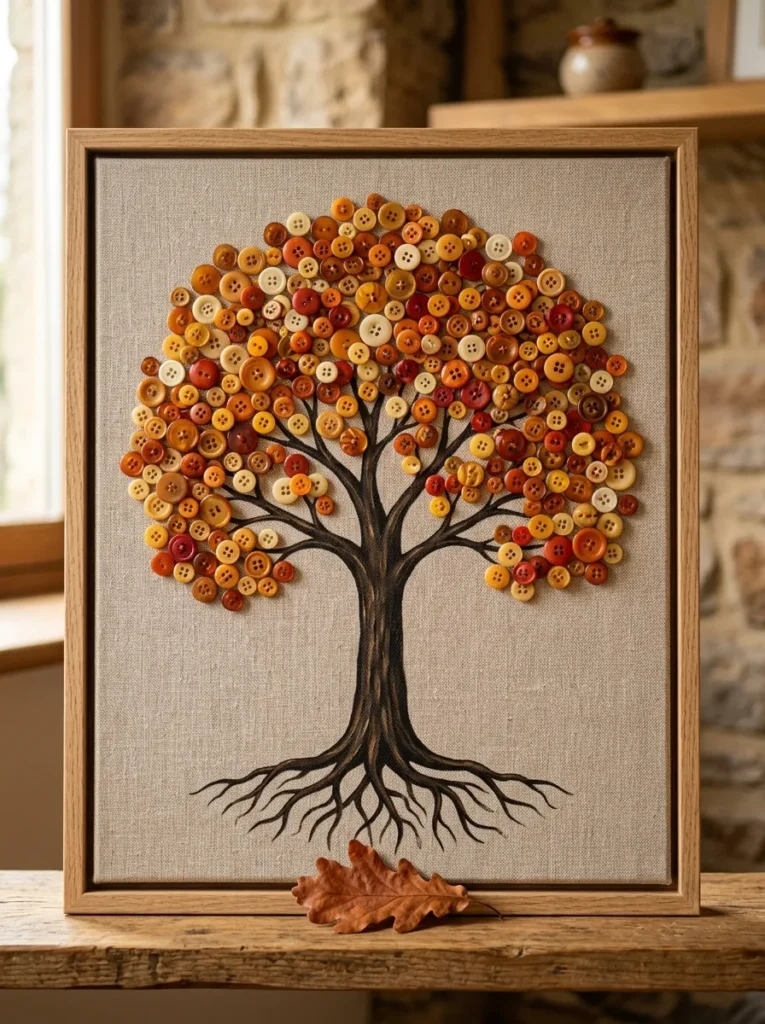
Vibe: The tree feels alive with season — a button autumn that doesn’t fall and doesn’t require raking.
Why it works: A button tree of life applies the craft art principle of material-subject alignment — using small rounded buttons as leaf substitutes in a tree composition works because buttons and leaves share relevant visual properties (small scale relative to the tree, clustered arrangement, varied tone within a color family, rounded form). The painted branch structure provides the compositional skeleton that makes the button clustering legible as foliage — without the branch structure, the same buttons arranged on the canvas would read as an abstract composition rather than a tree. Autumn tones are the most effective palette for this project because the warm amber, orange, and red tones of autumn leaves correspond naturally to the warmest tones in most button collections.
How to get it: Paint or draw the tree structure (trunk, branches, roots) on a stretched canvas using brown-black acrylic paint and a fine brush — keep the branch structure to the canvas’s lower two-thirds to leave the upper third for the button leaf canopy. Allow to dry completely. Sort buttons into the autumn palette and work from the branch tips inward, gluing clusters of buttons in the densest arrangement at the branch junctions (where leaves cluster most thickly) and thinning toward the outer branch tips (where leaves are more sparse). Use varied button sizes — larger buttons toward the tree’s interior, smaller at the canopy edges.
Shop The Look
| Product |
|---|
| Stretched canvas 40x50cm craft |
| Autumn tone button set amber orange red |
| Brown black acrylic paint craft |
| Fine detail paint brush set |
| Strong clear gel adhesive craft |
8. Button-Embellished Textile — Cushion Cover or Tote Bag
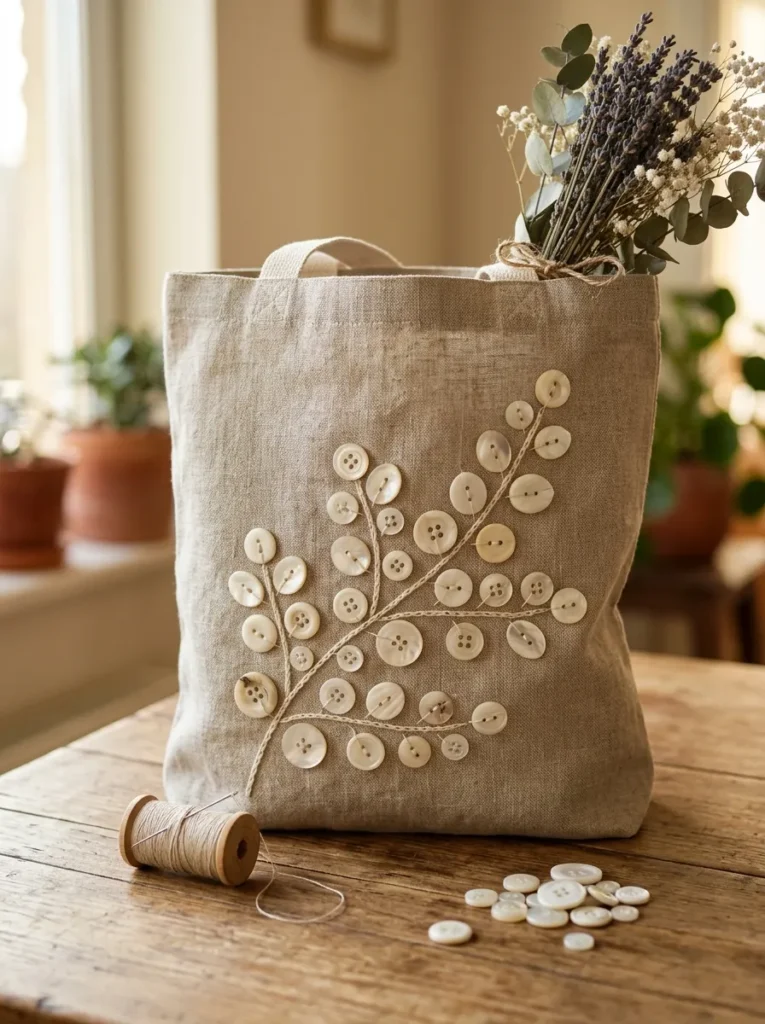
Vibe: The bag feels quietly decorated — the buttons a texture rather than a statement, noticed and then appreciated.
Why it works: Sewing buttons onto a textile in a deliberate pattern applies the fashion and textile design principle of surface embellishment through functional material — buttons are by nature sewn objects, and using them decoratively on fabric is a return to their original material context. A botanical motif (a single branch, a leaf form, a simple floral arrangement) is the most transferable design for button textile embellishment because the individual button reads naturally as a berry, blossom, or bud without requiring any additional representational elements. Natural linen is the best fabric substrate for this approach — its warm oat tone and visible weave texture provides the most complementary backdrop for cream and white vintage buttons.
How to get it: Transfer the design (a simple branch with bud positions marked) onto the linen surface using a water-soluble fabric pen. Using a double length of linen thread and a sharp needle, sew each button through its holes to the fabric in the marked positions, finishing with a firm knot behind the fabric. For a design using 40–60 buttons, allow two to three hours of hand-sewing time. Space buttons closely enough to read as a continuous motif but not so closely that the linen disappears — a 5–10mm gap between adjacent buttons allows the linen ground to contribute to the composition.
Shop The Look
| Product |
|---|
| Natural linen tote bag blank craft |
| Cream white vintage button set 100g |
| Linen thread set natural shade |
| Sharp hand sewing needle set |
| Water soluble fabric pen marking craft |
9. Mosaic Button Coasters from Wooden Discs
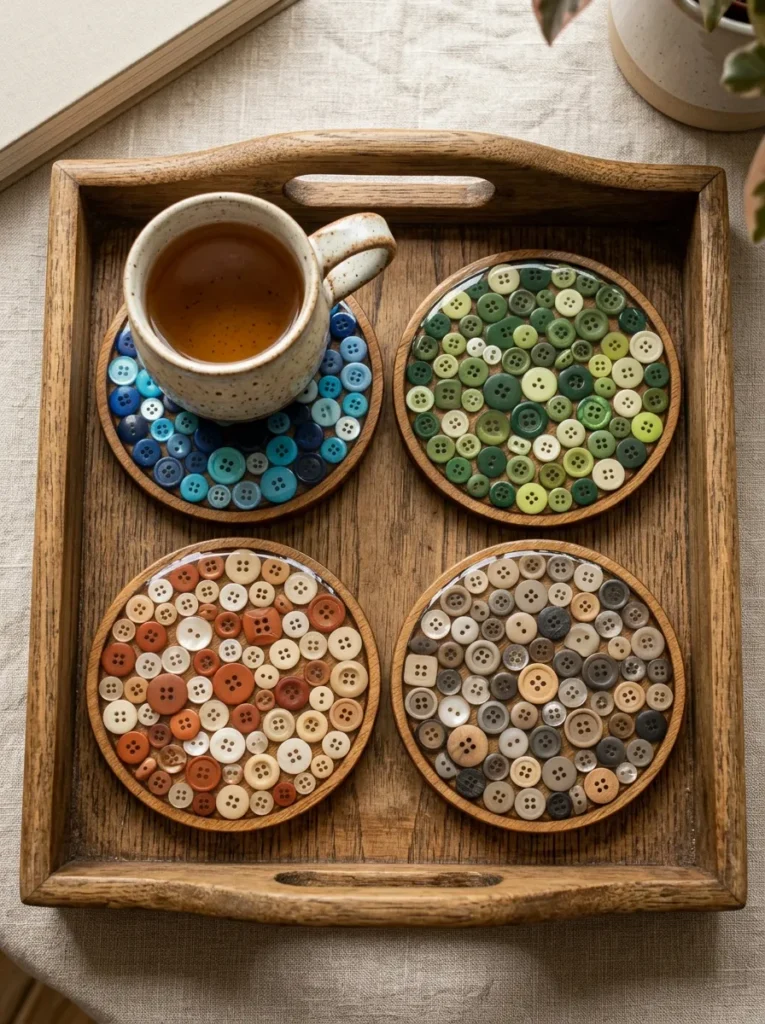
Vibe: The coasters feel like small paintings — the kind of object that prompts guests to turn over and examine before setting their mug down.
Why it works: Button mosaic coasters apply the craft design principle of functional art — an object that performs a practical function (protecting a surface from heat and moisture) while operating as a decorative composition provides double value per making investment. The 10cm diameter wooden disc is the ideal substrate for a button composition because it constrains the design to a manageable scale (20–40 buttons per coaster) while being large enough to accommodate a complete color theme. Sealing the finished button surface with multiple coats of clear polyurethane or bar-top resin is essential for functional use — unsealed buttons absorb moisture and the adhesive bond degrades in contact with hot cups and condensation.
How to get it: Purchase 10cm diameter wooden craft discs (available in packs of 10 from craft suppliers, $6–10 per pack). Apply strong craft adhesive to the disc surface in sections and press buttons into it, working from the outer edge inward. Fill every gap with the smallest available buttons from the palette — the denser the button coverage, the more resolved the finished coaster reads. Allow to dry for 24 hours, then apply three coats of clear waterproof polyurethane sealant (brush-on or spray, allowing full drying between coats). The final coaster surface should be fully sealed with no button gaps that could trap moisture.
Quick Win: A pack of 10 wooden craft discs ($6–10) and 100g of same-tone button assortments ($5–8 per color) in four colors creates a complete set of four themed coasters with materials left over, for under $40 total.
Shop The Look
| Product |
|---|
| Wooden craft disc 10cm set of 10 |
| Strong clear craft adhesive gel |
| Clear waterproof polyurethane sealant brush |
| Blue button assortment small 50g |
| Terracotta button assortment 50g craft |
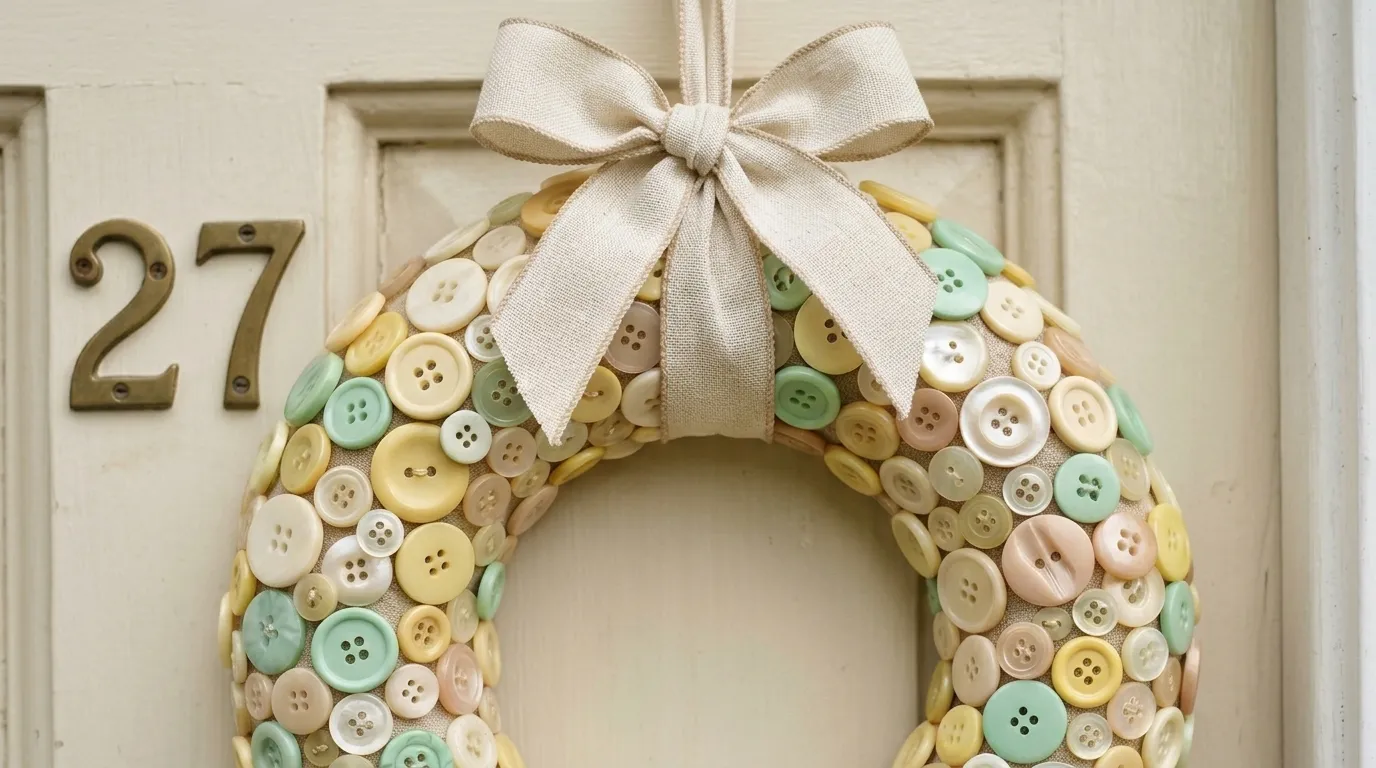
10. Button Wreath for Seasonal Door Decor
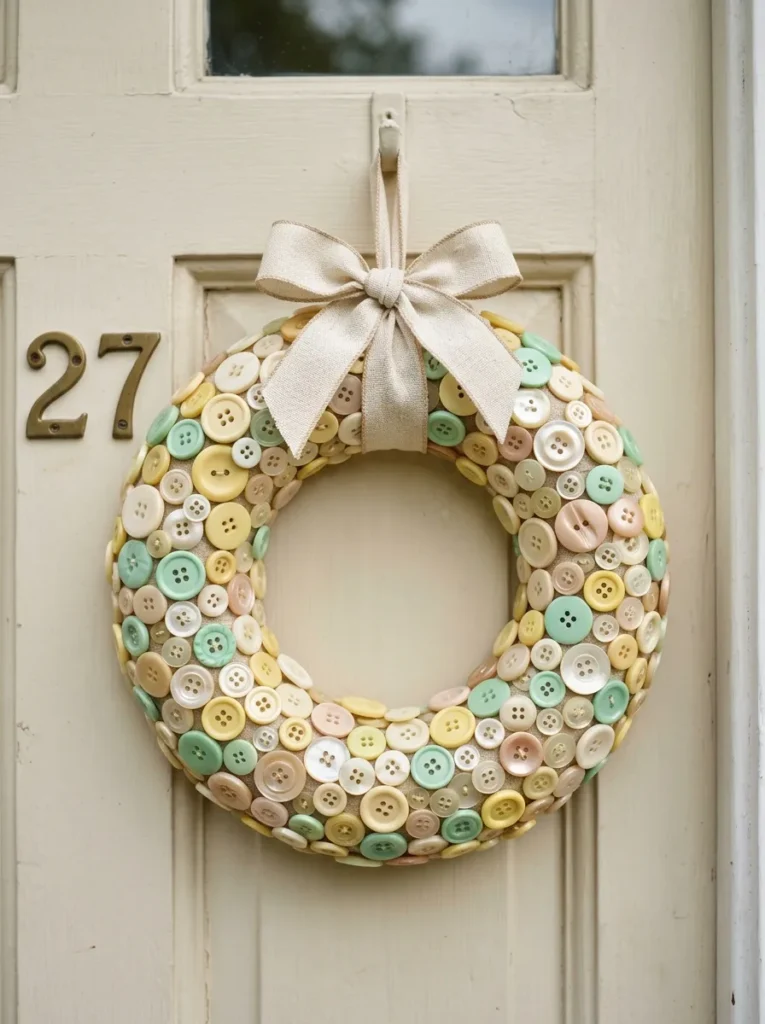
Vibe: The wreath feels handmade and welcoming — the kind of door decoration that makes visitors slow down before knocking.
Why it works: A button wreath applies the seasonal decor principle of material-specific interpretation — a traditional wreath form (circular, door-mounted, seasonal) made from buttons rather than foliage reads as a permanent craft object with seasonal color intention rather than a perishable botanical decoration. The foam ring substrate provides an ideal button surface because its slight give allows buttons to be pressed in at varied angles (flat against the surface, tilted at 15–30 degrees) creating the surface variation that makes a fully covered wreath visually interesting rather than monotonous. Coordinating the button palette with seasonal color families (spring pastels, autumn warmth, winter white and silver) allows the same wreath form to be made in multiple seasonal versions.
How to get it: Purchase a 30cm foam wreath ring (craft supply stores carry these in multiple sizes, $3–8 each). Working in sections, apply strong craft glue to the foam ring surface and press buttons into it at varied angles — some flat, some tilted, creating a textured surface without a uniform face direction. Fill with progressively smaller buttons as gaps appear. The goal is complete foam coverage — no green foam visible between buttons. Tie a loop of wide linen ribbon to the top of the ring for hanging, securing with a U-pin pushed through the ribbon into the foam.
Shop The Look
| Product |
|---|
| Foam wreath ring 30cm craft |
| Spring pastel button assortment 200g |
| Strong clear gel adhesive wreath |
| Cream linen ribbon wide 4cm |
| U-pin set foam craft wreath |
11. Button Jewelry — Stacked Ring Cluster
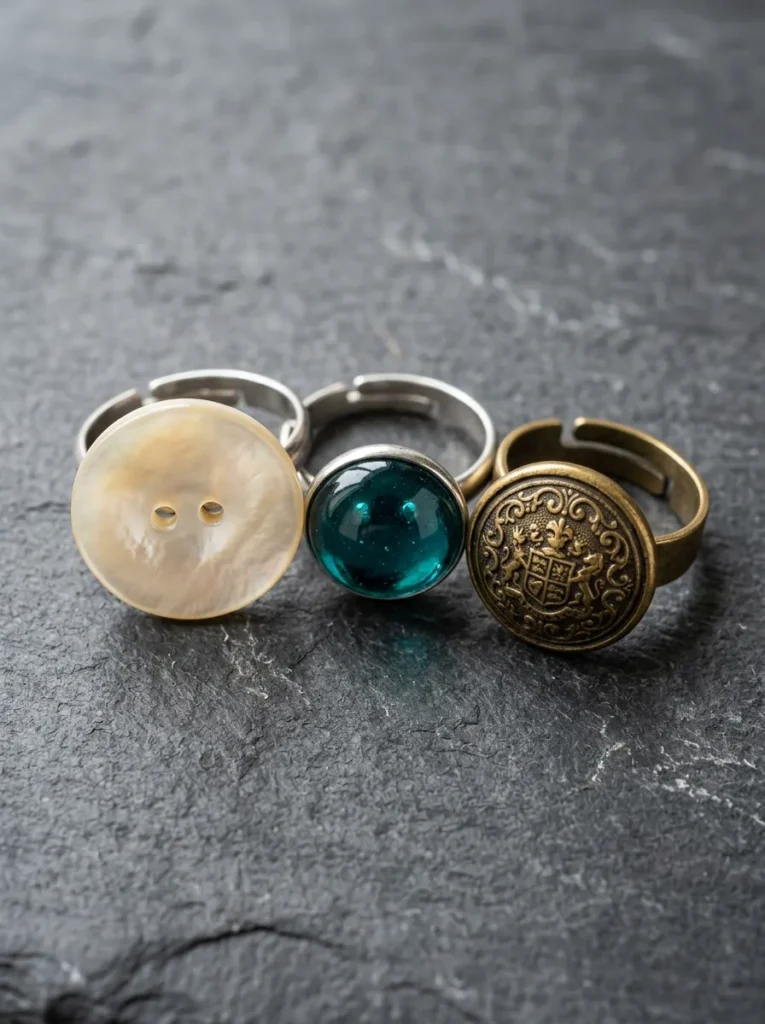
Vibe: The ring cluster feels like a curated collection — three objects that each stand alone but belong together.
Why it works: Button statement rings apply the jewelry design principle of material elevation through setting — placing a single interesting button on a ring band setting transforms it from a haberdashery object into a wearable art piece, because the ring band context signals jewelry while the button itself provides the aesthetic content. A set of three rings in varied button materials (pearl, glass, metal) demonstrates the range of button types as jewelry material while creating a coordinated collection that reads as intentionally designed. Glass dome buttons are particularly effective as ring tops because their convex surface catches and refracts light in the manner of a cabochon gemstone — the visual effect is surprisingly similar to that of an expensive semi-precious stone setting.
How to get it: Source flat-back adjustable ring band findings (available in gold, silver, and brass tones from craft and jewelry suppliers, $5–10 for a pack of 10). Select buttons with flat or near-flat backs — shank buttons require the shank to be filed off before gluing (use a metal file and file the shank flush with the button body). Apply a small dot of E6000 adhesive to the ring band’s pad and press the button firmly onto it. Allow 24 hours of cure time before wearing. Select ring bands in a metal tone that coordinates with the button — gold bands for cream and ivory buttons, silver for cooler glass buttons.
Shop The Look
| Product |
|---|
| Adjustable ring band finding set gold silver |
| Glass dome button set varied colors |
| Pearl vintage button set large flat |
| E6000 adhesive jewelry strong clear |
| Metal file small craft jewelry |
12. Button Portrait or Silhouette Art in a Shadow Box
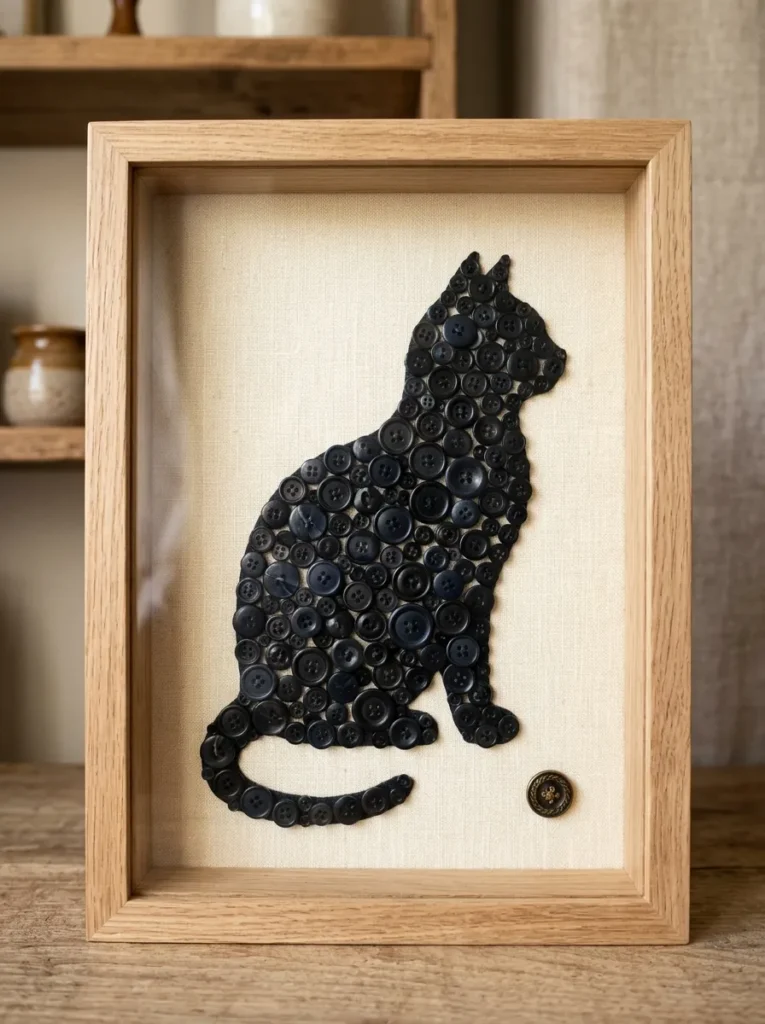
Vibe: The silhouette feels graphic and precise — a composition that works because it knows exactly what it is.
Why it works: A button silhouette in a shadow box applies the graphic design principle of positive-negative space — the densely packed dark button mass against a light-toned backing board creates a figure-ground composition that reads with the clarity and authority of a graphic print while being materially rich in a way that printing cannot replicate. The silhouette format works best with simple, iconic forms: animals (cat, dog, bird, deer), figures, trees, or simple botanical shapes — complex silhouettes with internal detail lose legibility at button scale. The shadow box frame’s depth (minimum 40mm) is essential because it accommodates the height of the button layer above the backing board and creates the shadow that defines the visual boundary between the button composition and its frame.
How to get it: Trace the chosen silhouette onto the backing board using a printed template or a projector. Fill the silhouette outline with strong craft adhesive (working in small sections to prevent skinning over) and press small buttons (maximum 10mm for a 20×25cm composition) into the adhesive as densely as possible with no backing board visible within the form. The tighter and more uniform the button packing, the more graphically clean the finished silhouette reads. Allow to dry completely before closing the shadow box frame.
Shop The Look
| Product |
|---|
| Deep shadow box frame 20x25cm natural wood |
| Black dark navy button assortment small 100g |
| Cream linen fabric backing board cover |
| Silhouette template set animal shapes |
| Strong craft adhesive clear fast setting |
13. Button Memory Box — Repurposing Inherited Buttons
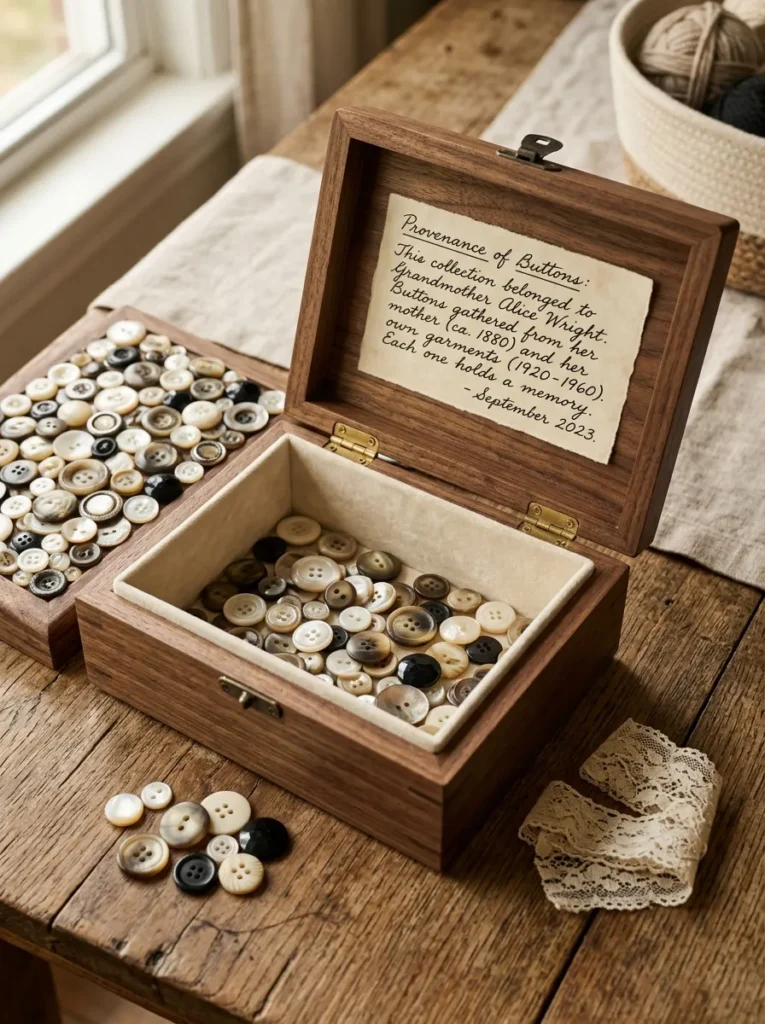
Vibe: The memory box feels like an heirloom already — the craft act of making it is also the act of preserving what it contains.
Why it works: A button memory box applies the craft-as-preservation principle — using inherited or found buttons as the decorative surface of a keepsake box creates a recursive object (buttons kept in a box, buttons on the box) that honors the material history of the collection while giving the maker a tangible creative output. This project has a specific emotional register that distinguishes it from other button crafts: the buttons on the lid are a curated representative selection of the collection inside, making the box simultaneously a container and a portrait of its contents. Mixing varied vintage button materials (shell, horn, bone, glass, pearl) on the lid surface creates a material survey of different button-making traditions that is visually interesting without requiring color curation.
How to get it: Select a small hinged wooden keepsake or cigar box (new or found). Choose 20–30 representative buttons from the inherited collection — one of each distinctive type or material — and arrange them on the box lid before gluing to assess the composition. Work from the lid edges inward, gluing each button individually using E6000 for its superior bond strength on smooth wood surfaces. Write a brief provenance note (whose buttons these were, the approximate date of the collection, any notable pieces) on card and glue inside the lid. Line the interior with cream velvet glued in with a thin, even coat of PVA.
Shop The Look
| Product |
|---|
| Small hinged wooden keepsake box craft |
| E6000 adhesive strong clear |
| Cream velvet fabric small piece lining |
| PVA glue adhesive fabric lining |
| Archival pen black fine writing label |
14. Button Chandelier or Mobile for Hanging Decor
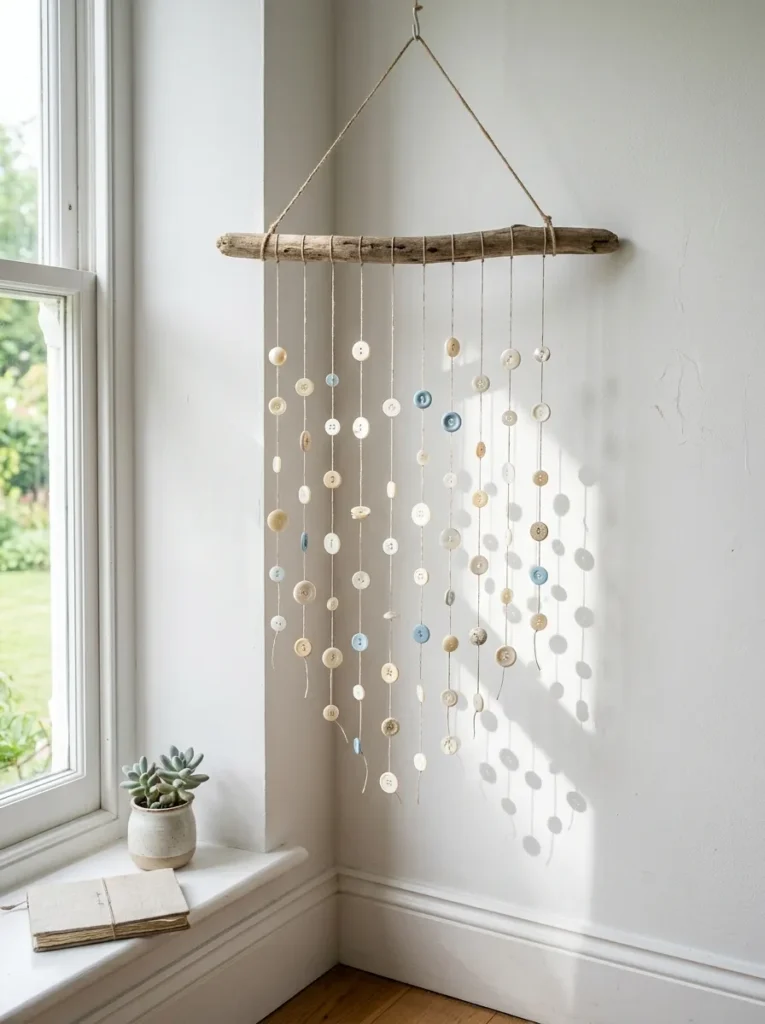
Vibe: The mobile feels airy and meditative — the buttons spinning slowly in any air movement, their shadows a second, shifting composition on the wall.
Why it works: A strung button mobile applies the kinetic art principle of movement-in-stillness — objects strung on thread respond to the slightest air movement (a door opening, a window ajar, air conditioning current), creating continuous slow motion that makes the piece feel alive without any mechanical assistance. The circular form of flat buttons makes them ideal mobile elements because they catch light from both faces equally and cast round shadows that read as clean circles on the wall behind — the shadow composition changes continuously as the light source moves through the day. A pale, tonal palette (cream, white, pale blue) is most effective for a mobile in a light-filled space because the nearly transparent quality of thin thread and pale buttons allows the light to pass through and around the composition rather than blocking it.
How to get it: Collect a piece of driftwood approximately 40cm long. Cut 12 lengths of clear nylon thread or fine white thread in varied lengths (ranging from 15 to 40cm). Thread each length through the holes of 6–8 buttons, spacing them 2–3cm apart by tying a small knot in the thread below each button to prevent sliding. Tie the completed thread lengths to the driftwood at regular intervals. Hang the driftwood from a single hook or two hooks at its ends. The slight natural bow of driftwood creates a more organic-feeling mobile than a perfectly straight dowel.
Shop The Look
| Product |
|---|
| Clear nylon thread fine jewelry stringing |
| Cream white pale blue button assortment |
| Driftwood piece natural 40cm craft |
| Single hook ceiling mount craft display |
| Fine white cotton thread craft sewing |
15. Button Magnets — Fridge or Noticeboard Accents
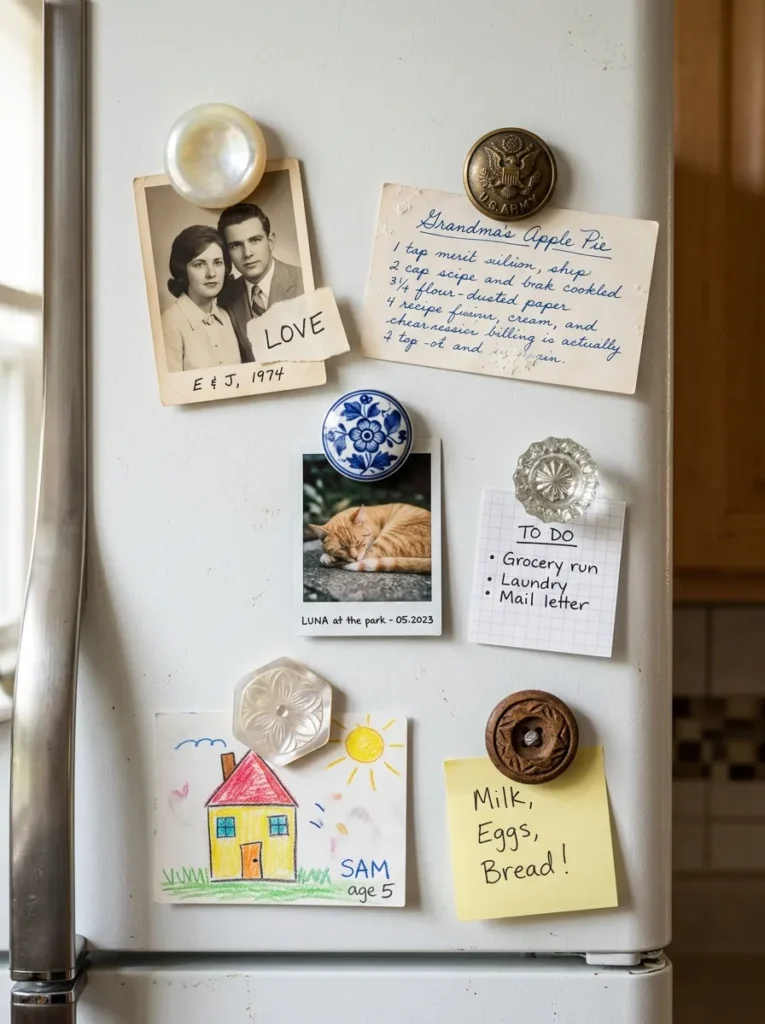
Vibe: The magnets feel like miniature collection pieces — every guest notices them individually and asks where they came from.
Why it works: Button magnets apply the functional craft principle of material-scale appropriateness — neodymium magnets are small enough to fit flush behind almost any button while being strong enough to hold several sheets of paper to a refrigerator or magnetic board. The button’s existing hole structure (in flat buttons) actually reinforces the adhesive bond by allowing the glue to enter the hole and create a mechanical lock around the magnet, making button magnets more durable than most other decorative magnet approaches. Choosing one interesting, characterful button per magnet (rather than grouping multiple buttons) allows each magnet to function as a small display object — a miniature portrait of an interesting button type.
How to get it: Select six to ten interesting buttons in varied types — one military brass, one large pearlescent dome, one hand-painted ceramic, one vintage glass, one natural shell, one novelty fabric-covered. Apply a small dot of E6000 adhesive to the flat back of each button and press a 10mm neodymium disc magnet firmly into the adhesive. For flat buttons with holes, fill the holes with a small amount of adhesive before pressing the magnet over them — this prevents the magnet from tilting toward the hole. Allow 24 hours of full cure before testing on a refrigerator surface.
Quick Win: A pack of 20 neodymium disc magnets ($5–8) and a selection of 20 interesting buttons from an inherited collection creates 20 individual button magnets for under $15 total — the most gift-efficient button craft on this list.
Shop The Look
| Product |
|---|
| Neodymium disc magnet 10mm set of 20 |
| E6000 adhesive strong clear craft |
| Vintage glass button assortment varied |
| Ceramic painted button set small |
| Military brass vintage button set |
16. Button Candle Ring for Table Centerpiece Styling
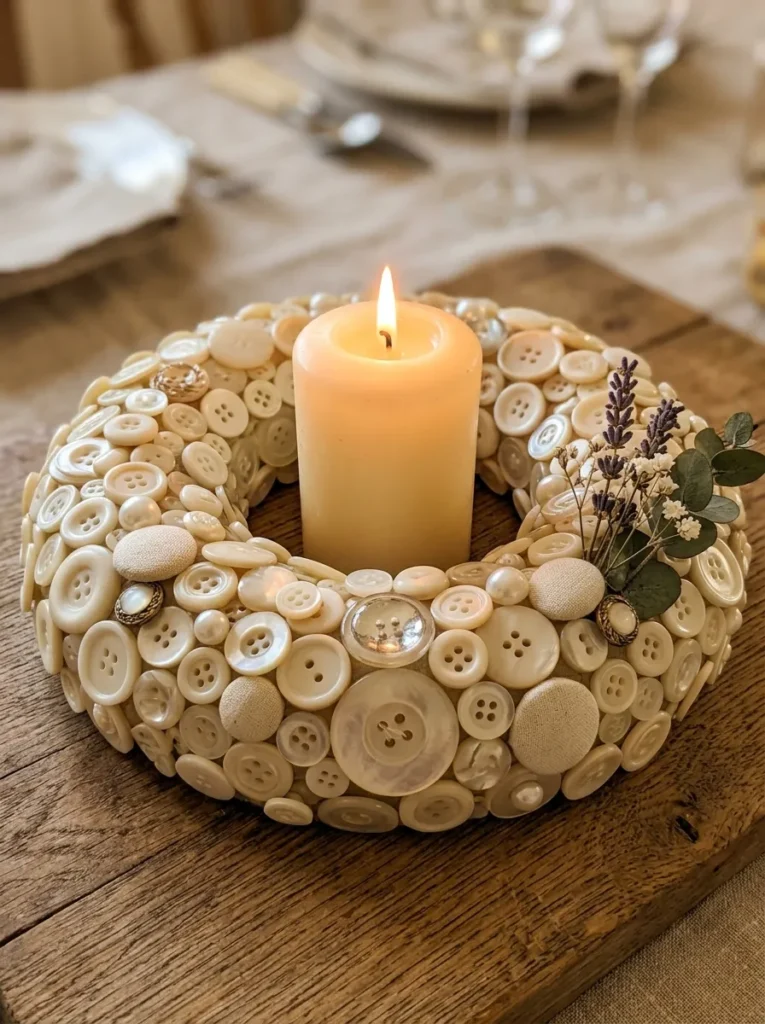
Vibe: The candle ring feels refined and warm — the kind of centerpiece that makes a simple dinner look considered.
Why it works: A button candle ring applies the table styling principle of material halo — a decorative ring around a pillar candle extends the candle’s visual presence beyond the flame and wax cylinder, creating a composed centerpiece from a single light source. The cream and ivory button palette is the most effective choice for a candle ring because candlelight’s warm amber tone is amplified by warm neutral surfaces (cream, ivory, pearl) and flatly absorbed by cool or dark surfaces — the cream buttons glow in candlelight in a way that colored buttons do not. Glass dome buttons within the cream palette are particularly effective because the candlelight refracts within the glass dome, creating small points of light that multiply the candle’s apparent luminosity.
How to get it: Source a 15cm diameter foam ring (the inner diameter should fit around the base of your pillar candle comfortably). Cover the ring completely with cream and ivory buttons glued at varied angles — the variety of surface angles (flat, tilted, domed) creates the reflective richness that makes the ring glow most effectively in candlelight. Never place the candle directly on the foam ring or allow the flame to approach the button surface — always use a glass or metal candleholder within the ring, and never leave a lit candle unattended near any craft material.
Shop The Look
| Product |
|---|
| Foam ring 15cm small wreath craft |
| Cream ivory button assortment 200g |
| Pillar candle cream 10cm tall |
| Strong clear craft adhesive gel |
| Small wooden board tray display natural |
17. Button Mosaic Address Number Plaque for House or Apartment
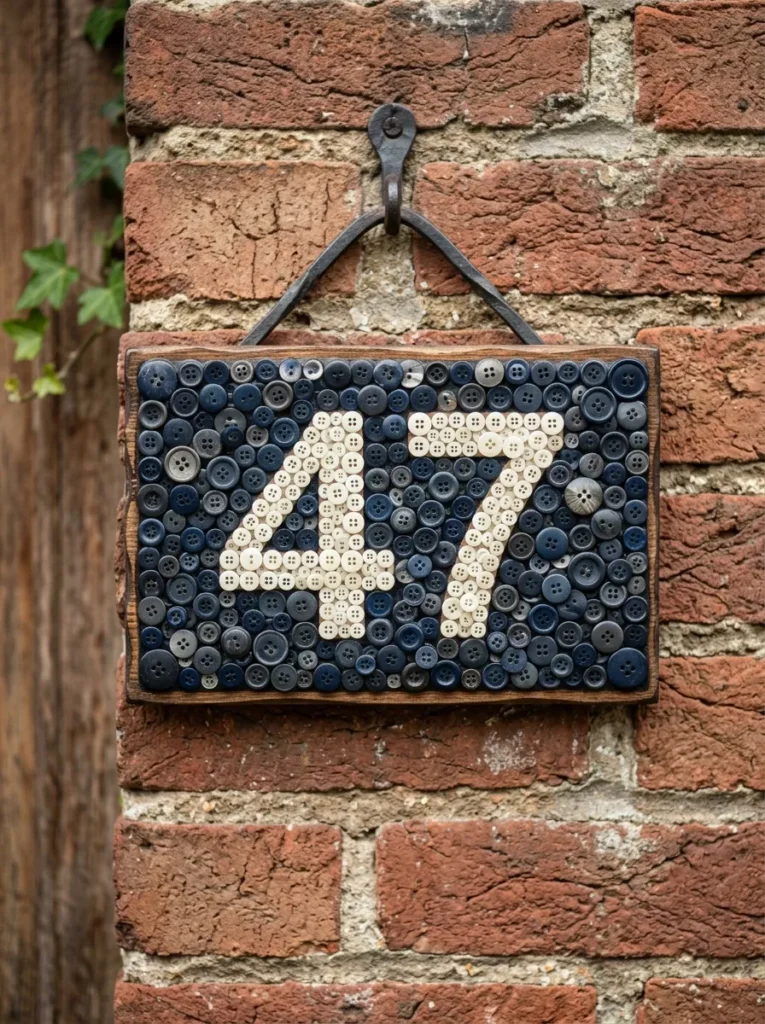
Vibe: The plaque feels handmade and permanent simultaneously — the kind of object that makes visitors notice the house before they’ve knocked.
Why it works: A button mosaic house number plaque applies the functional graphic design principle of figure-ground number legibility — a high-contrast composition (light number form on a dark background, or dark on light) ensures the address number remains readable at viewing distance even as the button texture fills both the number and background areas. The mosaic technique (filling both the number form and the background with densely packed buttons) produces a surface with much greater visual richness and durability than a simply painted plaque, and the handmade quality communicates the personality of the household in a way that a commercial cast metal number cannot. Outdoor use requires a waterproof substrate (slate, exterior-grade MDF, or treated hardwood) and a minimum of three coats of waterproof sealant over the finished button surface.
How to get it: Cut your substrate to the desired plaque size. Plan the number layout by printing the digits in a large, simple font, cutting out the template, and tracing onto the substrate. Fill the number form with small white and cream buttons (maximum 8mm for legibility of the number form at reading distance). Fill the background with small dark navy and charcoal buttons to create the high-contrast ground. Seal with three coats of exterior-grade waterproof varnish or bar-top resin. Attach a keyhole hanger fitting or two D-ring fixtures to the back for wall mounting.
Shop The Look
| Product |
|---|
| Slate board plaque exterior 20x12cm |
| Small cream white button assortment 50g |
| Small navy charcoal button assortment 50g |
| Exterior grade waterproof varnish clear |
| Keyhole hanger fitting set wall mount |
How to Start Your Button Craft Practice
The single best first move before beginning any button craft project is sorting your existing button collection by color. This sounds like preparation rather than making, but it is in fact the most design-generative act in button crafting — the moment you place all your blue buttons together, or all your cream and pearl buttons in a single pile, the project possibilities become immediately visible in a way they are not when buttons are mixed in a jar. The sorted color groups also reveal what you have in abundance (and can use for a large project) and what you’re missing (and might choose to purchase to complete a palette). This sorting exercise takes 30–60 minutes for a standard inherited button collection and is the foundation of every considered button craft decision that follows.
The most common mistake in button crafting is using the wrong adhesive for the substrate and use condition. PVA glue works for lightweight paper and card applications but fails on smooth surfaces and in moisture-adjacent environments. Mod Podge works as a sealer but provides insufficient bond strength as a primary adhesive for three-dimensional objects. E6000 is the professional-grade craft adhesive that correctly bonds buttons to glass, metal, fabric, wood, ceramic, and foam — it remains flexible after curing (preventing bond failure from thermal expansion) and is waterproof. Using E6000 rather than a school glue stick is the difference between a button craft that lasts for years and one that begins shedding buttons within weeks.
Three specific items under $50 that equip a complete button craft starter kit: a 500g assorted button collection in a coordinated color family ($8–15 from an online haberdashery or craft supplier — choose one color palette rather than a random mix); a tube of E6000 adhesive ($8–12 for a 110ml tube, which lasts through many projects); and a set of 20 adjustable ring band findings, 20 brooch bar pin findings, and 10 pendant bail findings combined in a jewelry findings starter pack ($12–18 from a craft or jewelry supplier), covering the mounting needs for ideas 1, 5, and 11.
A small button craft (brooch, ring, set of magnets) takes 30–90 minutes including adhesive cure time. A medium project (coaster set, wreath, candle ring) takes 2–4 hours of making plus cure time. A large or complex project (button tree canvas, rainbow gradient frame, address plaque) takes 5–10 hours across two to three sessions. Materials for small projects cost $5–20; medium projects $15–40; large projects $25–60. Every project in this list can be made from a combination of purchased buttons and inherited or found ones — the mix of new and old materials is itself a design decision that contributes to the finished object’s character.
Frequently Asked Questions About Button Crafts for Adults
What is the best way to collect and sort buttons for crafting?
The most effective button collection strategy combines three sources: inherited sewing boxes and button jars (the richest source of genuinely vintage and varied material), charity shops and thrift stores (haberdashery sections often contain large button assortments for very little money — $1–3 for a bag of mixed buttons), and specialist button suppliers online (for filling specific color or size gaps in the existing collection). Sort by color first (this is the most useful craft-organizing principle), then within each color by size (small under 12mm, medium 12–25mm, large over 25mm), and finally by material (plastic, glass, metal, shell, ceramic, fabric-covered) within size ranges for the finest level of selection. Store in clear jars or divided boxes so the collection is visible without opening — visible material is used material.
Which button types are best for jewelry making?
The best buttons for jewelry making have three properties: a flat or near-flat profile (which sits comfortably against the skin and adheres securely to a finding), interesting material quality (vintage glass, genuine shell, ceramic, pearl — materials that read as jewelry-like rather than utilitarian), and a clean back surface suitable for adhesive bonding or wire attachment. Vintage glass dome buttons are the most jewelry-appropriate of all types — their convex surface refracts light like a cabochon stone, their glass material reads as genuinely precious, and their flat back bonds securely to ring and brooch findings. Avoid shank buttons for flat jewelry applications unless the shank is filed off — shanks prevent the button from lying flat and create a weak point in the adhesive bond.
How do you seal button crafts for longevity?
The sealant choice depends on the application context. For indoor decorative pieces (framed art, memory boxes, decorative wreaths), three coats of Mod Podge in a gloss or matte finish provide adequate protection against dust accumulation and light handling. For functional indoor pieces (coasters, button rings worn daily, magnets in frequent use), bar-top epoxy resin provides the hardest, most durable, and most waterproof surface available and is the professional standard for button mosaic coasters. For outdoor pieces (address plaques, garden-facing wreaths), exterior-grade waterproof varnish or polyurethane in at least three coats is the minimum protection for year-round outdoor exposure, though even well-sealed button crafts benefit from positioning under a covered porch or overhang rather than full weather exposure.
Can button crafts be made as profitable items to sell?
Yes — several button craft categories have proven commercial viability at craft fairs, Etsy, and through social media sales. The strongest selling categories are: button jewelry (particularly statement brooches and resin pendant sets, which sell in the $18–45 range and require low material cost); personalized items (button-covered wooden letters and name plaques, which command $25–60 depending on size and complexity); home accessories (button mosaic coasters as sets of four, which retail at $30–55 and have consistent demand as gifts); and vintage-button-specific products (where the provenance and history of the buttons adds perceived value beyond the craft labor). Pricing must account for material cost, making time at a reasonable hourly rate, and platform fees — the most common pricing error is undervaluing the making time relative to the material cost.
What button sizes work best for different project types?
Small buttons (under 12mm) work best for jewelry (scale appropriate for wearing), mosaic number plaques (legibility requires fine detail), portrait and silhouette art (density of small buttons creates a clean graphic form), and the gap-filling layer in any mosaic project. Medium buttons (12–25mm) are the most versatile size across all project types — they work for frames, wreaths, coasters, tree of life compositions, and textile embellishment. Large buttons (over 25mm) work best as standalone statement elements — a single large glass dome button on a ring band, a large pearl button as the central element of a brooch stack, or large buttons as the primary layer in a wreath with small buttons filling the gaps. Most projects benefit from a combination of sizes rather than uniformity — the size variation creates the visual interest and surface richness that makes button craft compositions read as designed rather than simply covered.
Ready to Start Your Button Craft Projects?
These 17 ideas move through every dimension of what makes button crafting genuinely satisfying for adults — from the refined precision of wire-wrapped jewelry and resin pendant work, to the meditative density of a button mosaic frame or rainbow gradient art, to the functional pleasure of coasters and magnets that earn their place in daily life, to the sentimental depth of a memory box that honors the history of the buttons it contains. Beginning with the color sort is not a delay — it is the act that makes every project after it possible, because it is the first time the collection reveals itself as a palette rather than a pile. Sort the buttons this evening, identify the color family you have most of, and choose the project from this list that uses that color family most fully. The making begins the moment the buttons are sorted, and the result — whatever form it takes — will carry the particular warmth of something made by hand from material that already had a history before you touched it. Pin the projects that made you reach for the button jar while reading, and return to the more complex ideas when the simpler ones have proven what your collection is capable of.