14 Smart MOSSLANDA Storage Hacks for Small Spaces
Smart MOSSLANDA storage hacks use IKEA’s picture ledge shelf — a shallow (12cm deep), long (varying from 55cm to 115cm), frameless shelf designed for leaning pictures — as a versatile, flat-pack-affordable storage and display system that adapts to every room and every organizational challenge. This article gives you exactly 14 ideas spanning gallery ledges, kitchen spice storage, bathroom organization, desk management, children’s book display, plant staging, and room divider applications so every small space finds a MOSSLANDA approach that genuinely maximizes its limited square footage.
The MOSSLANDA’s specific genius for small spaces is its shallow depth — at 12cm, it projects only half as far from the wall as a standard shelf, occupying minimal floor and visual space while providing a display and storage surface at any height from skirting board to ceiling. Every centimetre of wall space becomes usable. Here are 14 ideas worth saving — and installing.
Why Smart MOSSLANDA Storage Hacks Work So Well for Small Spaces
The MOSSLANDA picture ledge was designed for a single specific purpose — to lean framed pictures against a wall with the benefit of a slight front lip preventing them from sliding off — but its physical dimensions (12cm deep, 2cm front lip, minimal visual profile, available in 55cm and 115cm lengths in white and pine, and recently expanded to additional lengths) make it one of the most adaptable storage and display tools in IKEA’s entire product range. The 12cm depth is the specific dimension that enables the MOSSLANDA’s versatility: it is sufficient to store paperback books, small plant pots, spice jars, bathroom essentials, and craft supplies — all the categories of small-format everyday objects that standard shelving over-accommodates in depth, wasting half their available footprint in empty space behind the stored items.
In small spaces specifically, the MOSSLANDA’s shallow depth provides two advantages that standard shelving cannot: it does not obstruct light (a 12cm shelf projects far enough from the wall to be functional but not far enough to shadow the wall below or create the visual weight that a 30–40cm deep standard shelf creates in a confined room), and it can be installed in spatial niches that standard shelving physically cannot occupy — the narrow strip of wall beside a door frame, the 15cm gap between a window and a corner, the section of bathroom wall between the mirror and the ceiling. These micro-territory opportunities are where the MOSSLANDA performs its most impactful small-space work.
The MOSSLANDA hacking community has been active since approximately 2015, when the product’s picture-ledge design use was rapidly displaced by organizational and storage applications documented on IKEA Hackers, Reddit, and Pinterest. The specific discovery that the MOSSLANDA’s front lip perfectly retains spice jars, bathroom products, and children’s books triggered a wave of organizational applications that now encompasses virtually every room in the house. Pinterest’s MOSSLANDA category shows consistent engagement with the recurring theme of spaces transformed by a series of the shelves installed in configurations their designer never intended, and the results consistently punch above their cost level — the MOSSLANDA is priced at $4.99 to $12.99 depending on length, making it the lowest cost-per-display-metre of any IKEA shelving product.
The honest constraint of the MOSSLANDA in storage applications is its weight capacity: rated at 5–7kg per shelf (depending on length and fixing method), the MOSSLANDA is appropriate for lightweight display and small-item storage but not for heavy books, large plant collections, or significant kitchenware. For anything above approximately 3–4kg per shelf, standard shelf brackets with a deeper shelf board provide greater structural reliability and are the appropriate specification. Within its weight rating, the MOSSLANDA’s elegant minimalism — the near-invisible shelf profile against a wall — makes it the most visually unobtrusive storage solution available at any price.
Style at a Glance
| Element | MOSSLANDA Core | Hack Potential |
|---|---|---|
| Philosophy | Shallow depth, minimal visual weight | Micro-territory opportunities no other shelf uses |
| Materials | White or pine MOSSLANDA, front lip | All rooms, all organizational categories |
| Load Limit | 5–7kg per shelf (lightweight items only) |
14 Smart MOSSLANDA Storage Hacks for Small Spaces
1. Floor-to-Ceiling Picture Ledge Gallery Wall
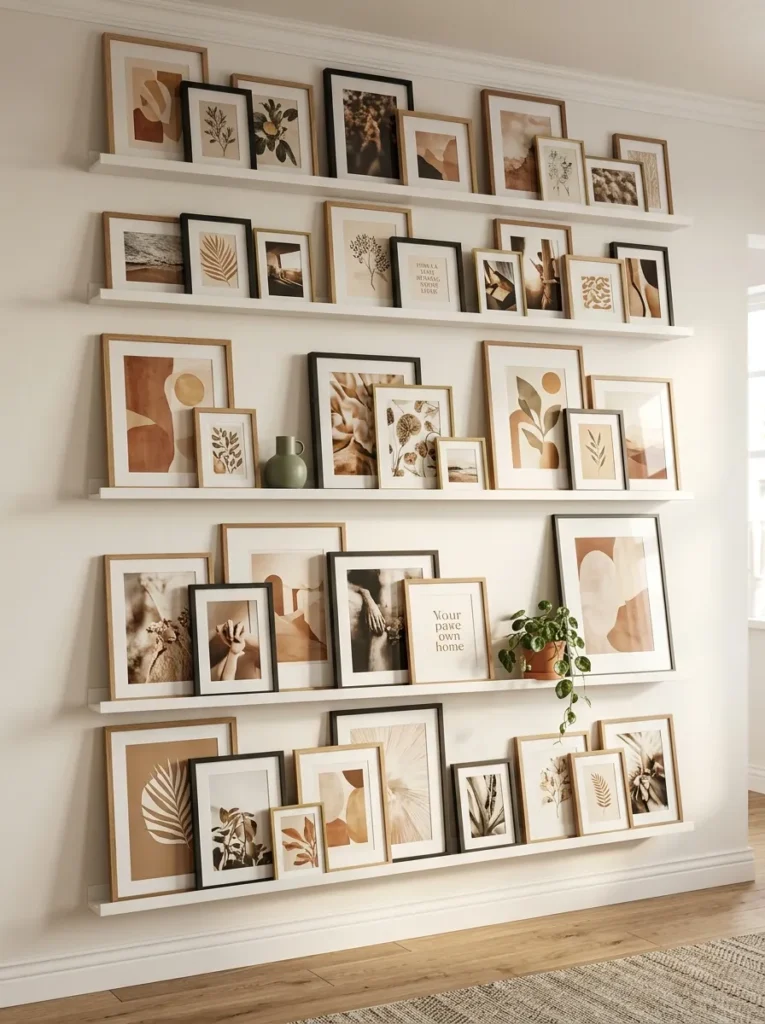
Vibe: The floor-to-ceiling gallery wall feels like a curated art installation that can be rearranged in minutes — the ledges allowing the entire display to be updated, added to, or completely changed without touching a single wall hook.
Why it works: A floor-to-ceiling MOSSLANDA gallery wall applies the design principle of display infrastructure — rather than hanging individual frames at fixed positions (each requiring its own hook and measured position, making rearrangement labor-intensive), the picture ledge system converts the entire wall into a continuous display surface from which frames can be picked up, shuffled, added, and removed without any wall modification. Eight ledges at 30cm intervals on a standard 240cm height wall covers essentially the entire wall from approximately knee height to just below the ceiling, with each ledge accommodating multiple frames layered at varied depths. The visual effect (a full wall of art in a gallery-style arrangement) is otherwise achievable only through extensive picture hook installation — the MOSSLANDA achieves it for the cost of eight shelf units.
How to get it: Install MOSSLANDA 115cm ledges at 30cm vertical intervals, using a level and measuring tape to ensure each ledge is perfectly horizontal (a 1-degree tilt is visible at this length). Fix into wall studs where possible — at 115cm length with multiple frames, the distributed load benefits from stud fixing rather than drywall anchor alone. Start the lowest ledge at 15–20cm above the skirting board (not at floor level — this gap allows easy cleaning beneath the lowest ledge and prevents damage from floor cleaning equipment). Style each ledge with frames layered front-to-back, varying frame sizes between ledges for visual rhythm.
Quick Win: Three MOSSLANDA ledges at 30cm intervals above a sofa (covering approximately 90cm of wall height) create the gallery wall’s most impactful visual moment — the section between the sofa top and the ceiling — for $15–40 in ledges, the most cost-effective gallery wall approach available.
Shop The Look
| Product |
|---|
| MOSSLANDA picture ledge 115cm white set |
| Level tool small shelf installation |
| Varied frame set warm tone gallery |
| Small ceramic object ledge accent |
| Wall stud finder tool |
2. Kitchen Spice and Condiment Organization Above the Worktop
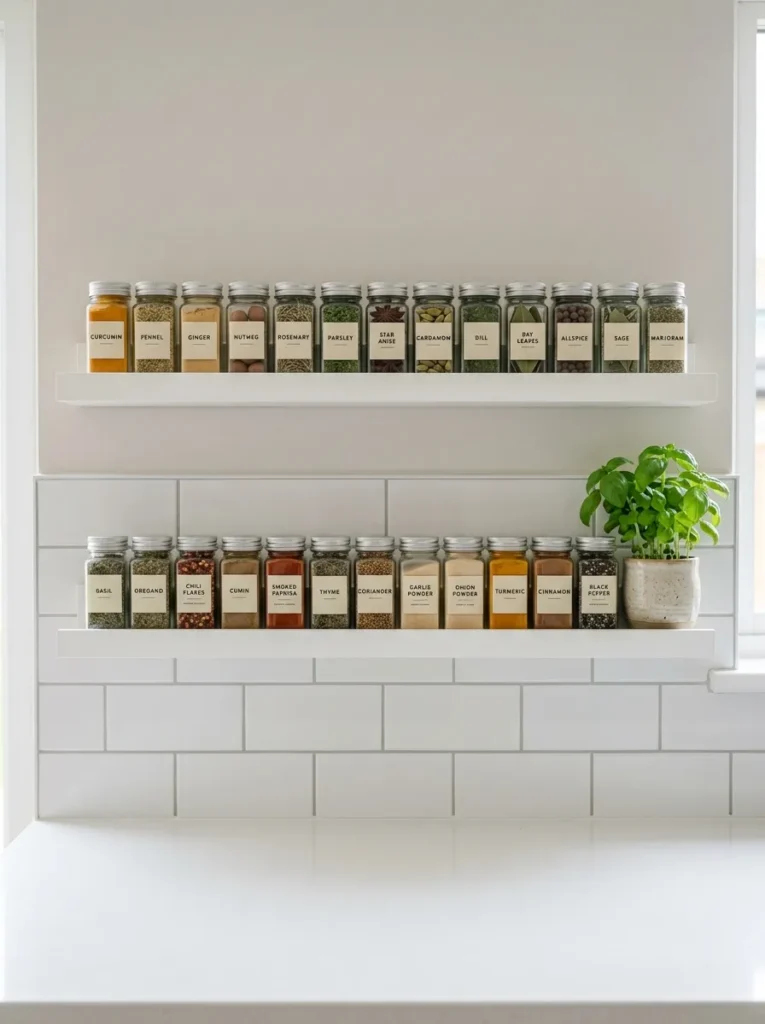
Vibe: The kitchen spice ledges feel like a professional kitchen’s mise en place translated to a home kitchen wall — every spice visible and accessible without occupying a single centimetre of worktop.
Why it works: MOSSLANDA spice ledges above a kitchen worktop apply the storage accessibility principle of vertical worktop extension — the wall space above a kitchen worktop backsplash (typically 45–55cm between the worktop surface and the underside of upper cabinets) is the kitchen’s most accessible storage zone but is usually left entirely empty in standard kitchen configurations. Two MOSSLANDA ledges at two heights convert this empty wall zone into a double-row spice storage system that holds 20–30 spice jars without occupying any worktop surface. The MOSSLANDA’s 2cm front lip is precisely the right height to retain standard cylindrical spice jars from rolling off the 12cm shelf depth while being low enough not to obscure the jar labels from a standing viewing angle.
How to get it: Install the lower MOSSLANDA at 8–10cm above the worktop surface (high enough that splashback cleaning and chopping board use don’t interact with the ledge, low enough that jars are at an accessible, label-readable height). Install the upper MOSSLANDA at 28–30cm above the worktop surface — this spacing allows both rows of jars to be readable and accessible from standing position. Decant all spices into uniform small glass jars with matching labels — the visual coherence of uniform containers is essential to the system’s organizational clarity and aesthetic success. Arrange alphabetically or by cuisine type for the fastest access.
Shop The Look
| Product |
|---|
| MOSSLANDA picture ledge 55cm white set 2 |
| Uniform spice jar set glass small |
| Label set spice jar matching |
| Label maker tape or printable set |
| Small herb plant ceramic pot kitchen |
3. Bathroom Shelf for Skincare and Essentials Above the Sink
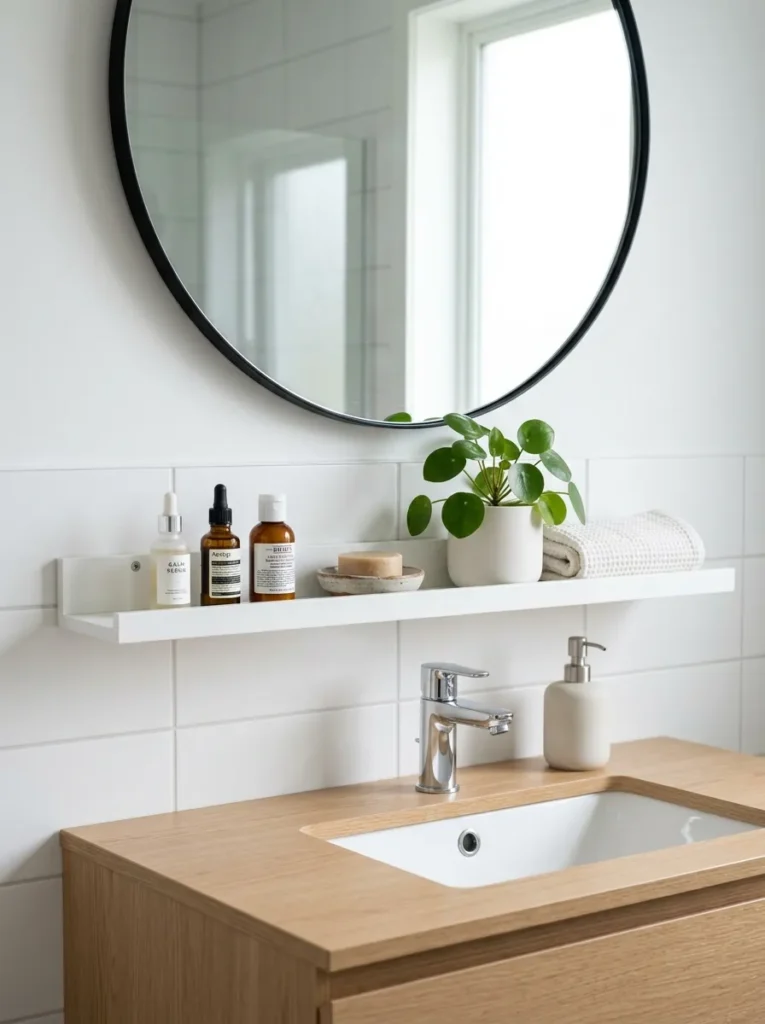
Vibe: The bathroom ledge feels like a boutique hotel’s bathroom counter floating on the wall — the cleared vanity below and the organized essentials above creating the specific spa calm that a cluttered surface prevents.
Why it works: A MOSSLANDA above the bathroom vanity applies the bathroom organization principle of surface clearance through vertical storage — a bathroom vanity accumulates skincare products, toiletries, and small accessories that collectively clutter the surface and make the space feel cramped regardless of the actual available area. A single MOSSLANDA at the correct height above the vanity holds the ten to fifteen small product bottles that typically occupy the vanity surface, clearing the surface entirely while keeping all products within arm’s reach and at full label-forward visibility. The spa bathroom aesthetic — a clear vanity, essential items in coordinated containers, a small plant — is achievable in any bathroom with a single ledge and the decision to decant products into uniform containers.
How to get it: Install at 155–165cm height (comfortable reach height for a standing adult, above the mirror’s reflection zone for most bathroom mirror heights). In a bathroom environment, use moisture-resistant wall anchors (plastic anchors are appropriate; avoid wood-fibre drywall anchors which absorb moisture and lose holding power in humid environments). Limit the ledge to 8–10 products maximum — the organizational benefit decreases rapidly above this number as the ledge becomes as visually complex as the cluttered surface it replaced. Add one plant (a small succulent or air plant in a white ceramic pot) at one end as the ledge’s single decorative element.
Shop The Look
| Product |
|---|
| MOSSLANDA picture ledge 55cm white |
| Moisture-resistant wall anchor set |
| Small ceramic skincare container set |
| Small succulent plant white ceramic |
| Folded face cloth linen white |
4. Children’s Book Display at Reading Height
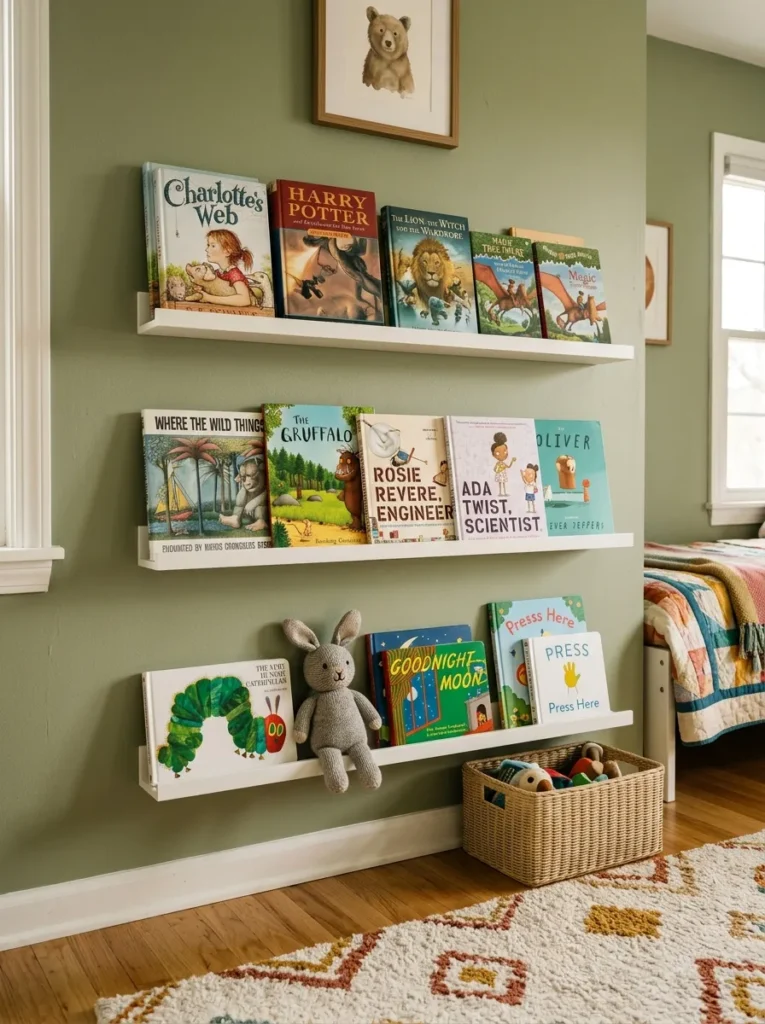
Vibe: The child-height book display feels like a bookshop for one specific child — the covers visible and inviting at precisely the height where little hands can reach them.
Why it works: Cover-facing MOSSLANDA book display at child height applies the children’s literacy environment principle of cover-out book display — children’s engagement with books increases dramatically when the book’s cover (the visual invitation to open it) is visible rather than only the spine. Standard bookshelves display only spines, which a child who cannot yet read cannot use to select a book; cover-facing MOSSLANDA display allows a pre-reader to identify and choose a book independently by its cover image. Three ledges at graduated heights (starting at 45cm for toddlers, stepping up in 30cm increments) ensure that books at every level are accessible without adult assistance to the age group for which they are appropriate — the lower ledges for board books and picture books, the upper ledges for longer-form illustrated chapter books.
How to get it: Install the lowest ledge at 45cm from the floor — low enough for a sitting toddler to reach and not so low that the ledge is a tripping hazard. Install subsequent ledges at 30cm intervals. On each ledge, lean books cover-facing with approximately 12–15 books per 55cm ledge (the 2cm lip retains book bases while the books lean back against the wall at approximately 10 degrees). Add one small stuffed toy or tactile object per ledge as a non-book resting element — this prevents the display from reading as purely functional and signals to the child that the ledge is part of the play environment.
Shop The Look
| Product |
|---|
| MOSSLANDA picture ledge 55cm white set 3 |
| Children’s book set cover display |
| Small stuffed animal ledge accent |
| Children’s room paint warm sage |
| Level tool shelf horizontal |
5. Home Office Desk Monitor Riser and Cable Management
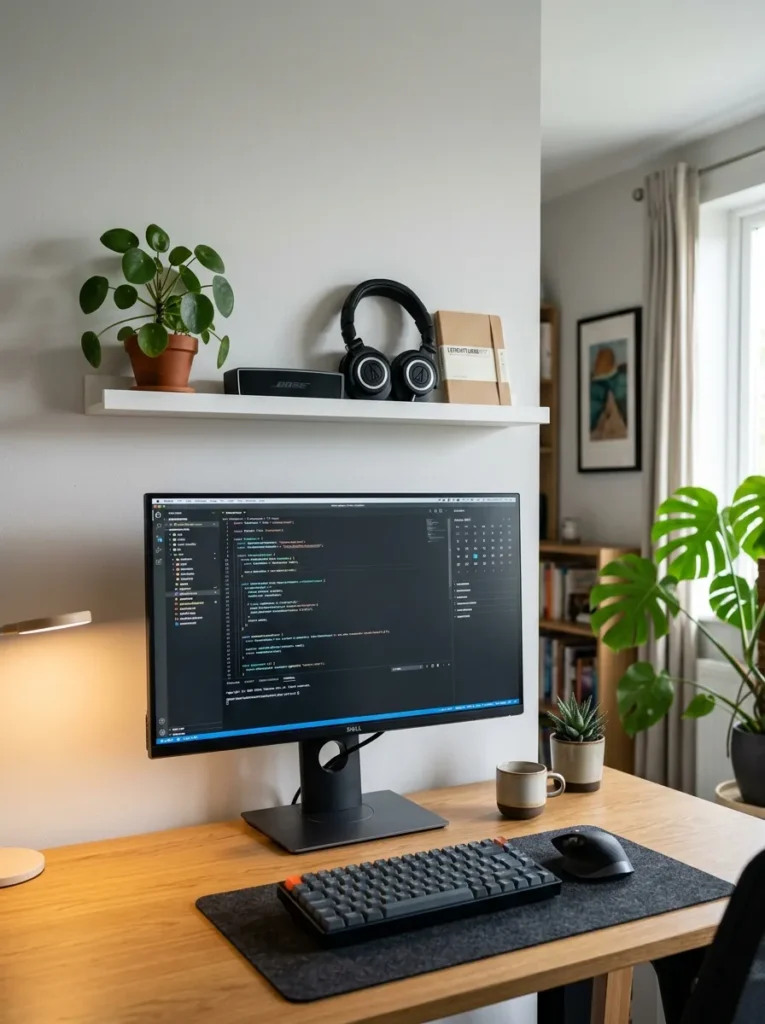
Vibe: The desk MOSSLANDA feels like adding a premium workspace accessory that organizes everything without touching the desk surface — the above-monitor zone finally put to use.
Why it works: A MOSSLANDA installed above a home office monitor applies the workspace organization principle of zone stratification — a standard home office desk has three vertical zones: below-desk (rarely used except for CPU towers and cable management), desk-surface (the primary working zone, perpetually cluttered), and above-monitor (typically empty wall space despite being within arm’s reach and perfect for lightweight items that don’t need desk-surface access but are used regularly). A MOSSLANDA in the above-monitor zone captures this empty space for headphone parking, notebook storage, a small plant, and small peripherals that would otherwise accumulate on the desk surface — clearing the desk without removing anything from practical reach.
How to get it: Install at a height where the ledge’s lower edge clears the monitor top by at least 8–10cm (to allow airflow and prevent the ledge from resting on the monitor when cables shift). For most standard monitors at standard desk heights (75cm desk + 40cm monitor = 115cm to monitor top), the MOSSLANDA lower edge should be at approximately 125cm from the floor — checking this against the specific monitor height before installation. Use the 55cm format for a single-monitor setup; the 115cm format for an ultrawide monitor or dual-monitor setup.
Shop The Look
| Product |
|---|
| MOSSLANDA picture ledge 55cm white |
| Small desk plant ceramic pot |
| Headphone hook ledge hang |
| Small Bluetooth speaker compact |
| Notebook small desk reference |
6. Narrow Hallway Shoe and Entry Organization
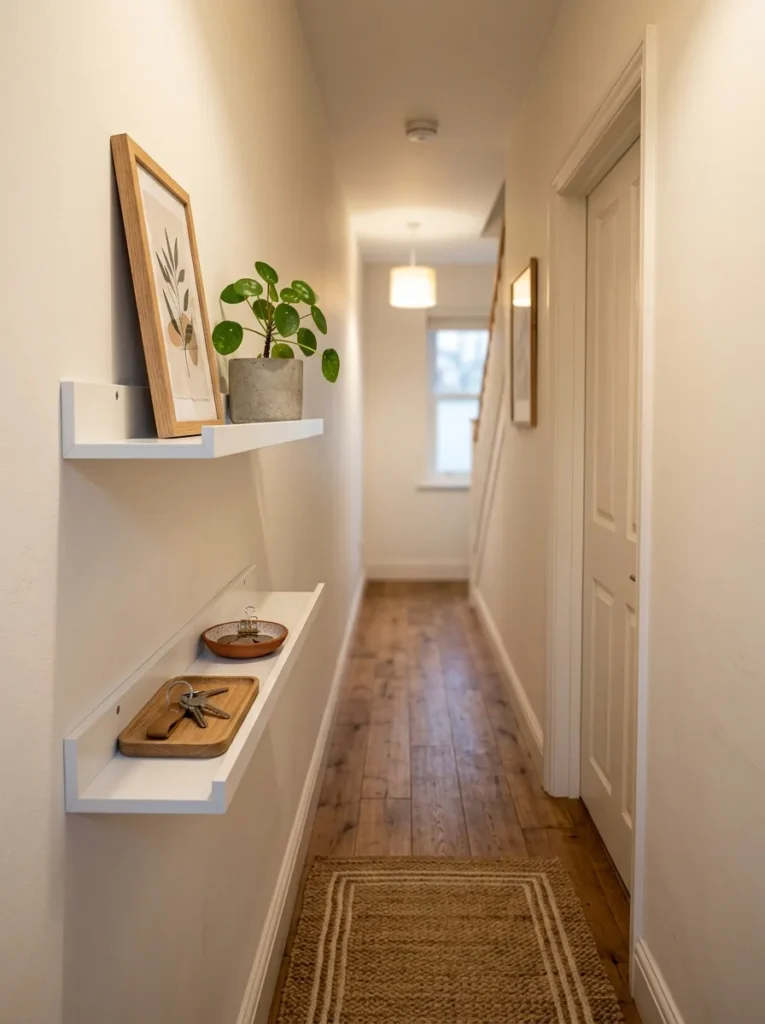
Vibe: The narrow hallway ledges feel like organization created from nothing — the 12cm depth providing functional storage in a corridor where any deeper shelf would create an obstacle.
Why it works: MOSSLANDA ledges in a narrow hallway apply the constrained-space storage principle — in hallways under 100cm width (common in Victorian terrace houses, flat corridors, and small apartment entries), a standard console table (typically 35–45cm deep) projects so far into the corridor that it impedes movement with coats and bags, while removing it leaves the entry without any organizational surface. At 12cm depth, the MOSSLANDA provides the essential entryway functions — a surface for keys, a display for a small plant or framed piece, a leaning spot for mail — without projecting more than 12cm from the wall surface. Two ledges at different heights create the vertical layering that gives the entryway its designed quality while maintaining clear passage width.
How to get it: In a hallway under 90cm wide, the standard MOSSLANDA 55cm length suits most entry wall sections between door frames and light switches. Install the functional ledge (for keys, mail, small tray) at 90–95cm — accessible without bending but below standard light switch height where the wall is usually clearest. Install the display ledge at 125–130cm for a small framed piece and a small plant. Keep the 12cm surface strictly limited to two or three objects per ledge — hallway ledges accumulate clutter faster than any other surface in the home.
Shop The Look
| Product |
|---|
| MOSSLANDA picture ledge 55cm white set 2 |
| Small key tray ceramic or leather |
| Small framed botanical print |
| Small entry mat natural fiber |
| Small plant pot entry hall |
7. Living Room Plant Staging at Varied Heights
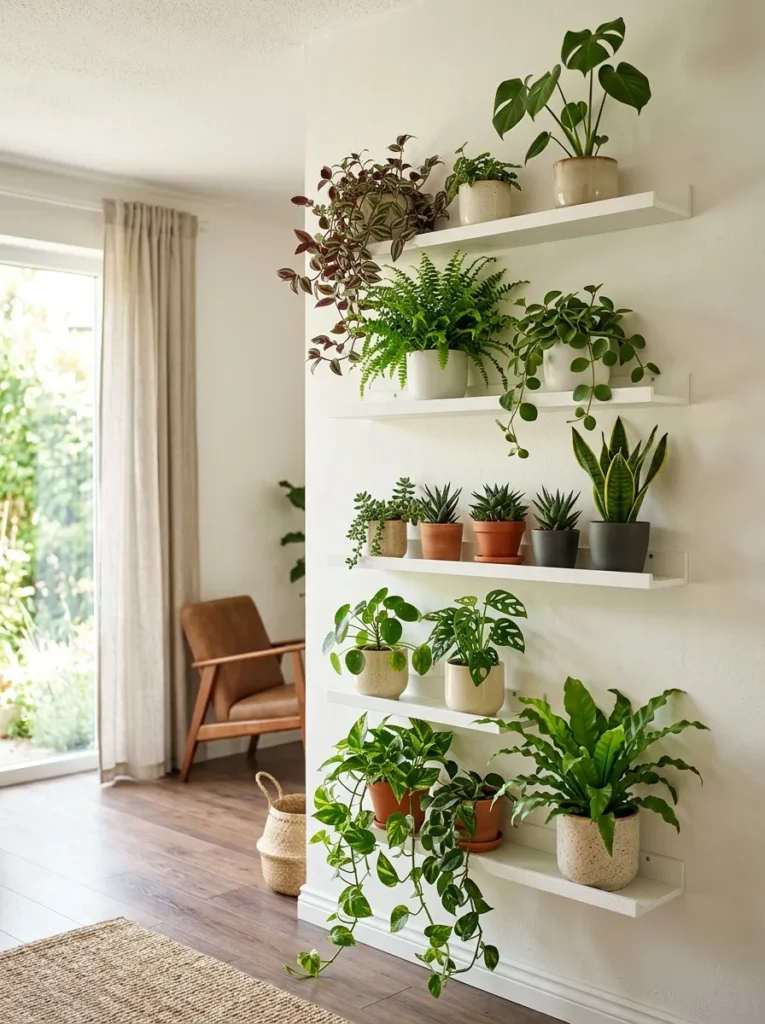
Vibe: The vertical plant wall feels like a living installation that changes with every week as the plants grow — the varied heights creating a botanical landscape that fills the wall without floor space.
Why it works: A multi-height MOSSLANDA plant display applies the biophilic design principle of vertical botanical coverage — a single shelf of plants creates a horizontal plant display; multiple shelves at varied heights create a vertical plant landscape that fills the wall from floor level to near ceiling. This vertical distribution is particularly valuable in small living rooms where floor space is at a premium — the plants consume no floor area but create the maximum visual impact of a planted environment. The MOSSLANDA’s 12cm depth is sufficient for plant pots up to approximately 14cm diameter, covering the majority of the small-to-medium houseplant range. Trailing varieties (pothos, string of hearts, devil’s ivy) placed on higher ledges cascade downward naturally, connecting adjacent ledge levels visually.
How to get it: For plant use, verify that each ledge is installed using stud fixings or heavy-duty drywall anchors — watered plants in ceramic pots are heavier than picture frames, and the weight rating should be calculated at maximum pot weight plus wet soil plus drainage water. Use drip trays on all ledges with plants that receive regular watering. Choose plants appropriate for the wall’s light level — the distance from natural light affects which plants thrive on which ledge, with the ledges closest to the window typically receiving more light than those away from it.
Shop The Look
| Product |
|---|
| MOSSLANDA picture ledge 55cm white set 5 |
| Small ceramic plant pot set varied |
| Trailing pothos indoor plant |
| Small succulent plant set |
| Drip tray set ceramic clear |
8. Above-Door Storage in a Small Room
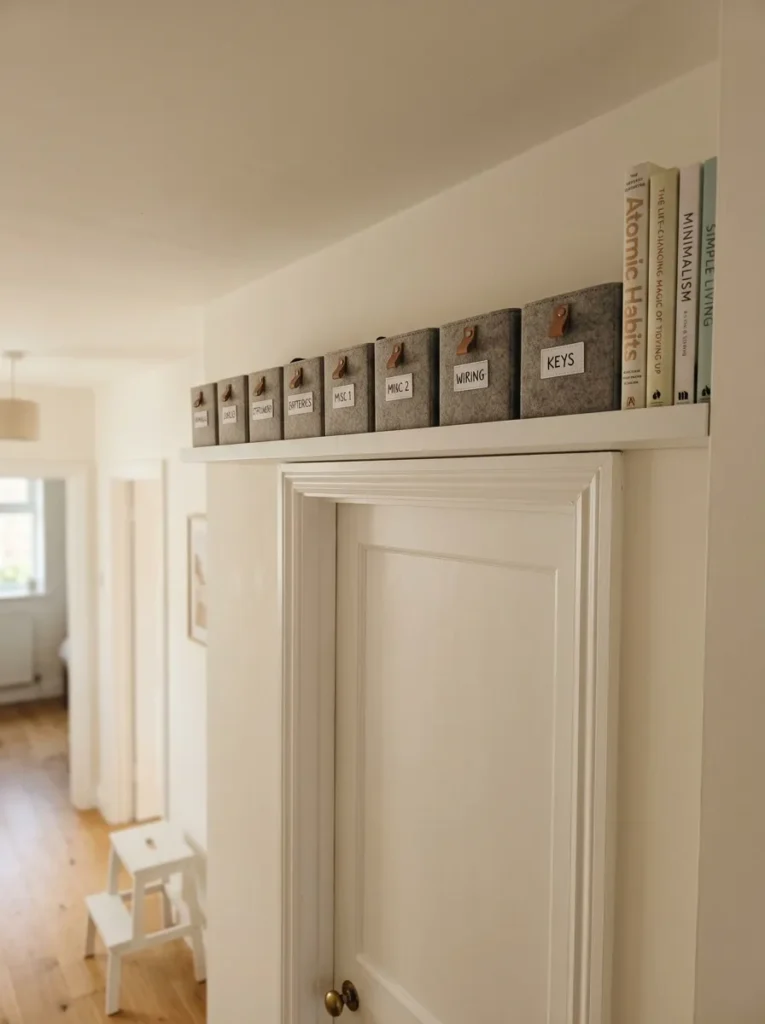
Vibe: The above-door ledge feels like discovering an extra storage room inside an existing room — the unused dead zone above every door suddenly converted to usable space.
Why it works: Above-door MOSSLANDA storage applies the dead zone activation principle at its most overlooked application — the wall space above an internal door (from the top of the door frame to the ceiling, typically 20–30cm of height with standard 210cm doors in 240cm ceiling rooms) is the single most consistently unused storage zone in any domestic space. A MOSSLANDA 115cm ledge installed immediately above the door frame spans the door opening and the wall sections on either side, creating a continuous above-door storage surface at a height appropriate for infrequently accessed but space-consuming storage (seasonal items, rarely referenced books, overflow storage from a full bookshelf). The above-door zone is also at eye level when viewed from across a room, making it visible but not intrusive.
How to get it: Install the MOSSLANDA immediately above the door frame’s top edge — in most UK and US domestic door configurations, this positions the ledge at approximately 213–215cm from the floor. The ledge must be fixed into the wall studs (which in standard timber-frame construction flank each door opening) rather than into the relatively thin plaster or drywall above the door — stud fixings at this height, with the ledge’s weight potentially exceeding the standard rating if stacked with small boxes, are essential. Items stored at this height require a step stool for access — assign only infrequently needed items to this ledge.
Shop The Look
| Product |
|---|
| MOSSLANDA picture ledge 115cm white |
| Stud finder tool wall location |
| Uniform storage box small labeled set |
| Step stool folding storage |
| Label maker tape storage box |
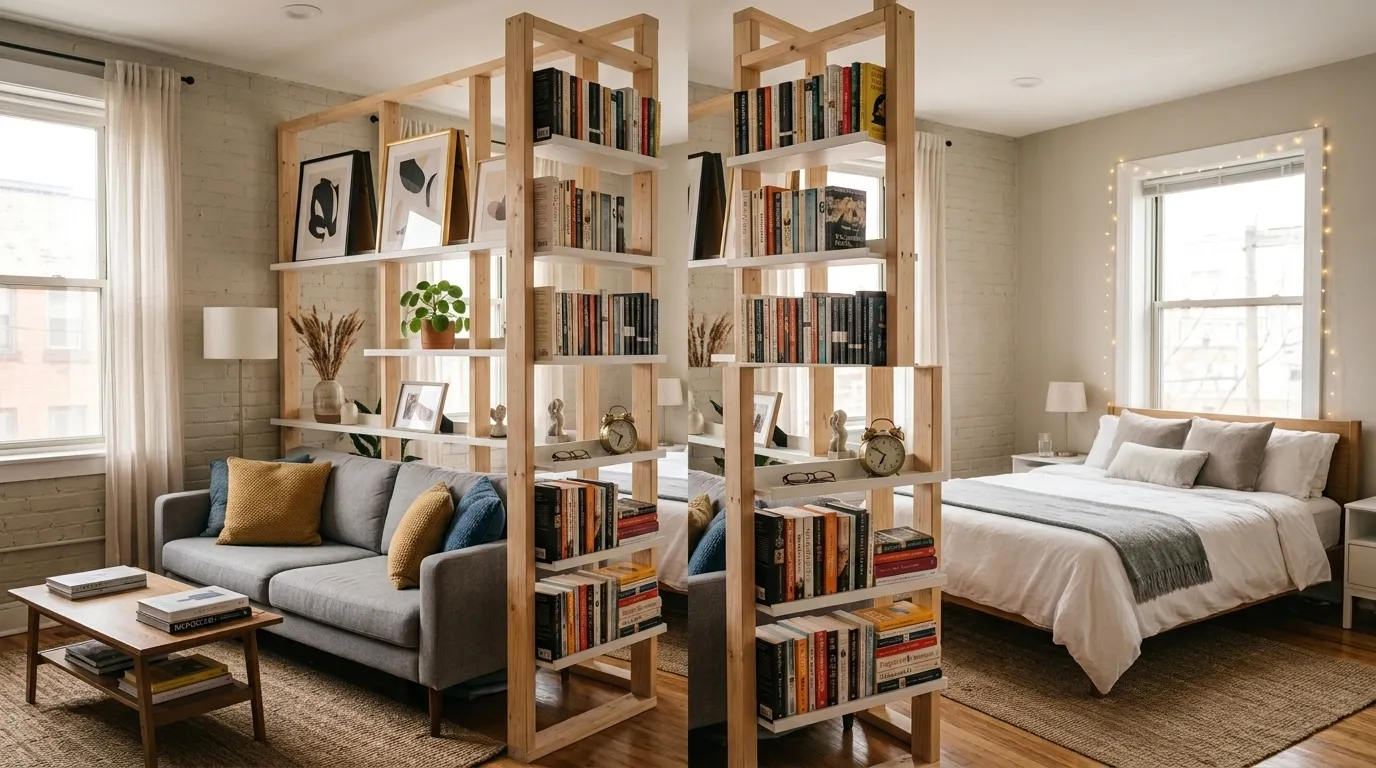
9. Studio Apartment Room Divider with Dual-Facing Shelves
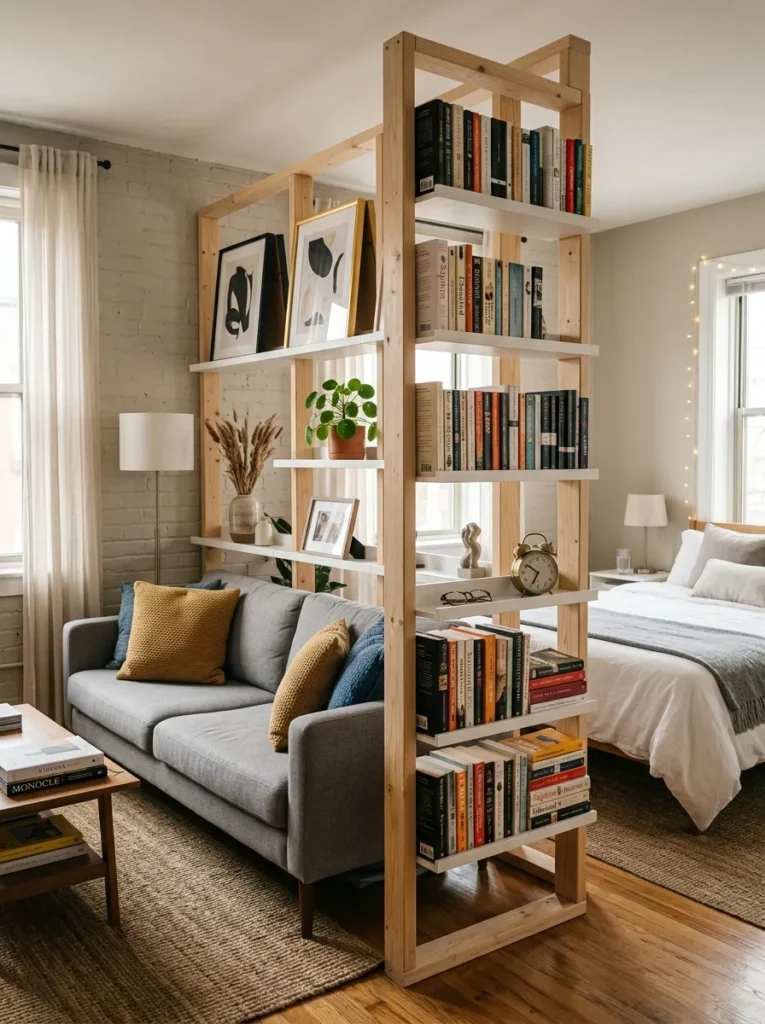
Vibe: The dual-facing room divider feels like getting two bookshelves and a room partition for the cost of a few ledges — the back-to-back mounting turning one structural solution into three functional outcomes simultaneously.
Why it works: Back-to-back MOSSLANDA ledges on a studio apartment divider apply the dual-use structure principle — a room divider that simply blocks the sightline between zones is doing one job; a room divider that also provides storage and display on both of its faces is doing three jobs (division, storage facing zone one, and storage facing zone two) simultaneously from a single structural footprint. The MOSSLANDA’s shallow depth is specifically appropriate for this application because a 12cm ledge on each face of a divider adds only 24cm total depth to the divider’s structural element — a standard freestanding divider with MOSSLANDA storage on both faces projects the same total depth as a single standard bookshelf, with twice the display surface and the additional room-dividing function.
How to get it: The simplest structural approach is a timber-frame panel (four 2×2 timber lengths forming a rectangular frame, covered with a sheet of 9mm plywood or OSB board) mounted to the wall at one end and freestanding at the other. Screw MOSSLANDA ledges through their rear fixing channels directly into the panel faces on both sides. An alternative using an existing KALLAX unit as the divider (providing both room division and cube storage) with MOSSLANDA ledges attached to the KALLAX’s back face converts a single storage piece into a dual-facing display-and-storage divider.
Shop The Look
| Product |
|---|
| MOSSLANDA picture ledge 55cm set 4 |
| KALLAX unit room divider base |
| Framed print living zone side |
| Small plant display living side |
| Small clock sleeping zone side |
10. Toddler Art Gallery — Rotating Display at Child Height
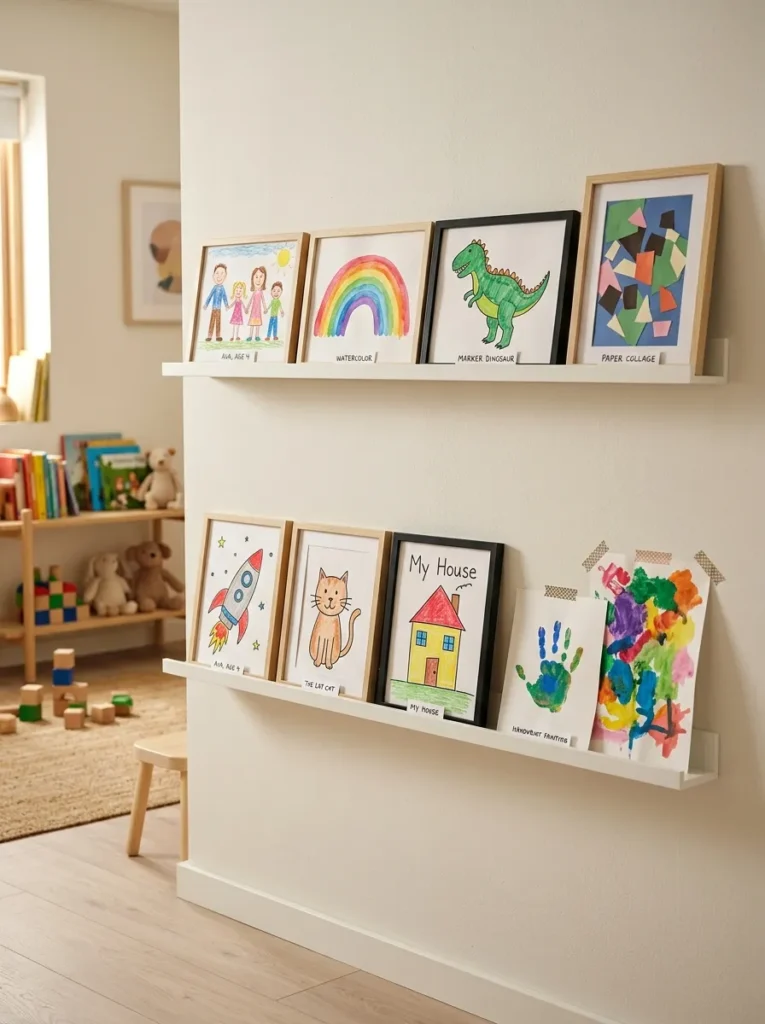
Vibe: The child’s art gallery feels like the most respectful possible use of a small wall — the child’s work given gallery-level status at their own eye height.
Why it works: A rotating children’s art gallery on MOSSLANDA ledges applies the child development principle of environmental self-representation — children whose artwork is displayed in their environment demonstrate higher self-concept and greater creative motivation than those whose work is filed or discarded. The MOSSLANDA ledge system’s specific advantage for children’s art display over wall-hung frames or sticky mounts is its rotation-friendly format — swapping one piece of artwork for a new one requires only lifting the old frame off the ledge and placing the new one, without removing any wall fixtures. This ease of rotation encourages frequent display updates that keep the gallery current with the child’s most recent work and prevent the gallery from becoming a static display that loses the child’s engagement over time.
How to get it: Install two ledges at 70cm and 100cm height — within comfortable reach for a child of 3–7 years and at eye height when the child is standing. Purchase a set of thin simple frames in consistent sizes (A4 and A5 are the most practical for children’s artwork) that fit the MOSSLANDA’s depth when leaning — the artwork should lean against the wall at approximately 10 degrees without falling. Replace the artwork displayed on the ledge at the end of each week or fortnight, allowing the child to select which pieces from the previous period they want displayed.
Shop The Look
| Product |
|---|
| MOSSLANDA picture ledge 55cm white set 2 |
| Simple thin frame black A4 set |
| Simple thin frame natural A5 set |
| Child height mirror adjacent display |
| Warm children’s room paint sage |
11. Bedroom Floating Bedside Table Alternative
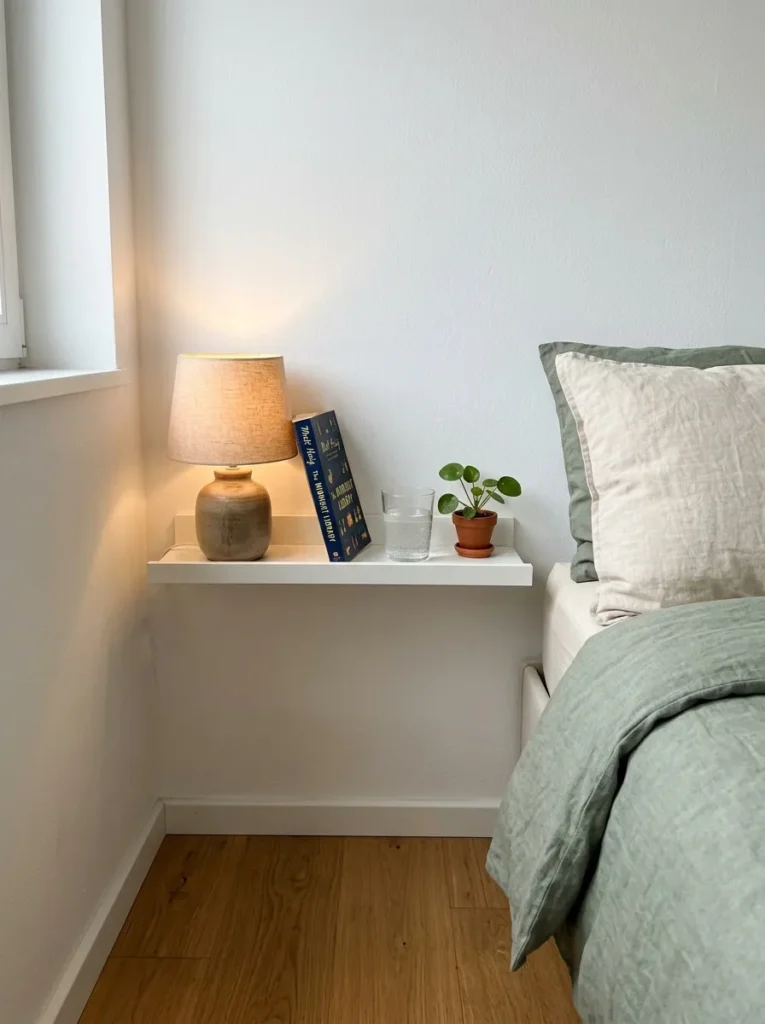
Vibe: The floating MOSSLANDA bedside feels like a small-room superpower — the full bedside function without a single square centimetre of floor footprint.
Why it works: A MOSSLANDA as a floating bedside table alternative applies the floor space reclamation principle — a standard bedside table (even a small one at 40×40cm) consumes 0.16 square metres of floor area on each side of the bed, which in a small bedroom is the difference between comfortable movement around the bed and a constrained squeeze. A wall-mounted MOSSLANDA provides the identical bedside surface function (lamp, book, water, small object) at zero floor footprint, because the ledge is supported entirely by the wall fixings. At 12cm depth, the MOSSLANDA provides slightly less surface area than a standard bedside table but accommodates all the items that constitute a functional bedside arrangement, because the front lip retains a glass of water and the leaning format suits a book naturally.
How to get it: Mount at precisely the height of the mattress surface (measure from floor to the top of the mattress and install the MOSSLANDA at this height — this positions the ledge surface flush with the mattress top, which is the correct height for arm-level accessibility from lying and sitting positions). A bedside lamp on a MOSSLANDA requires a lamp no heavier than approximately 1.5kg (a simple ceramic or glass base with a small linen shade) to remain within the ledge’s weight rating. Route the lamp cord down the wall behind the bedhead or through a small grommet hole in the wall for the clearest visual result.
Shop The Look
| Product |
|---|
| MOSSLANDA picture ledge 55cm white |
| Small ceramic bedside lamp linen shade |
| Small plant pot bedside ceramic |
| Warm white LED bulb 2700K small |
| Wall grommet cord concealment set |
12. Bathroom Towel and Small Storage Above the Toilet
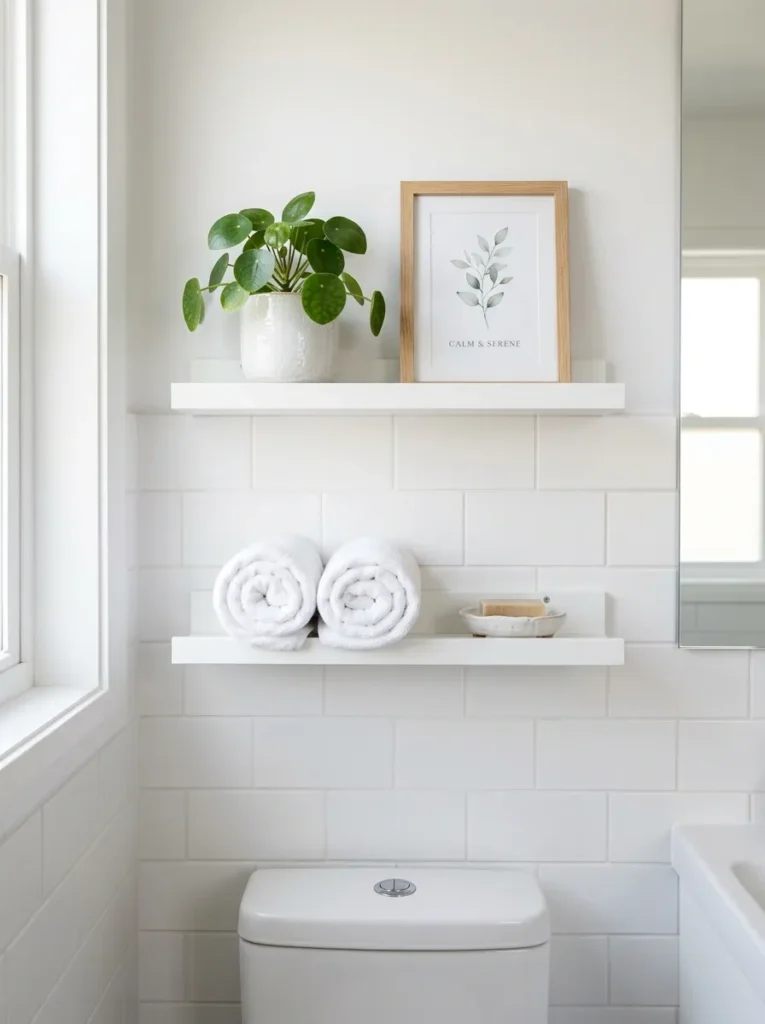
Vibe: The above-toilet MOSSLANDA feels like a complete bathroom storage solution from a wall section no other furniture can use — the narrow space between the cistern top and the ceiling finally organized.
Why it works: MOSSLANDA ledges above a toilet cistern apply the micro-territory activation principle — the 40–50cm wide wall section above a toilet (constrained by the cistern below and the ceiling above, typically leaving only 60–90cm of usable wall height) is unusable for most standard shelving because standard shelves are too deep to project over the cistern without obstruction. At 12cm depth, the MOSSLANDA projects within the available depth over the cistern in most toilet configurations, fitting in a space that deeper shelving cannot. Two ledges at 100cm and 125cm height (typically 20cm and 45cm above the cistern lid respectively) create a complete above-toilet storage solution in what is otherwise the bathroom’s largest dead zone.
How to get it: Measure the distance from the cistern’s back face to the toilet room’s wall — this distance is the maximum ledge depth available without the ledge projecting over the cistern lid. The MOSSLANDA at 12cm depth typically fits within this constraint in most toilet configurations, but verify before installation. Use moisture-resistant fixings and maintain at least 5cm clearance between the lower ledge and the cistern lid to allow the cistern to be removed for maintenance without ledge removal. Install the lower ledge at 100cm height and upper ledge at 125cm height for accessible reach.
Shop The Look
| Product |
|---|
| MOSSLANDA picture ledge 55cm white set 2 |
| Rolled white hand towel set |
| Small plant white ceramic pot bathroom |
| Small framed print bathroom ledge |
| Moisture-resistant anchor set bathroom |
13. Craft Room Washi Tape and Small Supply Organization
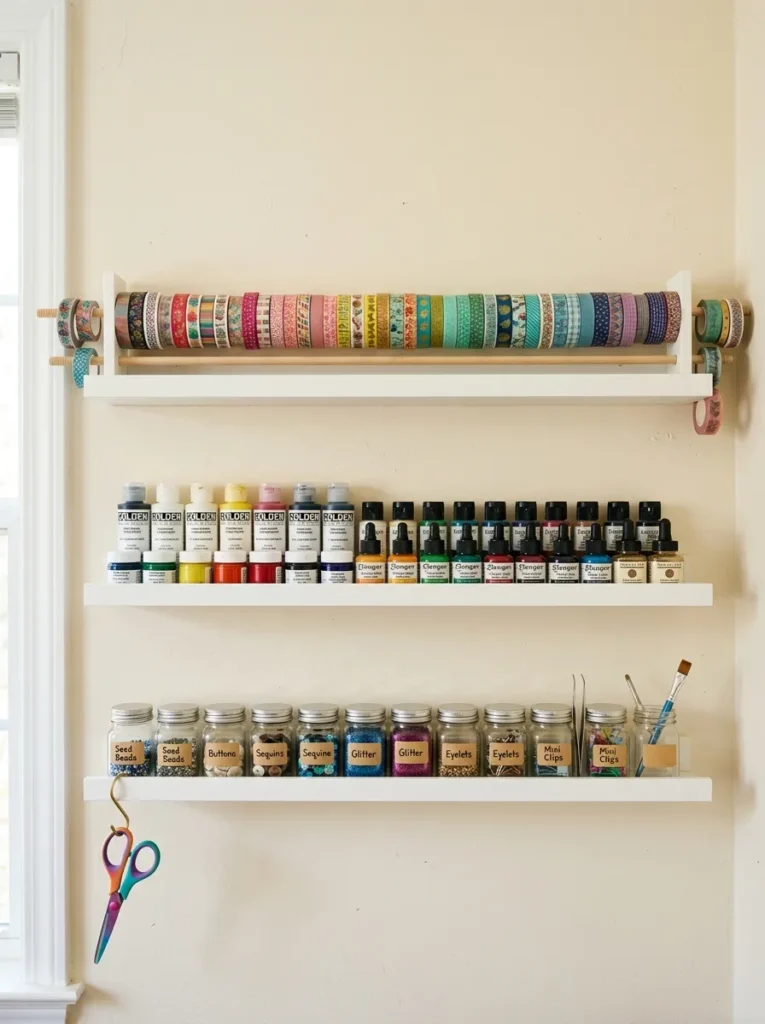
Vibe: The craft supply MOSSLANDA wall feels like the most organized version of a craft room’s small-item nightmare — washi tape, paint pots, and supply jars arranged in visible, front-facing rows that make every material findable at a glance.
Why it works: A craft room MOSSLANDA supply organization system applies the craft storage principle of visibility-first organization — small craft materials (washi tape, paint pots, ink bottles, small jars of beads or buttons) stored in drawers or boxes are effectively invisible and therefore effectively unused. The same materials arranged front-facing on MOSSLANDA ledges are visible, inspiring, and accessible in one motion. The washi tape on a dowel rod resting on the top ledge is the specific storage solution that converts the washi tape collection from a tangled pile (in a drawer) to an accessible display (on the ledge) — the rolls slide off the rod individually without disturbing others and return to the rod in a single sliding motion.
How to get it: Install three MOSSLANDA 115cm ledges at 100cm, 130cm, and 160cm height. For the washi tape ledge, cut a 1.2cm diameter dowel rod to 113cm length (2cm shorter than the ledge to fit within the ledge’s front lip on each end) and rest on the ledge — the washi tape rolls thread onto the dowel and rest against the back wall, held by the front lip. For the paint pot and supply jar ledges, arrange containers front-facing with labels visible. Use the 2cm front lip as a retention device for all cylindrical containers — both the paint pots and the supply jars will be retained naturally by the lip.
Shop The Look
| Product |
|---|
| MOSSLANDA picture ledge 115cm white set 3 |
| Wooden dowel rod 1.2cm washi tape |
| Washi tape collection varied |
| Small paint pot set front-facing |
| Small glass supply jar set labeled |
14. Staircase Wall Gallery with Multiple Angled Ledges
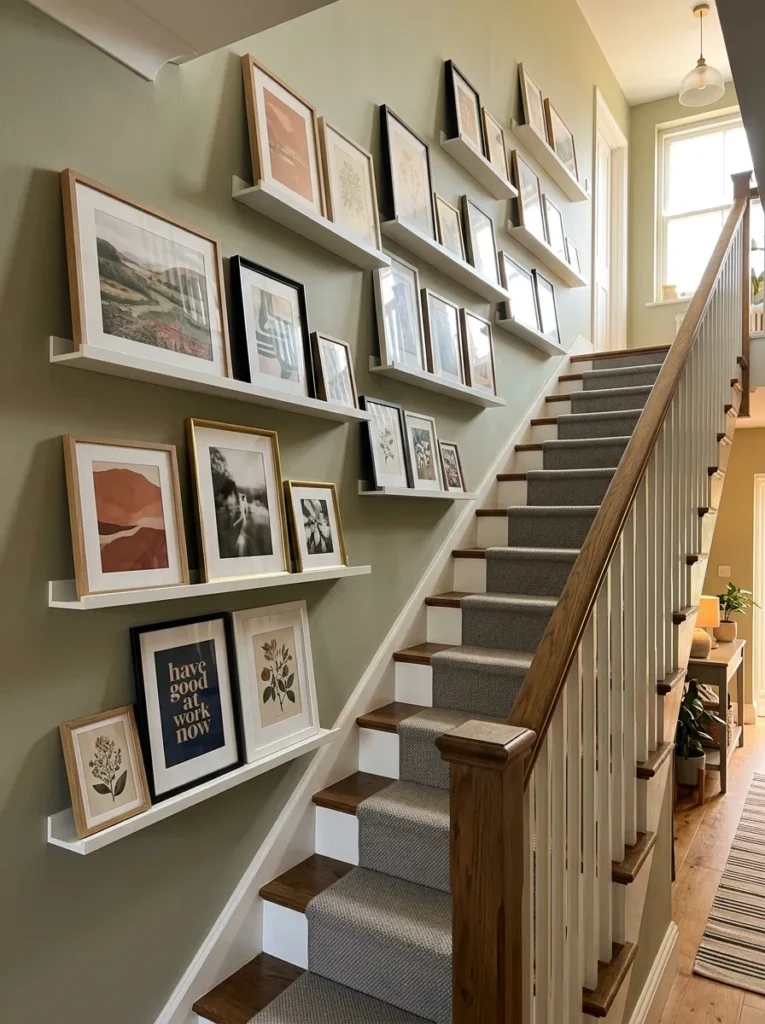
Vibe: The staircase gallery feels like ascending through an art collection — the stepped ledge positions rising with the staircase to create a gallery experience of a journey rather than a single destination.
Why it works: A staircase gallery using stepped MOSSLANDA ledges applies the architectural decoration principle of linear element celebration — the staircase wall is the home’s longest uninterrupted vertical surface and one of the most frequently experienced (every trip between floors passes it), yet it is typically decorated as a single flat surface with frames hung at varied heights. The MOSSLANDA system converts the staircase wall into a gallery that actively follows the architectural form of the staircase — each ledge steps upward with the stair rise, creating a composition that rises with the person ascending the stairs. Each ledge remains perfectly horizontal despite the diagonal staircase wall, creating a series of gallery shelves that step diagonally up the wall in a staircase pattern.
How to get it: Mark the ledge positions on the staircase wall by measuring from each stair tread level — the ledge above each tread step should be at approximately 160cm above that specific tread (measuring vertically from the tread to the ledge center). This keeps the gallery at a consistent visual height relative to a person standing on each step, even as the absolute floor height changes. Use a spirit level to ensure each individual ledge is exactly horizontal — the ledges step diagonally up the wall but each individual ledge must be perfectly horizontal for frames to lean stably. Space ledge positions at one-step or two-step intervals depending on the staircase rise height and available wall width.
Shop The Look
| Product |
|---|
| MOSSLANDA picture ledge 55cm white set 6 |
| Level tool precise horizontal |
| Varied frame set staircase gallery |
| Art print set staircase warm tones |
| Staircase wall paint warm white |
How to Start Your MOSSLANDA Storage Transformation
The single best first move before installing any MOSSLANDA ledge is conducting a dead zone audit — walking through every room in the home and identifying wall sections that are currently storing nothing but empty air: the wall above the toilet, the strip beside the door frame, the section above the door, the space between kitchen cabinets, and the wall above the desk monitor. These dead zones are the MOSSLANDA’s primary opportunity, and identifying them before purchasing any shelves allows the purchase to be precisely calibrated to the actual opportunities in the specific home rather than to a generic shopping list. Most homes have 8–15 linear metres of dead wall space in dead zones that the MOSSLANDA can productively occupy — far more than most inhabitants realize.
The most common mistake in MOSSLANDA installation is using insufficient fixings — the picture ledge’s design suggests that it is a lightweight decorative item, and many installers use the smallest available drywall anchor rather than locating and fixing into wall studs. In its picture-leaning application with lightweight frames, this is often adequate. In the storage applications described in this list (plant pots with wet soil, glass jars with product, books, kitchen items with significant combined weight), the load on a 115cm ledge can approach or exceed the drywall anchor’s rated capacity, particularly with dynamic loads (a trailing plant swinging in a breeze, a child reaching for a book). Locating wall studs (using a stud finder, available for $15–25) and fixing at least one anchor per ledge into a stud rather than relying entirely on drywall anchors provides the structural reliability that storage applications require.
Three specific items under $50 that enable the most impactful MOSSLANDA installations: a stud finder ($15–25, enabling confident stud-fixed installation for the storage applications that drywall anchors alone cannot reliably support), a digital level app supplement with a small physical torpedo level ($8–15, ensuring every ledge is perfectly horizontal — a 1-degree tilt is invisible to the installation eye but becomes obvious in the finished display when frames lean or jars roll), and a pack of twenty uniform small labels or a label maker tape roll ($8–12, for the labeling system that converts MOSSLANDA storage from organized-appearing to genuinely findable). These three items combined for under $50 ensure that every MOSSLANDA installation in this list is safely fixed, precisely level, and properly labeled.
A single MOSSLANDA installation (one shelf in one application) takes under an hour from first stud-finding to final leveling, costing $5–13 in the shelf plus $5–10 in appropriate fixings. A complete room system (spice storage, bathroom organization, or plant display requiring three to five ledges) takes two to three hours and costs $25–65 in shelves plus fixings. A whole-home MOSSLANDA transformation (every room addressed with appropriate ledge applications from this list) is achievable over a single weekend for $80–200 in shelves and fixings — the most comprehensive small-space storage transformation achievable at any comparable budget.
Frequently Asked Questions About MOSSLANDA Storage Hacks
How much weight can a MOSSLANDA picture ledge hold?
IKEA rates the MOSSLANDA at 5kg maximum load for the 55cm version and 7kg for the 115cm version, but these ratings assume correct installation (into stud or using appropriate drywall anchors) and even load distribution. In practical storage use, a 55cm ledge holding six small glass spice jars (approximately 300g each, total 1.8kg) is well within this limit; a 55cm ledge holding two large ceramic plant pots with wet soil (approximately 1.5–2kg each, total 3–4kg) approaches the limit and should be stud-fixed rather than drywall-anchored. Never exceed the stated weight limit, and always round down to 70% of the rated limit for storage applications with dynamic loads (watered plants, children’s books that may be pulled forcefully). For heavier applications, a standard shelf bracket system with a deeper shelf board is the appropriate specification.
Can MOSSLANDA ledges be used in wet rooms or bathrooms?
MOSSLANDA ledges are made from MDF (medium-density fibreboard) with a white paint finish — not inherently moisture-resistant materials. In a bathroom that is not directly shower-adjacent (a toilet room, a basin room, or a bathroom where the ledge is at least 150cm from the shower area), MOSSLANDA ledges perform adequately with no modification. In a wet room or directly shower-adjacent position, standard MOSSLANDA is not the appropriate specification — purpose-built bathroom shelving in stainless steel, glass, or ceramic provides the moisture resistance that MDF cannot. For the above-toilet and above-vanity applications in this list, the MOSSLANDA performs adequately in normal bathroom humidity conditions but benefits from an additional coat of matte varnish on the shelf surface and underside for moisture protection.
What is the best way to ensure MOSSLANDA ledges are perfectly level?
The most reliable method for ensuring a MOSSLANDA ledge is perfectly horizontal across its full length is a two-point level check — place a spirit level or phone-based digital level at the left third of the ledge and the right third of the ledge and adjust the fixing height at each point until both positions read horizontal. A single center-point level check is insufficient for the 115cm ledge length — a small discrepancy at each end (invisible when measured at the center) becomes a significant visible tilt at the ledge ends when frames or jars are placed at the full ledge width. For the staircase gallery application (Idea 14), each individual ledge must be checked for horizontal independently because the staircase wall’s diagonal plane creates a natural tendency to install ledges that follow the wall’s angle rather than remaining horizontal.
Can MOSSLANDA ledges be painted or modified?
Yes — MOSSLANDA ledges accept standard water-based emulsion paint directly over their white factory finish without priming. Light sanding with 180-grit sandpaper to key the existing surface, followed by two coats of wall paint in any color, converts the white MOSSLANDA to any color appropriate to the room’s palette. The spray-paint transformation used for IKEA mirrors (Idea 3 in the previous article) can be applied equally effectively to MOSSLANDA ledges — a warm matte gold, a sage green, or a warm terracotta MOSSLANDA ledge integrated into a specific room’s palette reads as a design decision rather than a product. The 12cm depth and front lip remain functional after painting, making the customized ledge identical in function to the white original.
How do you use MOSSLANDA in a rental property without damaging walls?
For rental properties where drilling is not permitted, the MOSSLANDA can be installed using a combination of heavy-duty adhesive strips (3M Command Large Strips rated for the appropriate weight per pair) and the specific no-drill approach of securing the ledge to the top of a freestanding bookcase or wardrobe — the ledge attached to the top face of a bookcase with strong adhesive or short screws through the bookcase’s top panel creates a top-of-furniture ledge at the height of the bookcase top. Alternatively, in rental properties where damage-free drilling is an option (using appropriate reversible fixings), a toggle bolt through the drywall provides adequate holding power for the lighter storage applications without requiring stud location. The photo-ledge design of the MOSSLANDA also means it can be balanced on top of freestanding furniture edges (door frames, wardrobe tops, tall bookshelves) without any fixing in light-use display applications.
Ready to Hack Your Space with MOSSLANDA Shelves?
These 14 ideas move through every dimension of what makes the MOSSLANDA an extraordinary small-space tool — from the gallery wall infrastructure that converts an entire wall into a rearrangeable art installation, to the kitchen spice organization that clears the worktop by going vertical, to the studio apartment room divider that does three jobs from a single structure, to the staircase gallery that turns the home’s most-traversed surface into an ascending art experience. Starting with the dead zone audit — walking through every room and identifying the wall sections currently storing nothing but air — is the beginning that makes every subsequent installation purposeful rather than experimental. Identify your home’s three most underused dead zones this week, measure their dimensions, and order the MOSSLANDA lengths that fit them. The stud finder arrives, the level is charged, and the ledge goes in on Saturday. When the spice jars are front-facing on the kitchen wall and the worktop is clear for the first time, and the plant wall is growing upward from knee height to near-ceiling in the living room corner that was previously empty, the MOSSLANDA will have done what the best IKEA products always do — made the home work better than it did before, for less money than anyone expected.