
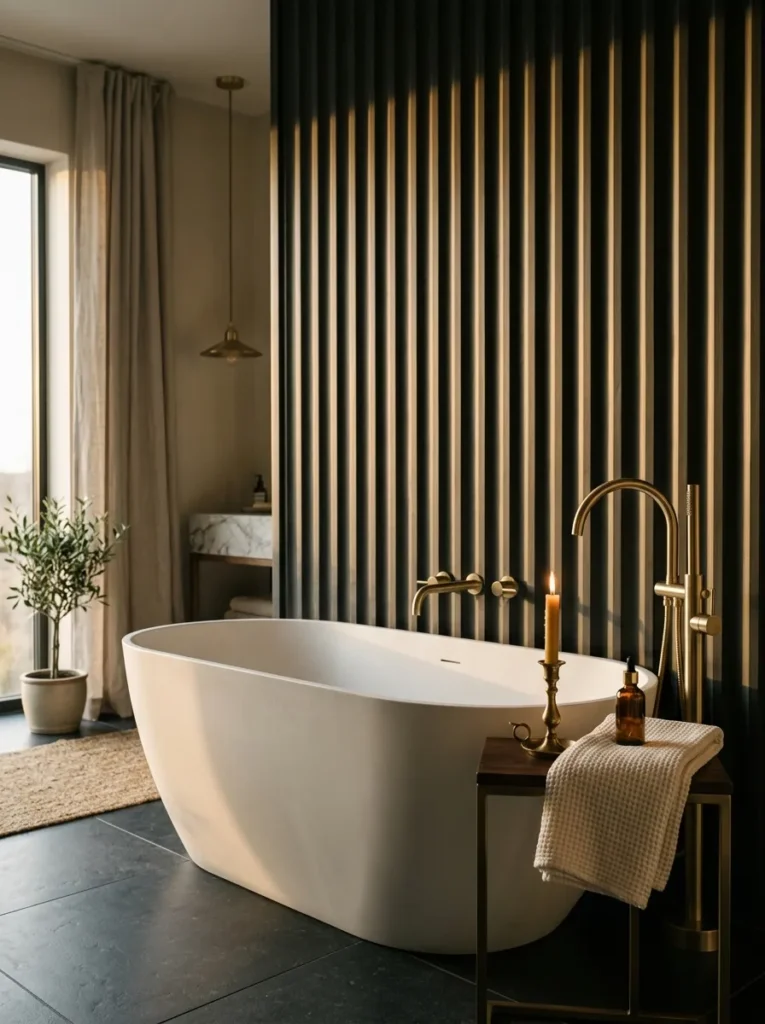
23 Bathroom Wall Panel Ideas That Look Expensive
Expensive-looking wall paneling relies on continuity minimal visible seams, mirrored stone veining, and a single material moment done well, rather than busy ornamentation. This guide gives you 23 bathroom wall panel ideas that look expensive, organized by color, material, lighting, and layout so you can match a technique to your actual budget.
The effect isn’t about square footage or price tag it’s about restraint. A single book-matched slab panel can read as more expensive than a fully tiled room, because the eye notices where a surface stops fighting itself. Light slides across a seamless panel the way it does across real stone, and brass trim catches it in one continuous line instead of a dozen broken ones.
Here are 23 ideas worth saving and stealing.
Why These Bathroom Wall Panels Look Expensive
This look draws from two traditions: classic European boiserie and molded paneling from 18th- and 19th-century French and English interiors, and the modern hospitality-design trick of book-matched stone and lacquered wet walls used in luxury hotel bathrooms. What separates “expensive” from “decorated” is continuity — fewer seams, mirrored veining, and one material doing all the talking instead of five competing finishes.
The palette stays warm and restrained: travertine tone, soft alabaster white, deep emerald, warm charcoal, and bronze. Materials lean toward book-matched marble slab, Venetian plaster (often called Roman clay), smoked oak, antiqued mirror glass, and unlacquered brass trim.
This look is trending now because “quiet luxury” has become a real design category, hospitality-inspired renovations are everywhere on Pinterest, and large-format slab panel technology has made the book-matched look achievable without a full stone-slab budget.
Small bathrooms can absolutely pull this off — in fact, restraint reads as more expensive in a tight footprint than it does in a sprawling one. Prioritize a single material moment, like one mirrored or book-matched panel, rather than trying to cover every wall.
| Element | Detail |
|---|---|
| Philosophy | One seamless material moment over decorative excess |
| Key Materials | Book-matched marble slab, Venetian plaster, smoked oak, antiqued mirror, unlacquered brass |
| Key Colors | Travertine tone, alabaster white, deep emerald, warm charcoal, bronze |
1. Book-Matched Marble Slab Panels for an Instantly Expensive Look
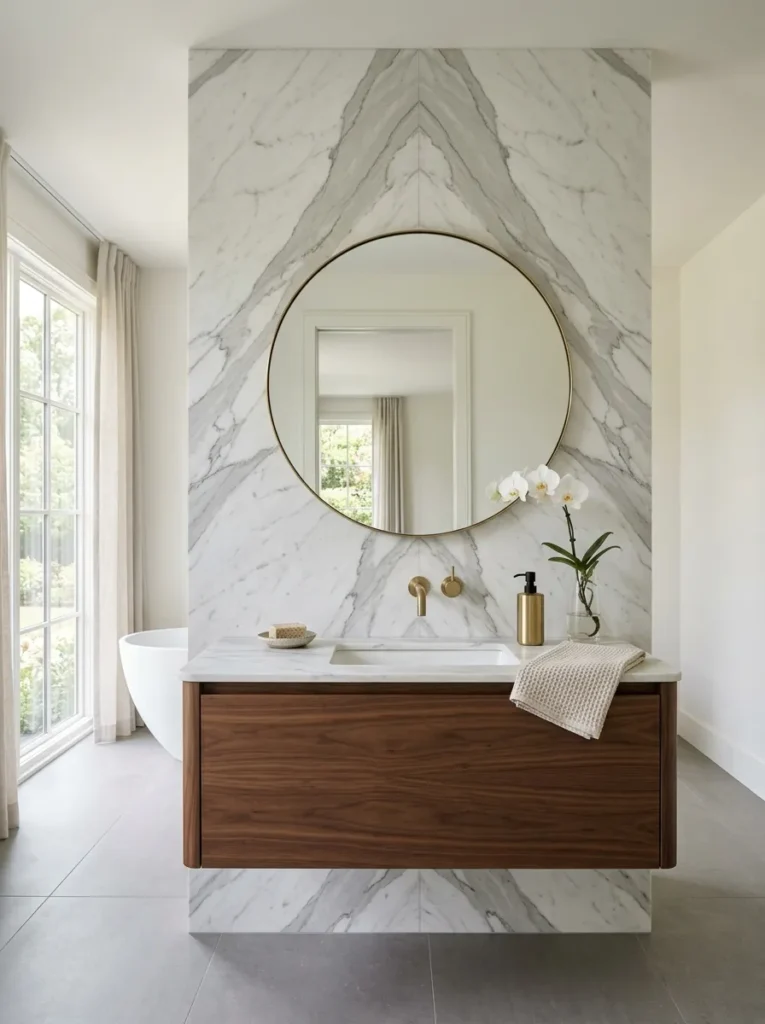
Vibe: Luminous, like the stone itself is the only decoration the room needs.
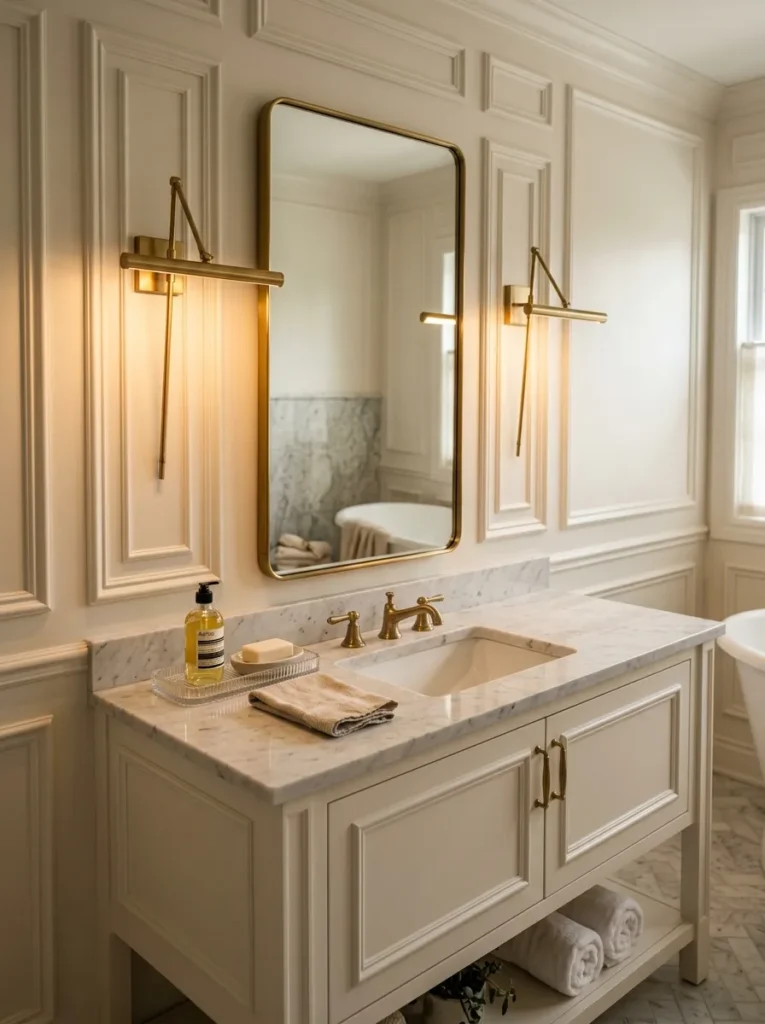
Why it works: Book-matching mirrors the same slab’s veining across a center seam, so the pattern flows as one continuous shape instead of two random halves — a contrast-and-proportion principle that reads as custom stonework even on a single panel.
How to get it: Order two slabs cut from the same block specifically for book-matching, and center the seam directly behind the vanity faucet so the mirrored pattern lines up with the room’s natural focal point.
Quick Win: A large-format porcelain slab with printed book-matched veining gets 90% of this look for a fraction of real marble’s cost.
Shop the Look
| Product |
|---|
| Book-matched porcelain slab panel pair |
| Brushed brass soap dispenser |
| Faux white orchid stem in glass vase |
| Stone-look panel seam sealant |
| Honed marble vanity countertop sample |
Also view: 13 Blue Bathroom Decor Ideas That Feel Like a Spa
2. Warm Travertine-Toned Panel Wall

Vibe: Warm and sun-baked, like the wall has been holding heat all day.
Why it works: Travertine’s natural pitting and warm undertone read as expensive because they’re impossible to fake convincingly with flat paint — the slight texture variation is a material-authenticity cue that signals real stone even from across the room.
How to get it: Choose a travertine-look large-format panel with visible natural pitting rather than a smooth polished finish, which keeps the warmth and texture intact without the maintenance of real porous stone.
Shop the Look
| Product |
|---|
| Travertine-look large-format wall panel |
| Linen waffle-weave bath towels, set of 3 |
| Brass taper candle holder |
| Travertine-toned panel grout, matching |
| Warm white bath mat, ribbed |
Also view: 25 Small Powder Room Wallpaper Ideas Full of Style
3. Backlit Onyx Panel Behind the Tub
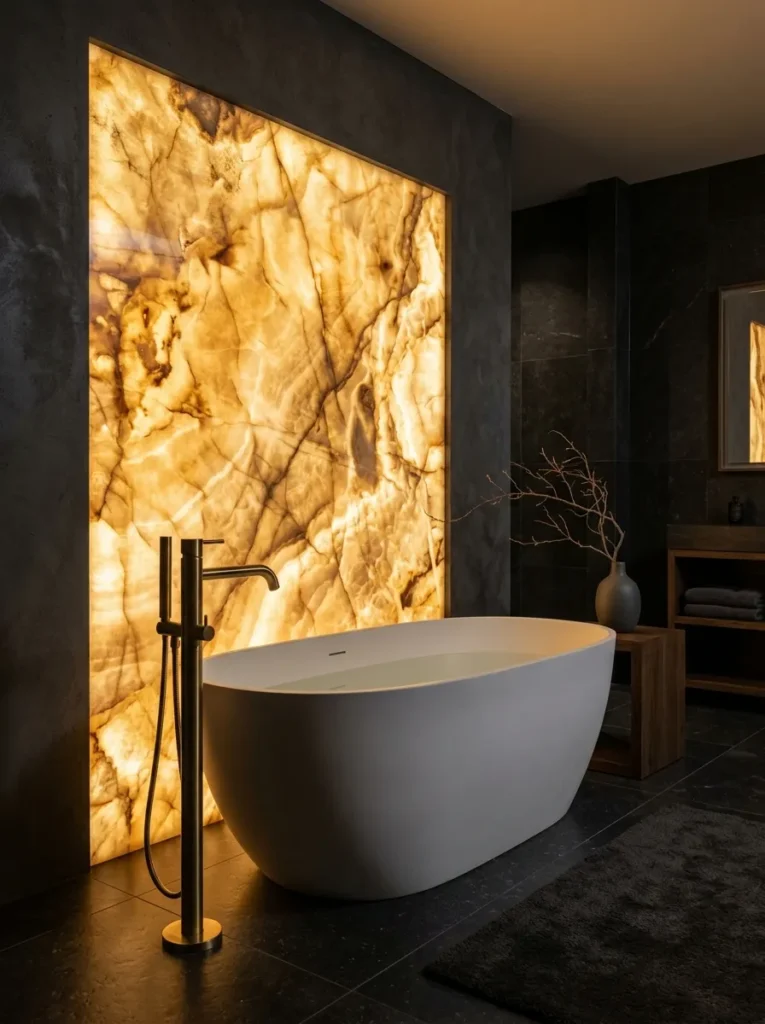
Vibe: Moody, like the wall is lit from somewhere you can’t see.
Why it works: Real onyx is translucent enough to glow when backlit, a light-behavior property almost no other stone shares — even a resin or acrylic panel that mimics this translucency reads as dramatically more expensive than an opaque tile wall ever could.
How to get it: Mount a translucent onyx-look acrylic resin panel over a slim LED light box, wiring it on a separate dimmer switch so the glow can be turned up for a bath and down for everyday use.
Quick Win: A single backlit panel section behind just the tub’s headrest area gets the effect without lighting the entire wall.
Shop the Look
| Product |
|---|
| Translucent onyx-look acrylic resin panel |
| Slim LED light box panel, dimmable |
| Brushed brass floor-mounted tub filler |
| Dried branch arrangement, tall vase |
| Dimmer switch plate, brass finish |
Also view: 15 Bathroom Wall Panel Ideas for Small Bathrooms
4. Floating Vanity Set Against a Floor-to-Ceiling Panel
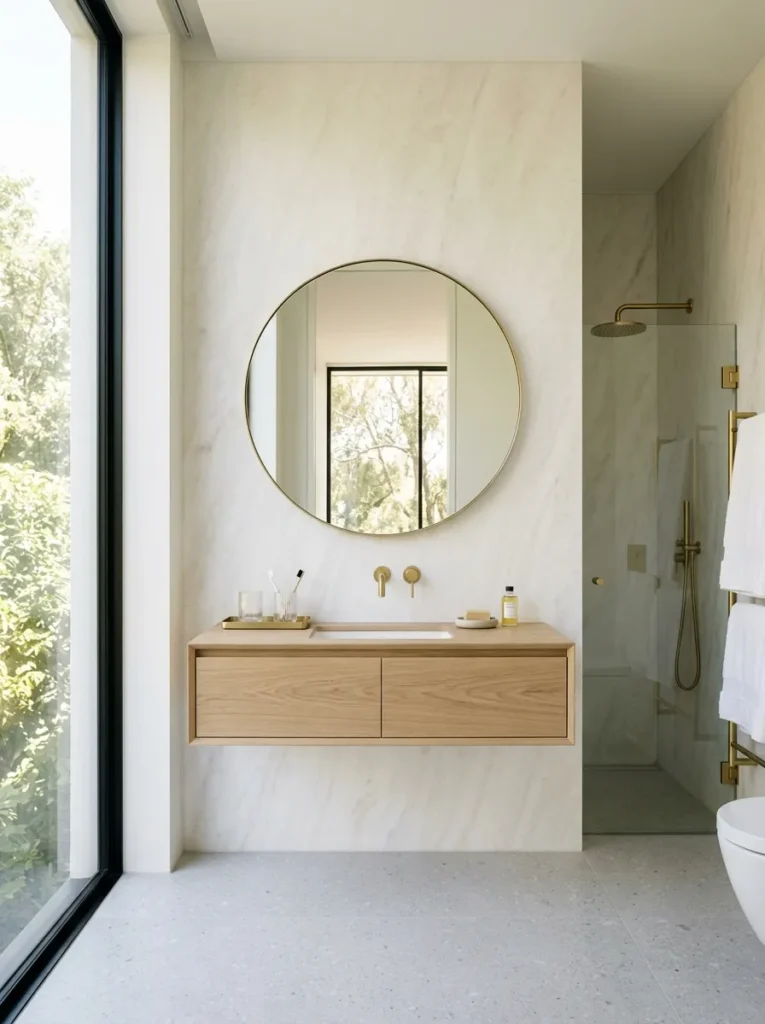
Vibe: Airy and uncluttered, like the wall and the floor both got more room to breathe.
Why it works: A floating vanity exposes floor space at the base of a full-height panel, a furniture-and-negative-space principle that lets the eye register the panel as one continuous plane instead of a backdrop interrupted by cabinetry legs.
How to get it: Choose a vanity narrower than the panel behind it by at least 6 inches on each side, and mount it at standard 32-inch height so the panel reads taller than the furniture in front of it.
Shop the Look
| Product |
|---|
| Floating oak vanity cabinet, single basin |
| Alabaster-toned large-format wall panel |
| Brushed brass vanity tray |
| Ribbed glass drinking tumbler |
| Concealed floating vanity wall bracket |
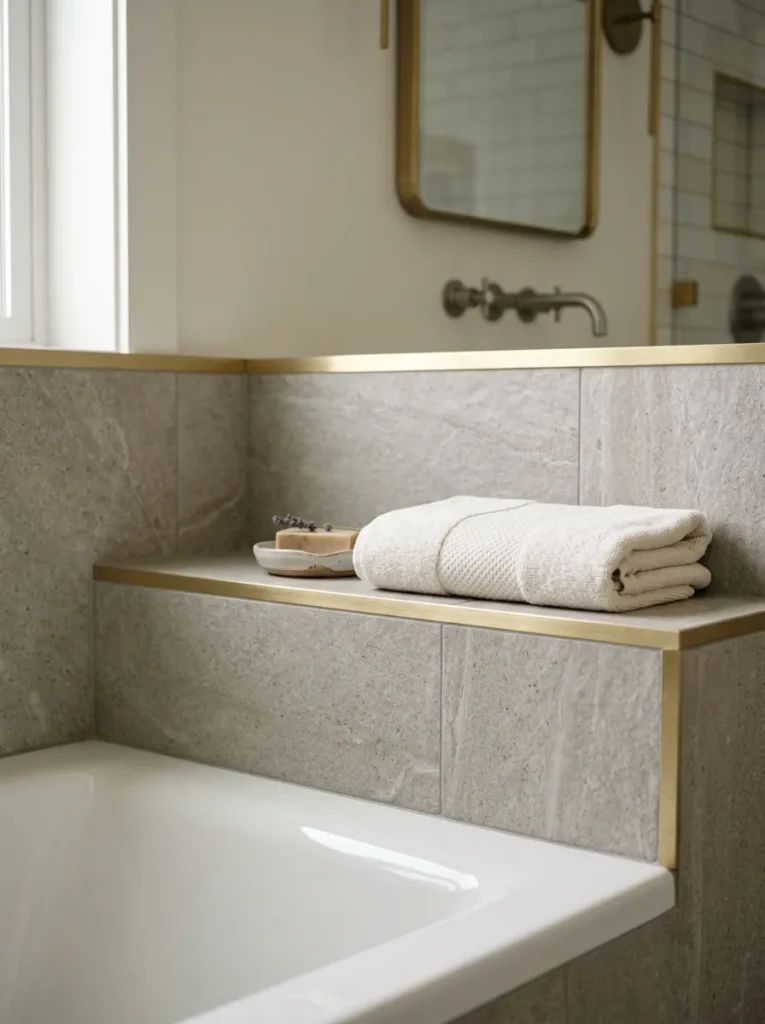
5. Brass Reveal Trim Between Panel Seams
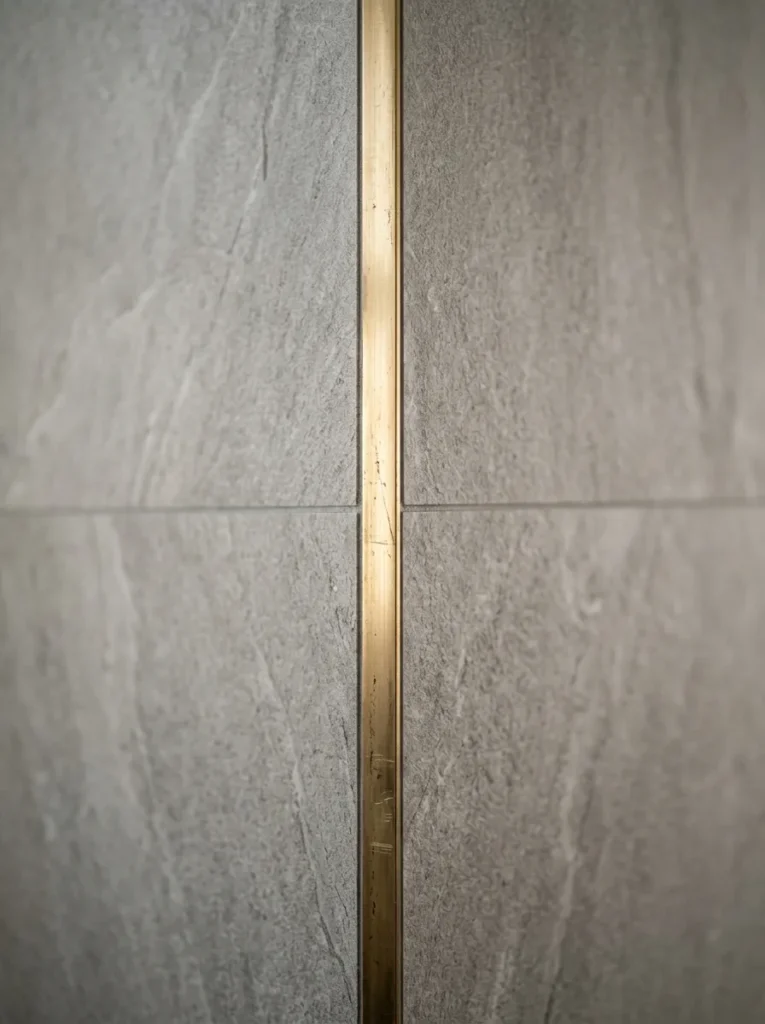
Vibe: Still and precise, like the seam was meant to be seen.
Why it works: A visible metal reveal trim turns an unavoidable panel seam into a deliberate design line instead of a flaw to hide — a contrast principle where the seam becomes the detail, the same trick used in high-end millwork.
How to get it: Install a thin unlacquered brass U-channel trim strip at every panel seam instead of caulking it flush, letting the brass tarnish naturally over time for an aged, intentional look.
Quick Win: Adhesive-backed brass trim strips skip the need for a router or custom channel cutting entirely.
Shop the Look
| Product |
|---|
| Unlacquered brass U-channel reveal trim |
| Adhesive-backed brass trim strips |
| Brass polish-free patina sealant |
| Panel seam measuring template |
| Brass corner trim end caps |
6. Channel-Grooved Smoked Oak Panel
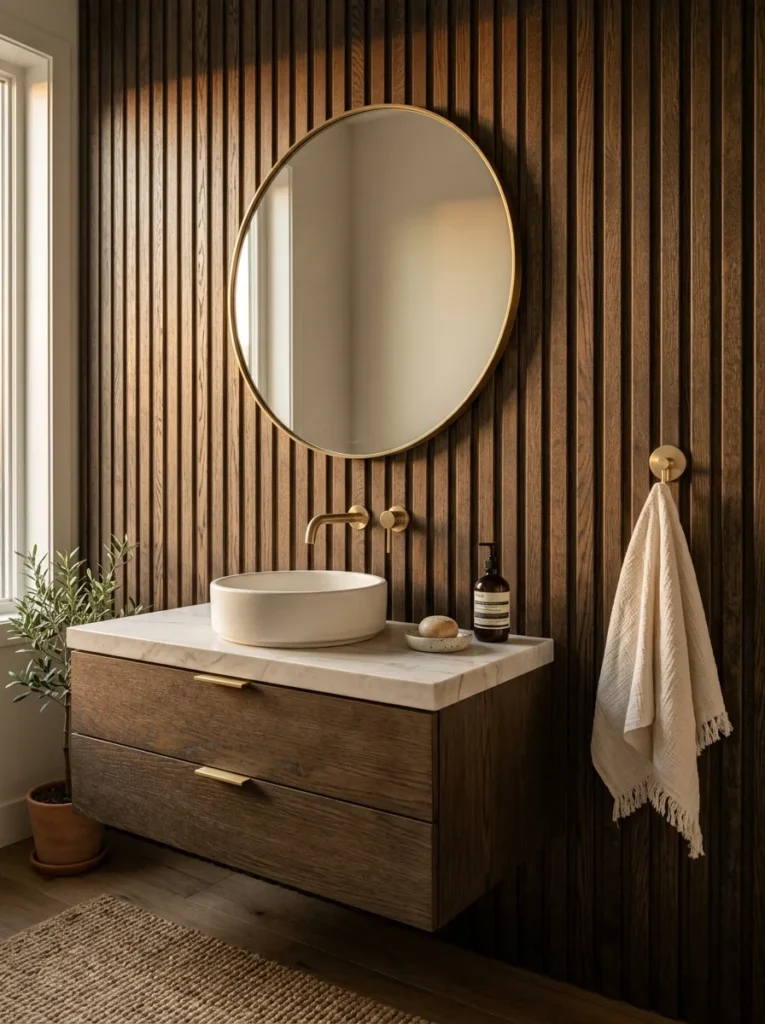
Vibe: Grounded and rich, like the wood has been aged on purpose.
Why it works: Smoking oak darkens the grain unevenly, which is a material-authenticity marker that mass-market stained wood can’t replicate — the deeper channel grooves also cast longer shadows than shallow grooves, adding visual depth that reads as custom millwork.
How to get it: Choose pre-smoked oak veneer panels with channel grooves spaced at least 3 inches apart, sealing with a matte oil finish rather than a glossy lacquer to keep the wood’s natural variation visible.
Shop the Look
| Product |
|---|
| Smoked oak channel-grooved veneer panel |
| Matte oil wood finish, natural |
| Brushed brass single towel hook |
| Small white ceramic catch-all dish |
| Wood panel edge trim, oak-matched |
7. Mirror-Paneled Wall to Multiply Light and Space
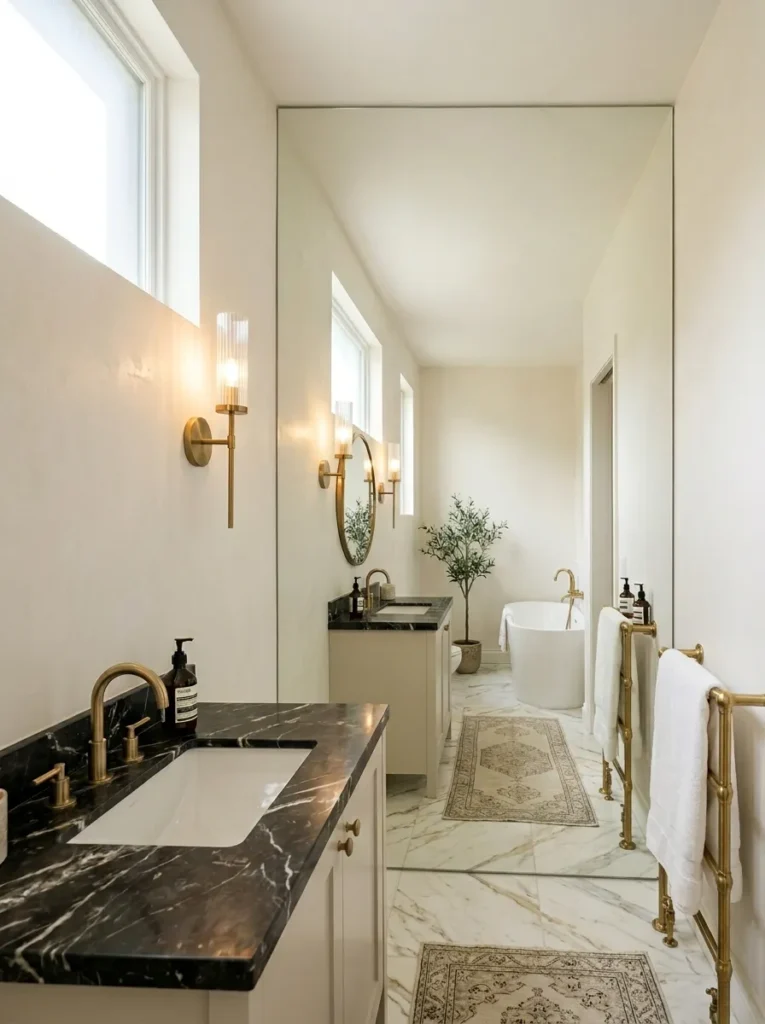
Vibe: Luminous, like the room doubled in size without moving a single wall.
Why it works: A full mirrored panel wall reflects both light and the opposite wall’s depth, a small-space illusion technique that does more to expand a cramped bathroom visually than any paint color could on its own.
How to get it: Mount a single seamless mirror panel — not several smaller mirror tiles — across the widest available wall, positioned opposite the room’s main light source so it reflects daylight rather than a blank wall.
Quick Win: A mirror panel sized to stop just short of the ceiling avoids the cost and risk of a full custom-cut sheet.
Shop the Look
| Product |
|---|
| Full mirror panel sheet, frameless |
| Mirror mounting clip kit, concealed |
| Brushed brass wall sconce |
| Mirror edge polishing trim |
| Anti-fog mirror spray |
8. Deep Emerald Lacquered Panel
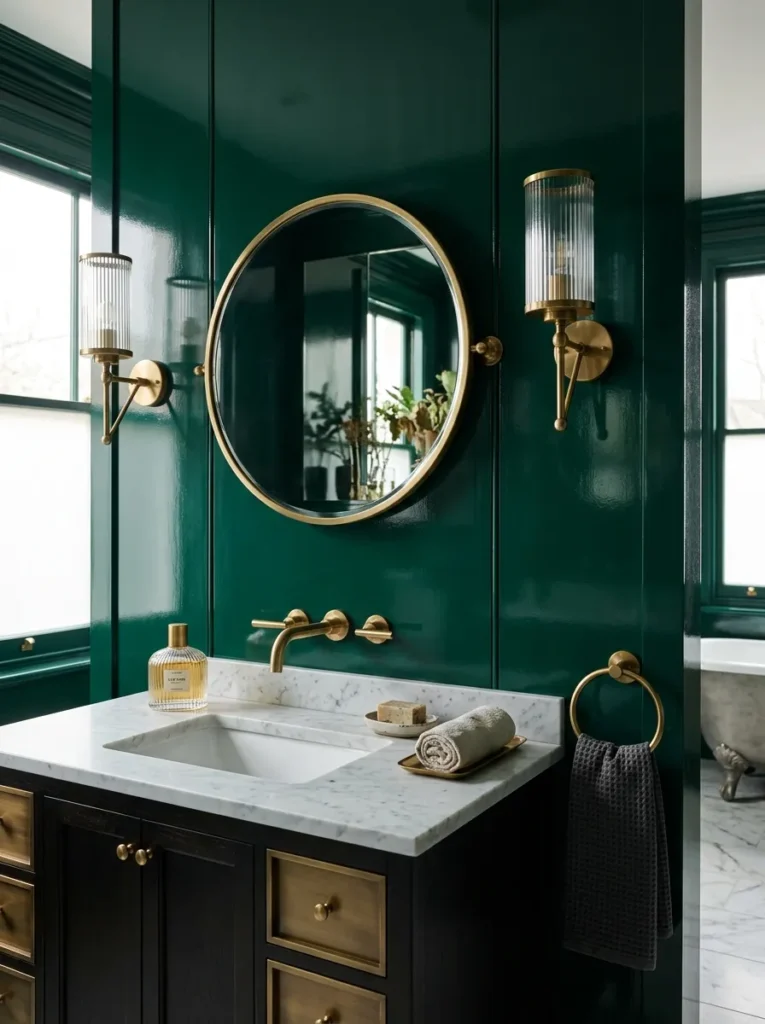
Vibe: Moody and rich, like the wall is holding its own spotlight.
Why it works: High-gloss lacquer reflects light almost like glass, which is a light-behavior principle that makes a small painted detail look custom-finished rather than simply painted — the deep emerald tone also reads as more deliberate than a typical bathroom blue or green.
How to get it: Apply a high-gloss lacquer paint in deep emerald to just one panel section, sanding between at least three coats so the final sheen reflects light without visible brush texture.
Shop the Look
| Product |
|---|
| Deep emerald high-gloss lacquer paint |
| Fine-grit sanding sponge set |
| Brushed brass single-handle faucet |
| Small glass perfume bottle, decorative |
| Lacquer paint roller, foam finish |
9. Picture-Frame Coffered Panels That Look Custom-Built
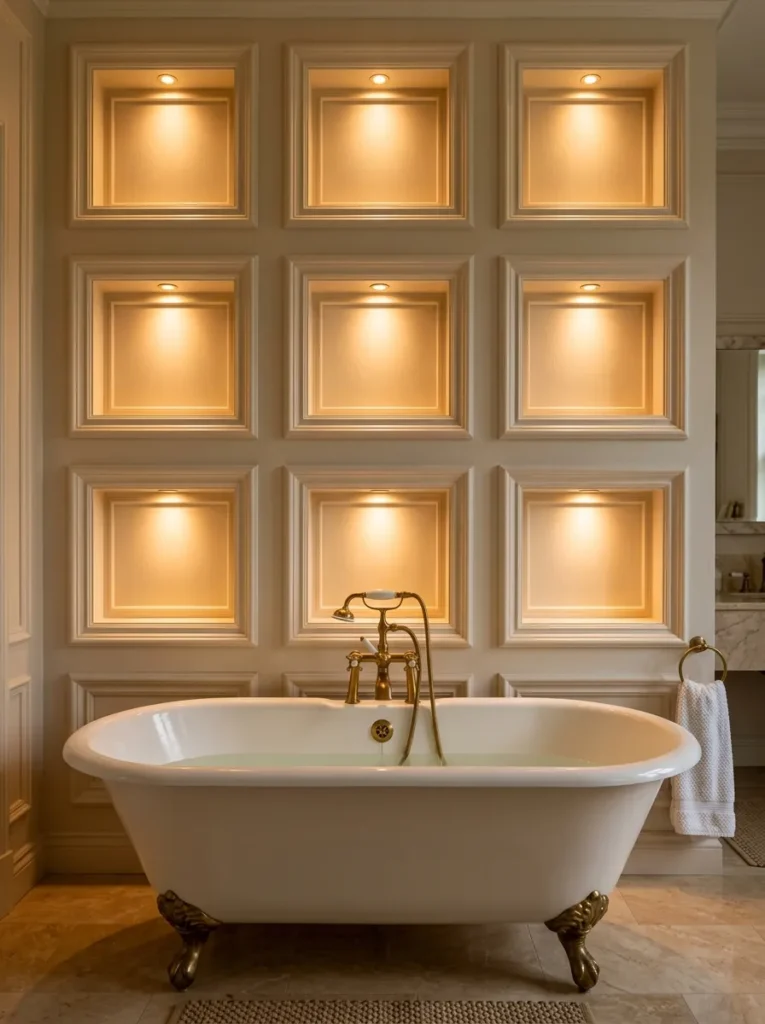
Vibe: Warm and architectural, like the ceiling and wall were designed together.
Why it works: Centering a recessed spotlight inside each coffered panel frame uses the molding’s existing grid as a lighting guide, a proportion principle that makes custom millwork and custom lighting look like one continuous design decision instead of two separate purchases.
How to get it: Install picture-frame molding in a repeating grid first, then place one low-voltage recessed spotlight at the center of each frame so light and molding align perfectly.
Quick Win: Battery-powered puck lights inside each frame mimic recessed spotlighting without any electrical work.
Shop the Look
| Product |
|---|
| Picture-frame coffered molding kit, paintable |
| Low-voltage recessed spotlight fixtures |
| Battery-powered LED puck lights |
| Warm white interior paint, matte |
| Molding corner trim pieces |
10. Venetian Plaster Textured Panel
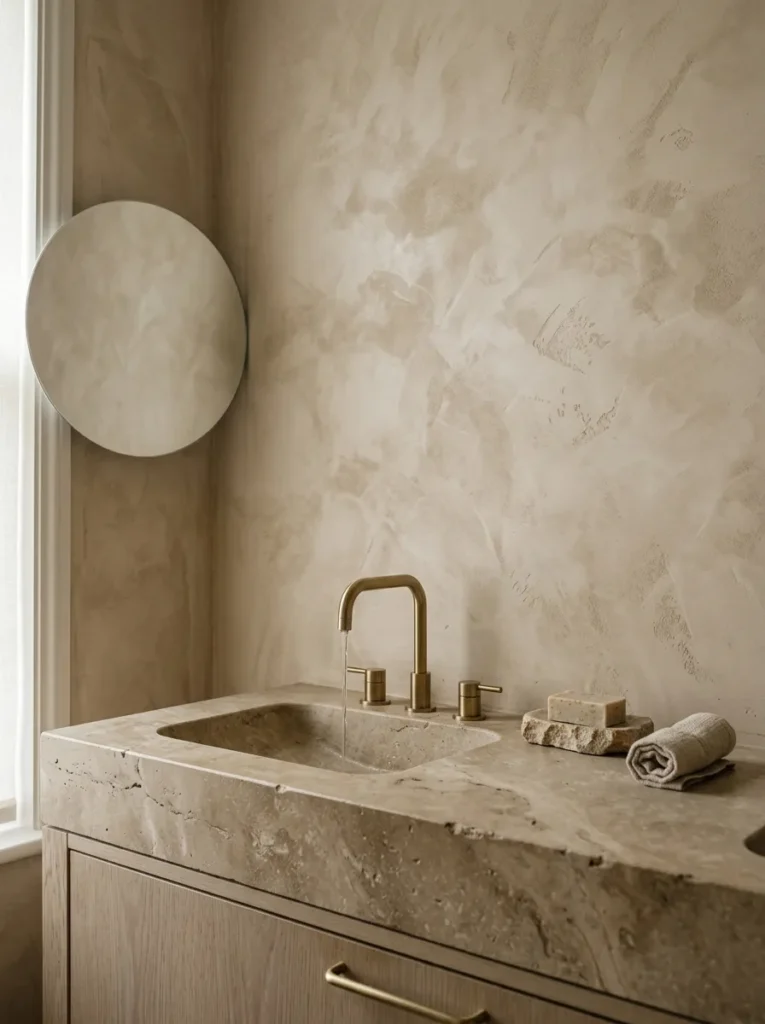
Vibe: Still and textured, like the wall has depth you only notice up close.
Why it works: Hand-troweled Venetian plaster creates subtle, cloud-like depth variation that flat paint physically can’t achieve, a texture-layering principle that signals hand craftsmanship — the irregularity itself is the luxury marker.
How to get it: Apply Venetian plaster (often sold as Roman clay) in thin layers with a steel trowel, burnishing the final coat to a soft sheen rather than a high polish, which keeps the texture visible under different light angles.
Shop the Look
| Product |
|---|
| Venetian plaster (Roman clay) finish kit |
| Stainless steel plaster trowel |
| Plaster burnishing pad |
| Natural stone soap dish |
| Plaster sealant, matte finish |
11. Panel-Defined Wet Room with No Visible Threshold
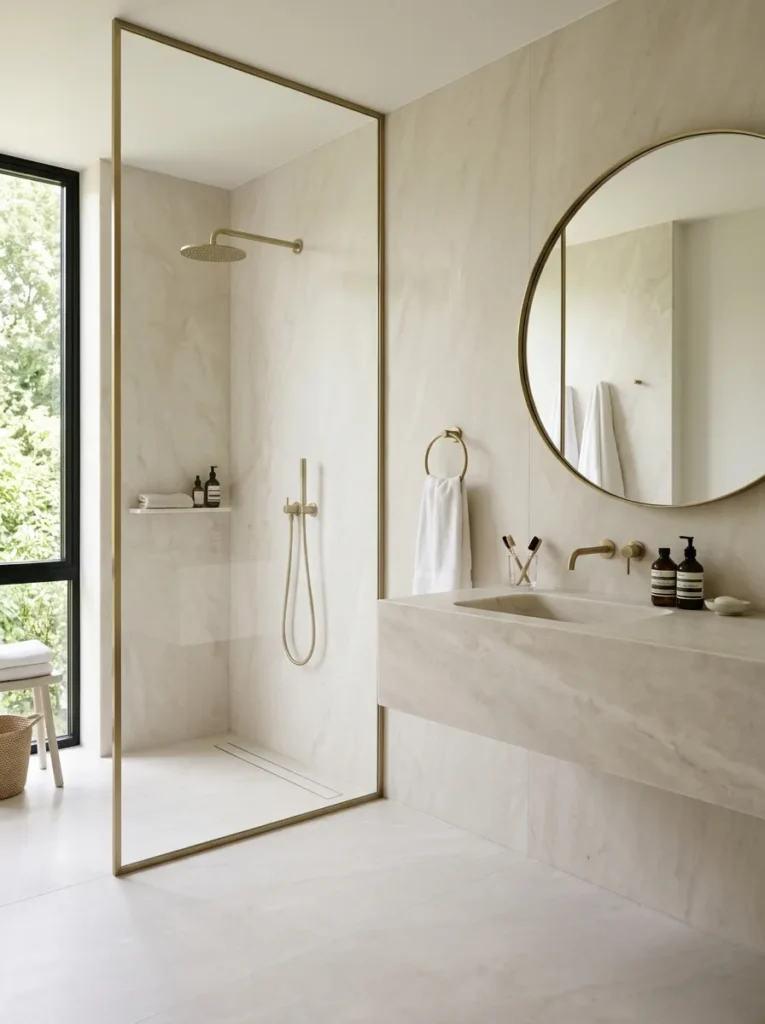
Vibe: Serene and continuous, like the whole room is one uninterrupted surface.
Why it works: Using the same panel material across the entire wet room — not just inside the shower — is a layout principle that removes the visual cue separating “shower” from “bathroom,” which is exactly how high-end spa bathrooms avoid looking segmented.
How to get it: Specify the identical alabaster-toned panel for both the shower walls and the surrounding dry-zone walls, with only a frameless glass divider (not a tiled threshold) marking the shower boundary.
Quick Win: A linear floor drain instead of a center drain keeps the floor line visually flat across the whole room.
Shop the Look
| Product |
|---|
| Alabaster-toned large-format wall panel, matching set |
| Frameless glass shower divider panel |
| Linear floor drain kit |
| Brushed brass towel ring |
| Waterproof panel seam sealant |
12. Hidden-Seam Bookmatched Panel Corner
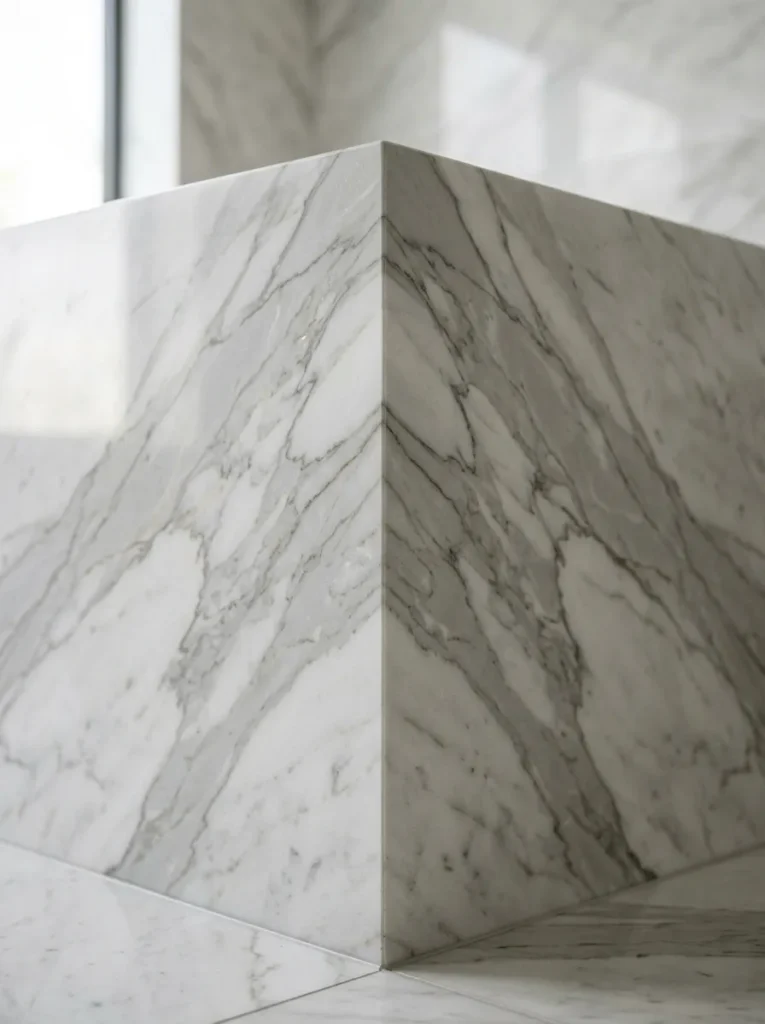
Vibe: Still and precise, the kind of detail only a careful eye catches.
Why it works: A mitered corner seam that keeps stone veining continuous around a 90-degree turn is a contrast-and-craftsmanship principle most budget installations skip entirely — it’s a small, easily missed detail that signals the entire installation was planned, not assembled piece by piece.
How to get it: Order panels pre-mitered at the corner from the same slab run, specifying veining direction so the pattern continues logically rather than mirroring oddly at the turn.
Shop the Look
| Product |
|---|
| Pre-mitered marble-look corner panel set |
| Corner seam matching template |
| Stone-look panel polish, matte |
| Panel corner protection trim |
| Veining-matched touch-up filler |
13. Warm Charcoal Fluted Panel
Vibe: Moody and rich, like the dark tone is doing more work than black usually does.
Why it works: Charcoal with a warm undertone, rather than a true cool black, reflects more ambient light while still reading as dramatic — a color-and-light-behavior principle that keeps a dark fluted wall from feeling flat or like a void.
How to get it: Paint fluted MDF panels in a warm charcoal with a satin sheen rather than matte, which lets the rounded groove edges catch just enough light to stay visible after dark.
Quick Win: Pre-fluted MDF panel sheets cut to size remove the need for any router work at all.
Shop the Look
| Product |
|---|
| Pre-fluted MDF panel sheet |
| Warm charcoal interior paint, satin finish |
| Brushed brass candle holder |
| Rolled waffle-weave towel, warm white |
| Panel edge cap trim, matte black |
14. Panel-Integrated Brass Shelf Niche
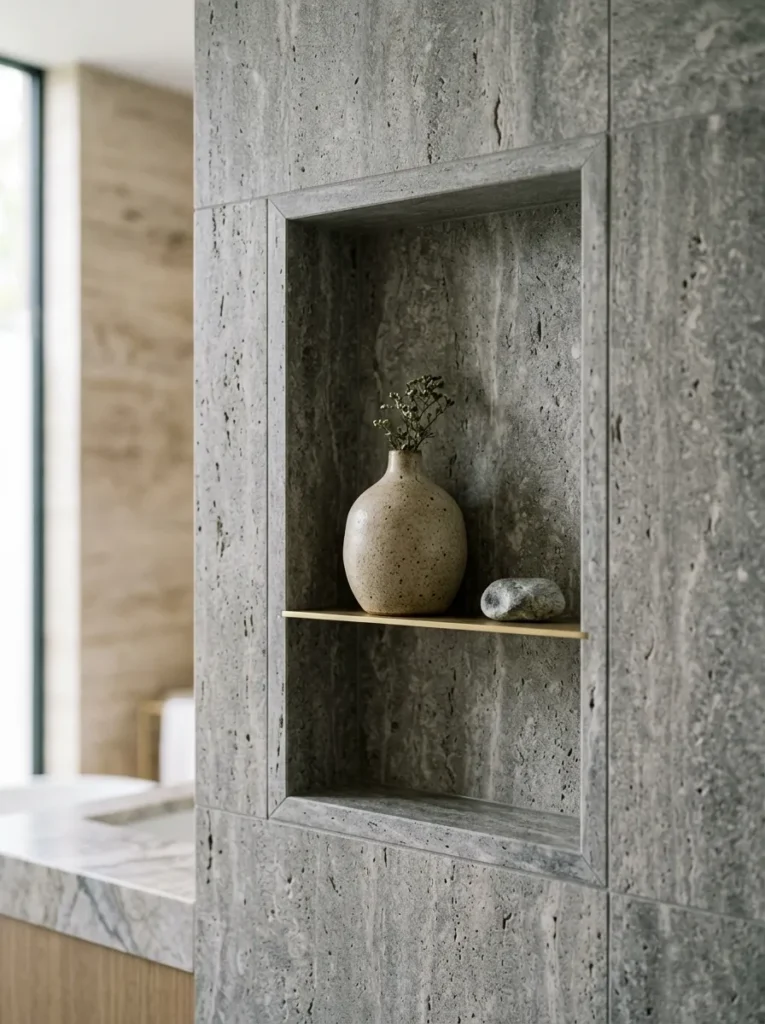
Vibe: Still and intentional, like the niche was planned before the wall was even built.
Why it works: A thin brass shelf set into a panel niche, holding exactly one object, uses negative space and visual weight together — too many items in a niche reads as storage, while one object on a slim brass ledge reads as a styled moment.
How to get it: Frame the niche into the panel during installation rather than cutting it in afterward, fitting a thin brass shelf (under half an inch thick) so the metal reads as a detail, not a structural shelf.
Shop the Look
| Product |
|---|
| Thin brushed brass niche shelf, custom-cut |
| Stone-look panel niche lining material |
| Small ceramic decorative vessel |
| Smooth decorative stone object |
| Niche-edge brass trim strip |
15. Antiqued Mirror Panel Wall
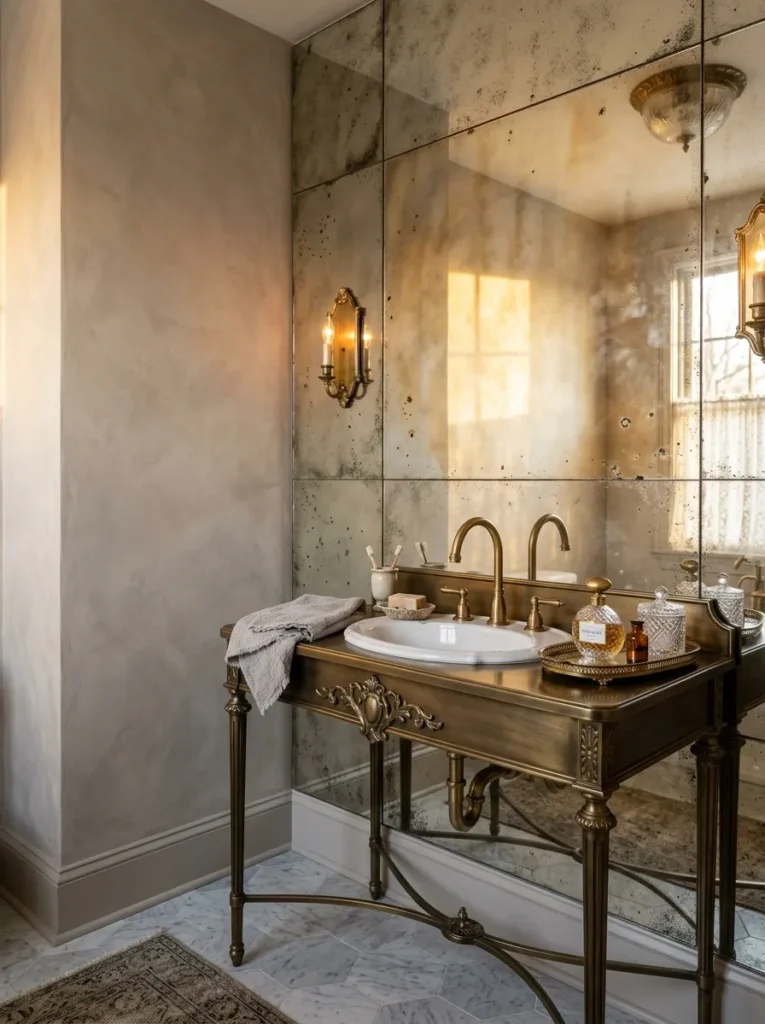
Vibe: Romantic and aged, like the wall has decades of history it isn’t explaining.
Why it works: Antiqued mirror with visible foxing (the cloudy aged spots) reflects light unevenly rather than perfectly, a texture-and-light principle that reads as collected and original rather than store-bought and new — a flaw deliberately built in as the feature.
How to get it: Order antiqued mirror panels with factory-applied foxing patterns rather than trying to age a regular mirror yourself, sizing the panel to the vanity width for a tailored fit.
Shop the Look
| Product |
|---|
| Antiqued mirror panel sheet, factory-foxed |
| Vintage-style brass vanity fixture |
| Brass perfume and jewelry tray |
| Small glass decorative bottle |
| Mirror panel mounting adhesive |
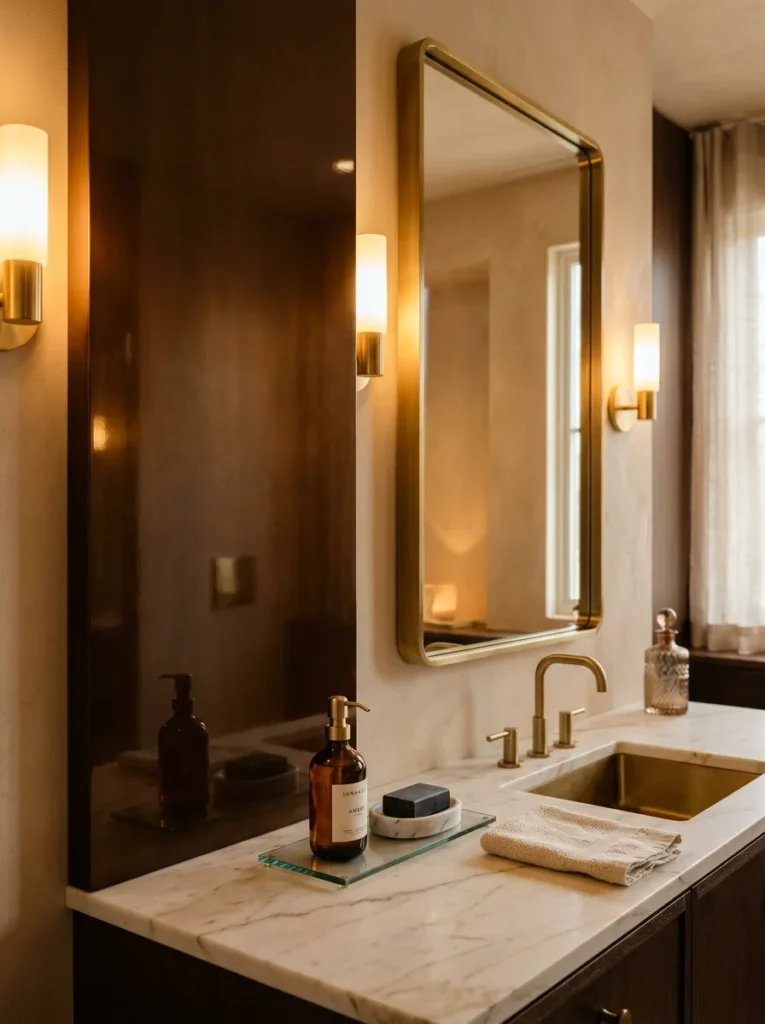
16. Brass Picture-Light Sconces on Raised Panel Molding
Vibe: Warm and flattering, like the light was borrowed from a gallery wall.
Why it works: Picture-light sconces — the slim, downward-angled fixtures typically used to light artwork — read as more considered than standard vanity bars, a lighting-direction principle that softens shadows on the face while doubling as an architectural detail on the molding itself.
How to get it: Mount one slim brass picture-light sconce centered inside each raised panel frame flanking the mirror, angling the shade slightly downward rather than straight out.
Quick Win: Plug-in picture-light sconces with a cord cover kit skip any electrical rewiring.
Shop the Look
| Product |
|---|
| Brushed brass picture-light sconce, plug-in |
| Cord cover kit, paintable |
| Raised panel molding frame kit |
| Small glass vanity tray |
| Warm white dimmable bulb, 2700K |
17. Leather-Wrapped Panel Accent
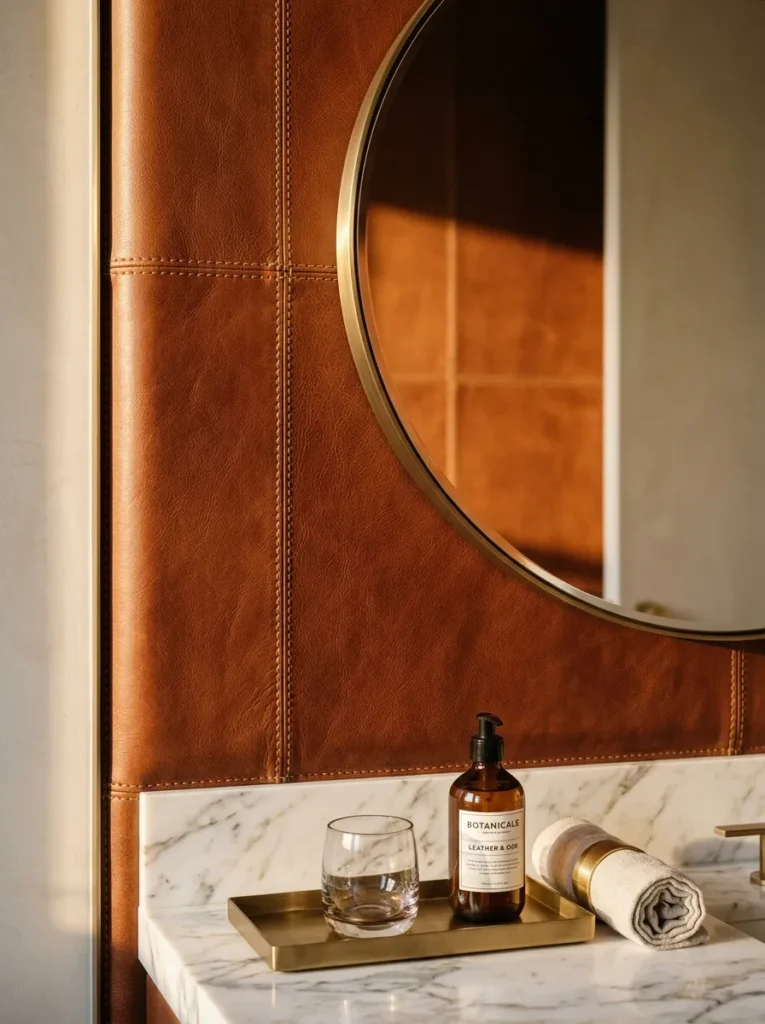
Vibe: Warm and tactile, like the wall was upholstered rather than installed.
Why it works: Leather-wrapped panels introduce a soft, upholstered texture against an otherwise hard-surfaced room, a texture-contrast principle borrowed from luxury hospitality design where headboards and wall panels often share the same material language.
How to get it: Choose a moisture-resistant faux or treated leather panel for a small accent area away from direct water spray, with visible stitched seams running in one consistent direction.
Shop the Look
| Product |
|---|
| Moisture-resistant leather-look wall panel |
| Stitched leather panel trim strip |
| Brushed brass vanity tray |
| Ribbed glass drinking tumbler |
| Leather panel mounting adhesive |
18. Soft Alabaster Marble-Look Panel
Vibe: Serene and weightless, like the wall barely exists at all.
Why it works: A near-monochrome alabaster panel with only faint veining avoids competing for attention with the room’s furniture and fixtures — a visual-weight principle where the most expensive-looking rooms often have the quietest backgrounds.
How to get it: Choose an alabaster-toned panel with subtle, low-contrast veining rather than a dramatic high-contrast marble pattern, keeping every other surface in the room equally soft and neutral.
Quick Win: Order a panel sample at least 12×12 inches, since small swatches can’t show how subtle veining reads at full wall scale.
Shop the Look
| Product |
|---|
| Alabaster-toned marble-look wall panel |
| Linen hand towel, soft white |
| Faux white bloom stem, single |
| Panel sample swatch, large-format |
| Soft white panel grout, matching |
19. Large-Format Slab Panels That Make Grout Lines Disappear
Vibe: Airy and uninterrupted, like the shower has no edges at all.
Why it works: Grout lines break a wall into a visible grid, which is a proportion principle that shrinks a room’s perceived size — a single large-format slab removes that grid almost entirely, letting the wall read as one continuous plane instead of dozens of small tiles.
How to get it: Order slab panels pre-cut to your exact floor-to-ceiling height so only one horizontal seam, if any, is needed, and finish any remaining seam with a color-matched sealant instead of contrasting grout.
Shop the Look
| Product |
|---|
| Large-format slab shower panel, floor-to-ceiling cut |
| Color-matched panel sealant |
| Brushed brass shower fixture set |
| Panel installation adhesive, heavy-duty |
| Slim aluminum panel edge trim |
20. Panelled Tub Surround with Brass Trim Cap
Vibe: Still and finished, like the surround was meant to have an edge this clean.
Why it works: A metal cap along the top edge of a panel surround gives the furniture-like tub edge a defined boundary, a furniture-profile principle that makes the surround read as a built piece rather than a flat wall extension.
How to get it: Cap the top edge of the paneled tub surround in a thin unlacquered brass strip, mitered cleanly at each corner so the metal reads as one continuous line around the entire perimeter.
Shop the Look
| Product |
|---|
| Stone-look tub surround panel kit |
| Unlacquered brass cap trim, mitered corners |
| Folded cotton bath towel |
| Brass corner trim connectors |
| Panel-to-tub waterproof sealant |
21. Warm Bronze Lacquered Panel Accent
Vibe: Warm and glowing, like the wall is holding onto late afternoon light.
Why it works: Bronze sits warmer on the color wheel than charcoal or black lacquer, which is why it reflects ambient light with a golden cast rather than a cool one — a color-and-light principle that keeps a dark, glossy accent from reading as harsh in a small room.
How to get it: Apply a bronze-toned high-gloss lacquer to a single panel section no larger than one wall, balancing it with warm white on every surrounding surface so the bronze stays the room’s one bold statement.
Quick Win: A pre-finished bronze lacquer panel insert avoids the multi-coat sanding process a painted lacquer finish requires.
Shop the Look
| Product |
|---|
| Bronze high-gloss lacquer panel insert |
| Warm white interior paint, matte |
| Small glass vanity tray |
| Bronze panel edge trim |
| Lacquer panel cleaning cloth, microfiber |
22. Coffered Ceiling Drop Created by a Panel Height Break
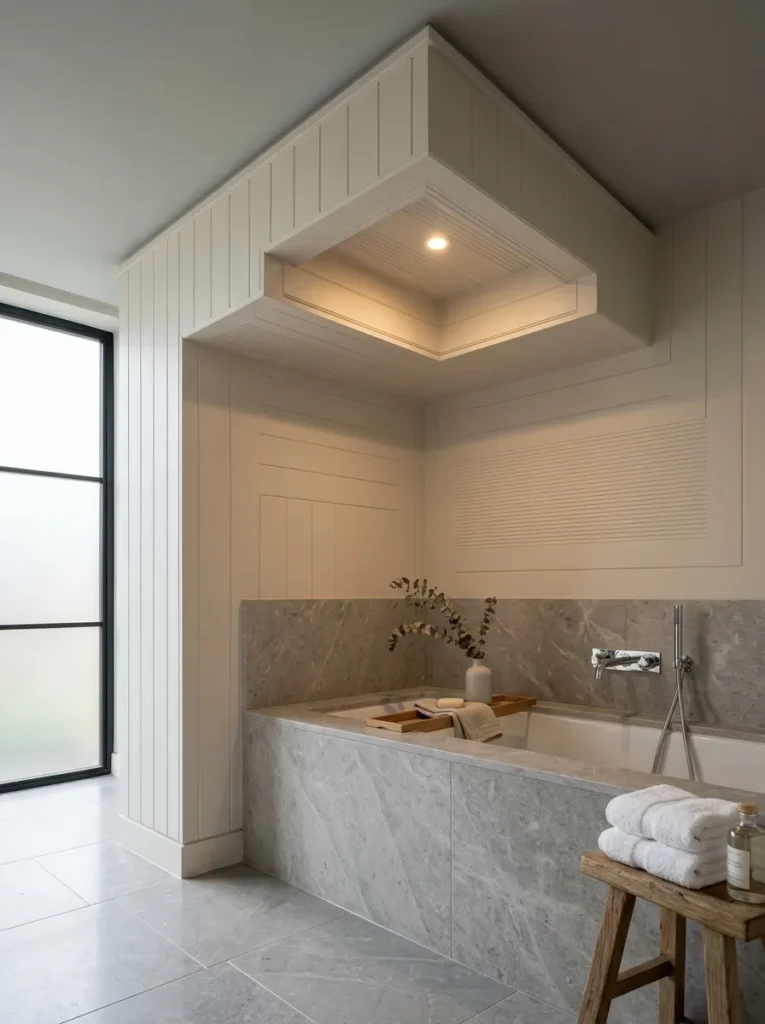
Vibe: Grounded and architectural, like the ceiling was lowered on purpose, not by accident.
Why it works: Dropping the ceiling height specifically above the tub, framed in the same panel material as the wall, is a layout principle that zones the space architecturally — it signals “this is the bathing area” the way a furniture grouping would in an open-plan room.
How to get it: Frame a shallow ceiling drop directly above the tub using the same panel material as the surrounding walls, recessing one light fixture into the coffer so the height break reads as intentional rather than a plumbing chase.
Shop the Look
| Product |
|---|
| Matching stone-look ceiling panel material |
| Recessed coffer light fixture |
| Ceiling drop framing trim kit |
| Panel-to-ceiling seam sealant |
| Low-profile recessed light housing |
23. Vertical Fluted Panel to Stretch a Narrow Wall
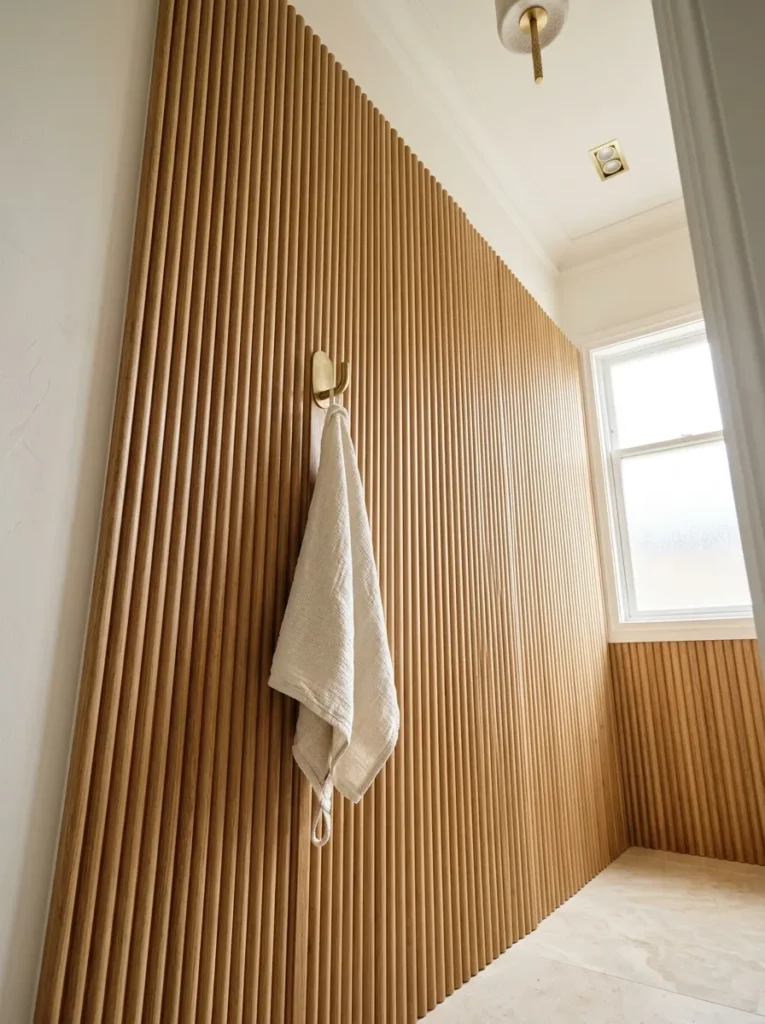
Vibe: Airy and stretched, like the narrow wall stopped feeling like a leftover space.
Why it works: Tight vertical fluted grooves running floor-to-ceiling pull the eye upward rather than across, a small-space illusion technique that makes a narrow wall — often the most awkward space in a small bathroom — feel like a deliberate architectural feature instead of a gap.
How to get it: Run fluted oak panel in one continuous piece from floor to ceiling on the narrowest wall in the room, avoiding any horizontal trim break that would cut the vertical line short.
Quick Win: Adhesive fluted panel strips sized for a single narrow wall keep this a one-afternoon project.
Shop the Look
| Product |
|---|
| Vertical fluted oak panel, adhesive-backed |
| Slim brushed brass wall hook |
| Oak panel edge trim, matching |
| Warm white ceiling paint, matte |
| Panel measuring and leveling kit |
How to Start Your Expensive-Looking Wall Panel Project
Start with one move: install a single book-matched or large-format slab panel behind the vanity mirror only. This one surface becomes the room’s material anchor, and because it’s contained to one wall, it doesn’t require touching plumbing or committing to a full-room budget before you know how the look reads in your actual light.
The most common mistake is mixing metal finishes — brass trim against chrome faucets, or matte black hardware against polished nickel. This breaks the seamless, considered look that makes paneling feel expensive in the first place. Fix it by committing to one metal tone, ideally unlacquered or brushed brass, across every fixture, trim piece, and hook in the room.
Three items under $50 create immediate impact: a single unlacquered brass towel ring, a small Venetian plaster sample tin large enough to test on one panel section, and a slim adhesive-backed brass reveal trim strip for an existing seam.
A single accent panel is a realistic weekend project at $200–$600. A full slab or plaster wet-room installation typically takes three to six weeks and runs $4,000–$15,000 or more, depending on whether real stone or large-format porcelain is used.
Frequently Asked Questions About Bathroom Wall Panels That Look Expensive
What’s the difference between book-matched and large-format slab panels?
Book-matched panels are two slabs cut from the same stone block and installed side by side so their veining mirrors perfectly across the seam, creating a symmetrical, almost butterfly-like pattern. Large-format slab panels simply refer to oversized single sheets — stone, porcelain, or resin — used to minimize grout lines; they don’t require matched veining, though many large-format porcelain options are now printed to mimic a book-matched look at a much lower cost.
What panel color looks the most expensive in a bathroom?
Warm, low-contrast neutrals like alabaster white and travertine tone tend to read as the most expensive because they avoid competing with the room’s fixtures and let texture do the visual work. Deep, warm darks like emerald or bronze lacquer also read as luxurious, but work best limited to one accent wall rather than the entire room.
How much do luxury-look bathroom wall panels cost to install?
A single accent panel using large-format porcelain or a lacquer finish typically costs $200–$800 including materials and basic installation. A full wet-room treatment using real book-matched marble slab or onyx can run $8,000–$20,000 or more, while a large-format porcelain version of the same look often comes in closer to $4,000–$10,000.
Can you get an expensive panel look in a rental or small bathroom?
Yes — adhesive-backed fluted or mirror panels, a single peel-and-stick stone-look accent, and unlacquered brass hardware swaps can all be removed without damaging walls, making this approach renter-friendly. In a small bathroom, a single mirrored or book-matched panel reads as more luxurious than full-room coverage, since restraint is part of what makes the look feel expensive in the first place.
Do wall panels need real stone to look expensive?
No. High-quality large-format porcelain, acrylic resin, and printed laminate panels can replicate book-matched veining and onyx translucency convincingly, often at a third of the cost of real stone. What matters more than the material itself is minimizing visible seams and committing to one consistent finish throughout the room.
Ready to Make Your Bathroom Wall Panels Look Expensive?
You’ve now got 23 ways to bring a high-end, seamless feel into a bathroom, from book-matched stone and backlit onyx to brass trim details and architecturally zoned wet rooms. None of this needs to happen all at once — a single panel behind the vanity mirror is a complete, finished-looking first step on its own. Start today by ordering one large-format panel sample at full scale and holding it against your existing fixtures under your bathroom’s actual light. Once it’s in, the room should feel less assembled and more considered, the way a single good material always does. Pin your favorite three or four ideas now, before the brass trim, the mirrored veining, and the lacquer finishes start to blur together in your saved tab.